Cloud is the future of hosting whether you like it or not and trust it or not! While Azure and AWS made the cloud adoption easier, they are continuously moving the goal posts to serve their clients better. For us, Developers/Evangelists, the possibilities are unlimited but things can get spoiled quickly unless we adhere to best practices. As I start the journey to cloud, I would be building proof-of-concept applications and deploying them to Azure following the best practices. You are welcome to visit my site and suggest your thoughts.
azure.aspnet4you.com:
While I could have built the portal with ASP.Net Core/MVC, I decided to use Angular 5. This application is built with angular-cli and Visual Studio 2017 (IDE). Visual Studio or Visual Studio Code makes the editing much easier and you are free to choose either. For this exercise, I would be using Visual Studio 2017 (why settle for less while you have the capabilities!). So, what are the things you need to get started?
You can search in Google and you will find all kinds of answers! Remember, we want to follow trusted and reliable documentations and follow the best practice? So, we go straight to angular.io and start with Visual Studio 2015 QuickStart Guide. Why VS 2015? It’s because Angular page has not been updated officially but you can follow the same steps for VS 2017. No need to follow any external template. Template will move your focus elsewhere and there is no need to complicate the solution! You can use an empty web template because you would not be using any of the MVC features.
Note: We are using VS 2017 and there is no need to install Update 3 as you would require if you were using VS 2015.
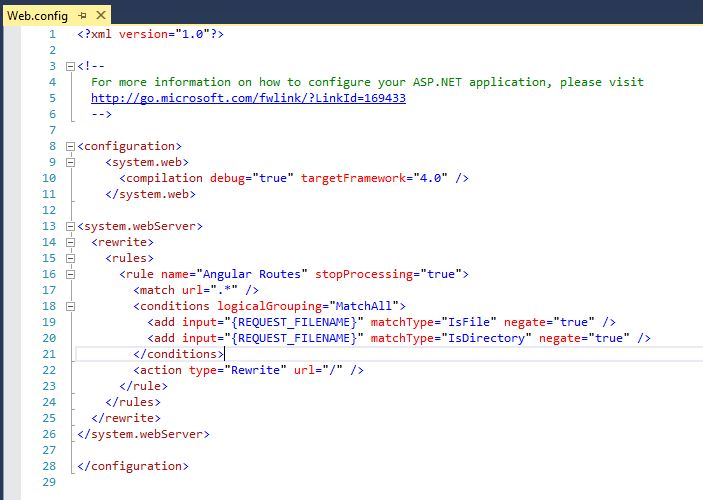
Create an empty ASP.NET v4 project in VS 2017. You don’t need anything but the web.config file. You can safely remove everything else unless they are required for ASP.NET v4. While here, you can update the web.config file required for angular routing to work. I have the config from the QuickStart page @Configure IIS rewrite rules.
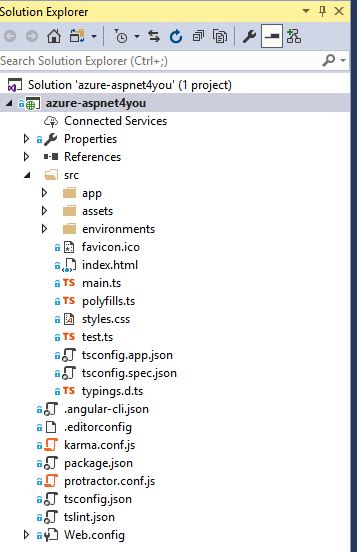
Download and extract the Architecture project source code from angular.io. Once extracted, copy and paste all the files and folders from Architecture folder to Visual Studio project folder. Alternatively, you can download the source code of azure.aspnet4you.com, which is derived from Architecture project but customized for Visual Studio 2017, from GitHub.
Install latest version of Node.js® and npm. Verify that you are running node version 4.6.x or greater, and npm 3.x.x or greater by running node -v and npm -v in a terminal window or command prompt.
Install Angular CLI. Don’t know why QuickStart is missing this important step! Now that you have npm installed, you can simply run “npm install -g @angular/cli” at the command prompt to install CLI. You can find additional information at cli.angular.io.
Install TypeScript 2.6.1 or latest for Visual Studio 2017. Be sure to update package.json file with the TypeScript version and run “npm install -g typescript” at the command prompt. You must open the command window and change the directory to project folder before running the commands. You can download the installer and install manually if you prefer. We are going to use npm to install for this exercise.
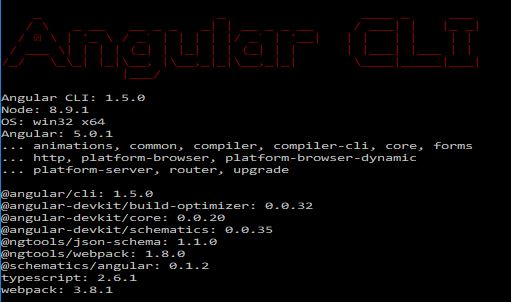
You have the prerequisites required thus far but you are missing the dependencies. We will install the dependent packages as defined in the package.json file. Run “npm install” at the command prompt (@ project root directory) to update the packages. You can see versions of different components if you run “ng -v” at the command prompt.
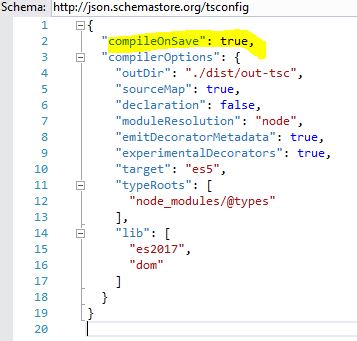
Open the tsconfig.json file under src folder and change the compileOnSave to true
Remember, we are using Visual Studio 2017 for editing files. VS 2017 provides nice intellisense and other debugging capabilities. We would be using CLI to build/run the project/app. To run the project, open the command prompt and change the directory to the project folder. You can run “ng serve” at the command prompt and it would compile all the typescript files, do all the transformation and tell you that you are ready to access the application through the browser @ http://localhost:4200. You are running angular in development mode at this stage!
WOW! You got the angular 5 application running locally! You can make changes to any file in Visual Studio and all the changes are auto compiled (on save) and reflected in the browser. You don’t have to restart the ng command.
ng serve vs ng build?
ng serve: Easily test your app locally while developing. For more info, checkout at cli.angular.io.
ng build: compiles the application into an output directory. You can simply take the contents of the output directory and deploy to IIS server.
We all should test the application thoroughly before deploying to server. Don’t you want to know that your application runs in chrome and in IE? You would be surprised that the app as it now would not render in IE! You must uncomment the section IE9, IE10 and IE11 in the polyfills.ts file located under src folder. That’s just one example. You should open the developer console (F12) in browser and make sure there is no error in the console.
Running angular 5 app under IIS locally. It’s best to try out the application at the local IIS before moving to Azure. It’s simple to do but you will require Windows 7 or 10 professional to have the IIS feature. You will need to compile the CLI with “ng build –prod –build-optimizer” at the command prompt. This would create the output folder as defined in the .angular-cli.json file. In my case, the output folder is “dist” under the project folder.
Create a website or virtual application under IIS with v4 App Pool and map the “dist” folder as the physical path. You are ready to access your angular app in the browser (port 80 or 443). Don’t forget to grant read permission to IIS AppPool\your-app-pool-name account to “dist” folder. In addition, you would need to add IIS AppPool\your-app-pool-name account to IIS_IUSRS group on local machine. Well, you are almost there! You are likely to get error message when you try to access the app. Why? You would need to tell IIS to use angular routes in the URL Rewrite instruction. Don’t see URL Rewrite in IIS console? Download and install the URL Rewrite v2.1 extension. Simply add the web.config at the dist folder (see the QuickStart page for url rewrite elements) and you are ready to rock! Adjust the Rewrite path according to deployment structure. You will need to change the path for virtual application.
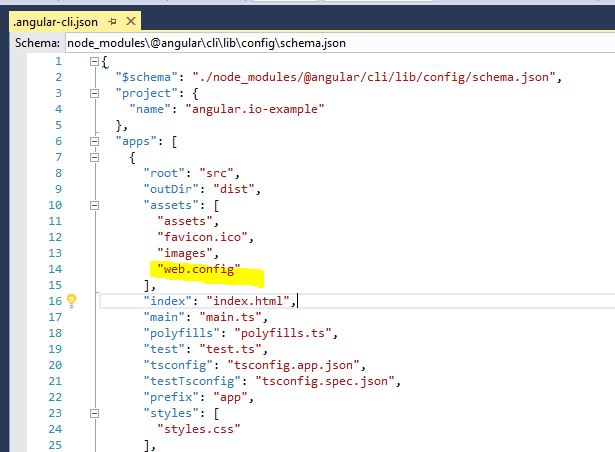
As best practice, I added the web.config under the src folder and updated .angular-cli.json file to include it during the build. You will need this web.config file at the root of the website or virtual application when you deploy in Azure.
That’s all for setup, build and testing angular application on local machine. You can find azure-aspnet4you project and the source codes in GitHub. This post would be incomplete unless I can take the codes from local machine to VSTS (or GitHub), automate the build and release. Let’s see how we can automate the build and deploy- Build and Deploy Angular5 App in Azure App Services all from VSTS Online.
How to deal with issue when Global Angular CLI version greater than local version?
Found this post helpful and it worked to solve the problem-
https://stackoverflow.com/questions/43931986/how-to-upgrade-angular-cli-to-the-latest-version/43931987
The issue came when I updated the latest version of @angular/cli. The local version is not compatible anymore! To solve the issue, I went to the project directory at the command prompt and executed the following commands.
npm uninstall –save-dev angular-cli
npm install –save-dev @angular/cli@latest
npm install