My colleague, Christian Nowosiadly, and I had the opportunity to conduct a proof of concept to configure Office 365 for Federated Authentication with external Identity Provider (IdP) using SAML 2.0 protocol. We are happy to say, all worked perfectly and we were able to login successfully.
Why Federated SSO?
- Risk Mitigation- Allow users to access company resources only when they are connected to company network. User access is automatically disabled once they are no longer employed with the company.
- Make users happy with seamless (Kerberos) authentication at the IdP and they don’t have to input their credentials.
We followed few documentations as none of them can satisfy 100% of our requirements but they were very helpful and guided us to the right direction. Let’s share some of the highlights here.
The best place to start is at Use a SAML 2.0 Identity Provider (IdP) for Single Sign On. This article guides you with all the steps but it is not specific to any IdP implementation.
You do NOT need to do Active Directory Sync. Microsoft (and some of the documentations) suggests you do but it is not required. That was a scary part as we don’t want to connect our internal server to Azure! SSO works w/o the sync as long as you maintain the custom domain users via scripts.
Step 1: Configure Ping Federate to add SP connection to Azure Active Directory
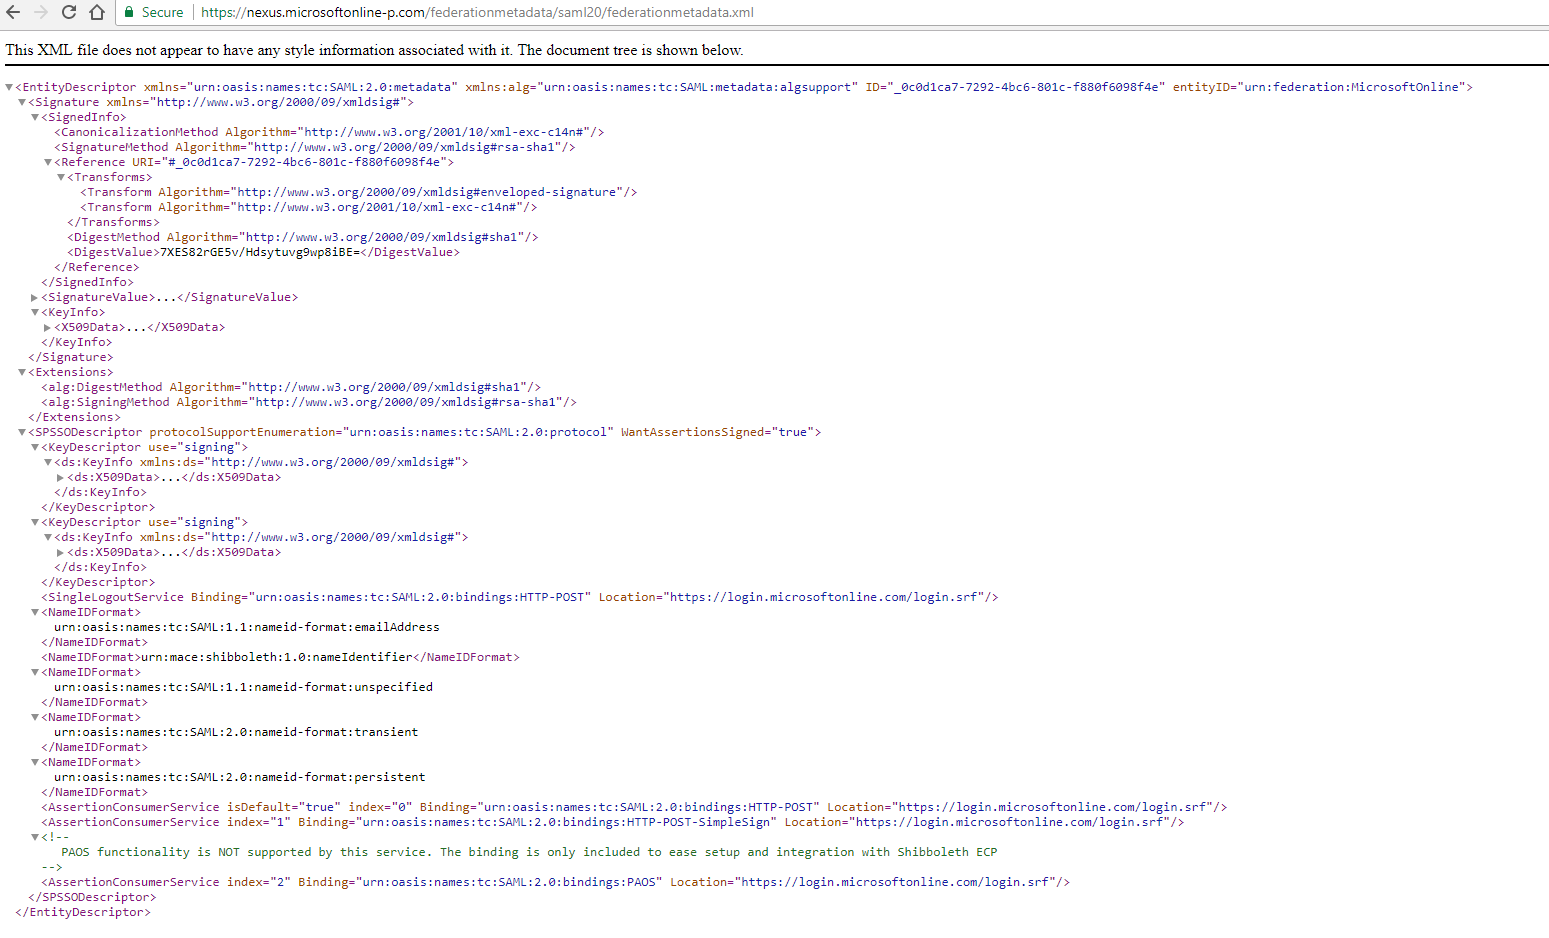
Our organization uses Ping Federate for federated authentication and our goal is to configure IdP as per Microsoft’s requirements. We configured Ping Federate using Azure AD Metadata. We tried to import the metadata file and it failed on certificates. So, we manually modified the metadata file to remove all the certificates because we can add them at a later time. Import went smoothly after removing certificates and Ping Federate is configured for Azure Active Directory entity id urn:federation:MicrosoftOnline.
Here are the Required attributes-
- NameID: This maps to NameId field in SAML Assertion. Example value: Prodip@aspnet4you.com
- IDPEmail: This is extended attribute. For our use case, we are passing email address in this field.
- Issuer: Issuer field is automatically included in every SAML response message. We don’t have to add this in the list of attributes.
Step 2: Add Custom domain in Azure Active Directory
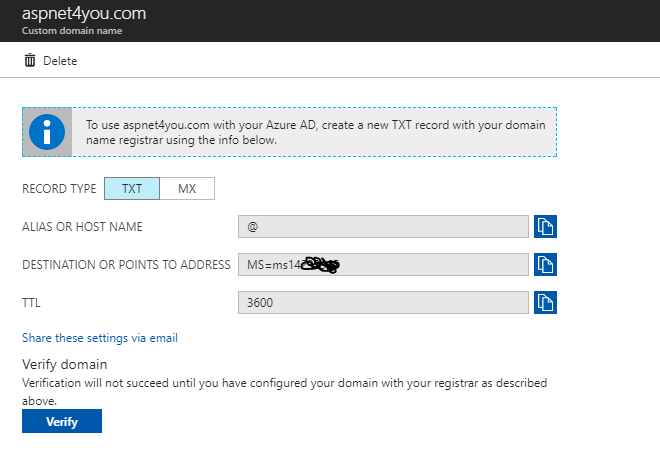
The documentation is very clear and upfront! “Before configuring federation on an Azure AD domain, it must have a custom domain configured.” No big deal, Christian has few spare domains and he added the custom domain to Azure Active Directory. Microsoft needs to verify the custom domain ownership and it does by providing information on TXT DNS record. Christian added the TXT record as provided by Azure Active Directory at the registrar of the domain (i.e. GoDaddy). Next, you need to go through the verification wizard at Azure Active Directory. Done!
Step 3: Configure the custom domain in Azure AD Directory for federation
To complete this step, you do need to have correct version of PowerShell installed on your machine. Don’t have it? No problem, you start from here- Connect to Office 365 PowerShell. Install both Install the 64-bit version of the Microsoft Online Services Sign-in Assistant and Install the 64-bit version of the Microsoft Azure Active Directory Module for Windows PowerShell. Can’t seems to find working link for the later! You would need to install AdministrationConfig-V1.1.166.0-GA.msi. If you have older version of PowerShell, you may need to install Windows Management Framework 5.1. Once you are done with the installations, you can run the power shell scripts.
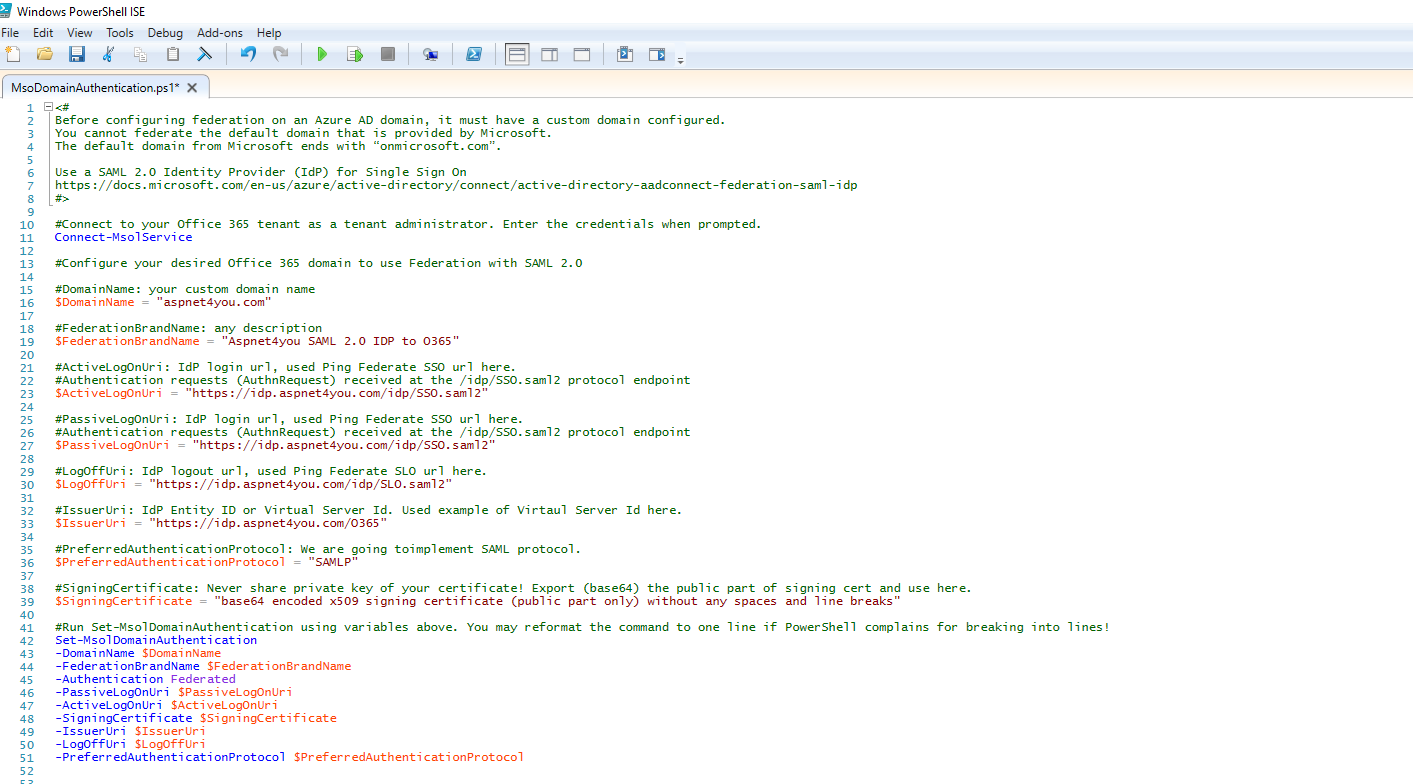
Run the following scripts (be sure to change the parameters!)-
<#
Before configuring federation on an Azure AD domain, it must have a custom domain configured.
You cannot federate the default domain that is provided by Microsoft.
The default domain from Microsoft ends with “onmicrosoft.com”.

Use a SAML 2.0 Identity Provider (IdP) for Single Sign On
https://docs.microsoft.com/en-us/azure/active-directory/connect/active-directory-aadconnect-federation-saml-idp
#>

#Connect to your Office 365 tenant as a tenant administrator. Enter the credentials when prompted.
Connect-MsolService

#Configure your desired Office 365 domain to use Federation with SAML 2.0

#DomainName: your custom domain name
$DomainName = "aspnet4you.com"

#FederationBrandName: any description
$FederationBrandName = "Aspnet4you SAML 2.0 IDP to O365"

#ActiveLogOnUri: IdP login url, used Ping Federate SSO url here.
#Authentication requests (AuthnRequest) received at the /idp/SSO.saml2 protocol endpoint
$ActiveLogOnUri = "https://idp.aspnet4you.com/idp/SSO.saml2"

#PassiveLogOnUri: IdP login url, used Ping Federate SSO url here.
#Authentication requests (AuthnRequest) received at the /idp/SSO.saml2 protocol endpoint
$PassiveLogOnUri = "https://idp.aspnet4you.com/idp/SSO.saml2"

#LogOffUri: IdP logout url, used Ping Federate SLO url here.
$LogOffUri = "https://idp.aspnet4you.com/idp/SLO.saml2"

#IssuerUri: IdP Entity ID or Virtual Server Id. Used example of Virtaul Server Id here.
$IssuerUri = "https://idp.aspnet4you.com/O365"

#PreferredAuthenticationProtocol: We are going toimplement SAML protocol.
$PreferredAuthenticationProtocol = "SAMLP"

#SigningCertificate: Never share private key of your certificate! Export (base64) the public part of signing cert and use here.
$SigningCertificate = "base64 encoded x509 signing certificate (public part only) without any spaces and line breaks"

#Run Set-MsolDomainAuthentication using variables above. You may reformat the command to one line if PowerShell complains for breaking into lines!
Set-MsolDomainAuthentication
-DomainName $DomainName
-FederationBrandName $FederationBrandName
-Authentication Federated
-PassiveLogOnUri $PassiveLogOnUri
-ActiveLogOnUri $ActiveLogOnUri
-SigningCertificate $SigningCertificate
-IssuerUri $IssuerUri
-LogOffUri $LogOffUri
-PreferredAuthenticationProtocol $PreferredAuthenticationProtocol

#Setup users in Azure Active Directory under custom domain
#The “ImmutableID” value must match the value sent in your “NameID” assertion.
#The “UserPrinciplName” value must match the value that you will send for “IDPEmail” in your SAML 2.0 claim

New-MsolUser
-UserPrincipalName Prodip@aspnet4you.com
-ImmutableId Prodip@aspnet4you.com
-DisplayName "Prodip Saha"
-FirstName Prodip
-LastName Saha
-AlternateEmailAddresses "Prodip@aspnet4you.com"
-UsageLocation "US"

New-MsolUser
-UserPrincipalName Christian@aspnet4you.com
-ImmutableId Christian@aspnet4you.com
-DisplayName "Christian Nowosiadly"
-FirstName Christian
-LastName Nowosiadly
-AlternateEmailAddresses "Christian@aspnet4you.com"
-UsageLocation "US"
Step 4: Test Federated Authentication with Azure Active Directory
After you run the scripts and there was no errors, you can login to Azure Portal to verify the users.
Again, you don’t have to do directory Sync as suggested by Microsoft! Azure portal will show appropriate error message if something is not correct on IdP or SP side and you would be able to correct them.
IdP initited SSO: urn:federation:MicrosoftOnline is Azure Active Directory EntityID
https://idp.aspnet4you.com/idp/startSSO.ping?PartnerSpId=urn:federation:MicrosoftOnline
SP Initiated SSO: whr=[your-custom-domain], wreply=[targetresource]
https://login.microsoftonline.com/login.srf?wa=wsignin1.0&whr=aspnet4you.com&wreply=https://portal.office.com
Scripts above is modified for Ping Federate but you can change them to fit other product specifications. It was an excellent collaboration and I could not have done it alone without the help from Christian. We would be implementing the solution to protect resources in Azure Cloud.