Our objective is to build an API application with Micro-Services design pattern and Deploy in Azure Kubernetes Service. There are lot of integration points and complexities involved to deploy containerized apps into Kubernetes cluster. You will get through initial hurdles setting up development environment and building your first container image with Docker. This post would try to address some of the pain-points. I would suggest you have good understanding of Kubernetes services-networking feature before making your journey to Azure Kubernetes Service (AKS).
Here are some of our design goals-
- API application must follow Micro-Service design pattern and it would be independent of host OS/platform.
- API must be able to scale based on the loads.
- Security is utmost important and API must be hosted in a private vNET. DevOps can access the servers via Point-Site or Site-Site or ExpressRoute but the hosts are not accessible from internet.
- User/Client must be authenticated and authorized to use protected resources at the API.
Milestones to achieve the design goals-
- ASP.NET Core with Entity Framework Core for data access to SQL Server
- Docker to build Container image with Linux OS.
- Azure Container Registry (ACR) to store docker images.
- Deploy container image from ACR to multiple PODs on multiple Nodes in Azure Kubernetes Service (AKS) connected to Azure vNET.
- Expose the containerized API application via internal (private) load balancer. SSL is not required at the cluster level.
- Publish the API to Azure API Gateway for client consumption over HTTPS.
- Apply jwt token at API Gateway as well as at the Container to allow access to protected resources.
When you create a cluster in Azure Kubernetes Service (AKS), it creates the nodes with Linux (Ubantu) OS and, with your surprise, Microsoft does not support Windows OS to join Kubernetes cluster! If you are planning to deploy your full dotnet application with Docker image of Windows Container, you would not have luck when you try to deploy your app to AKS. The same image works great in Azure Container Instance published from Azure Container Registry (ACR) but you can’t pull the same image from Kubernetes. The error messages from Kubernetes are not going to help you either. You literally hit a dead end as was my first encounter! I don’t mind failing sometimes, indeed failure is the key to success if you have the passion for the technology.
In order for you to deploy an ASP.NET application, you must convert your full dotnet application to ASP.Net Core. The reason is simple, dotnet core applications can be deployed to any platform that includes Linux which happened to be only supported platform in AKS. Microsoft has road map to support Windows OS Node in Kubernetes but we have to wait till it becomes GA candidate. For the purpose of the post, let’s assume we already have an ASP.NET Core application and let’s focus on what we have to do to deploy the app in Kubernetes cluster in Azure (or other cloud).
Setup of Development Environment:
- Visual Studio 2017- for coding, configuring and compiling.
- Docker CE for Windows 10– to containerize the app with the base OS and to publish the image to a private registry.
- Ubuntu– to run Linux container on Windows. Complete all the steps. Otherwise, you would not be able to compile the project with Linux Container.
- Subscription to Azure.
- Azure CLI– to interact with Azure resources from local machine.
- Kubernetes CLI– to interact with Kubernetes cluster. Save it to a folder and add the binary in to your PATH variable.
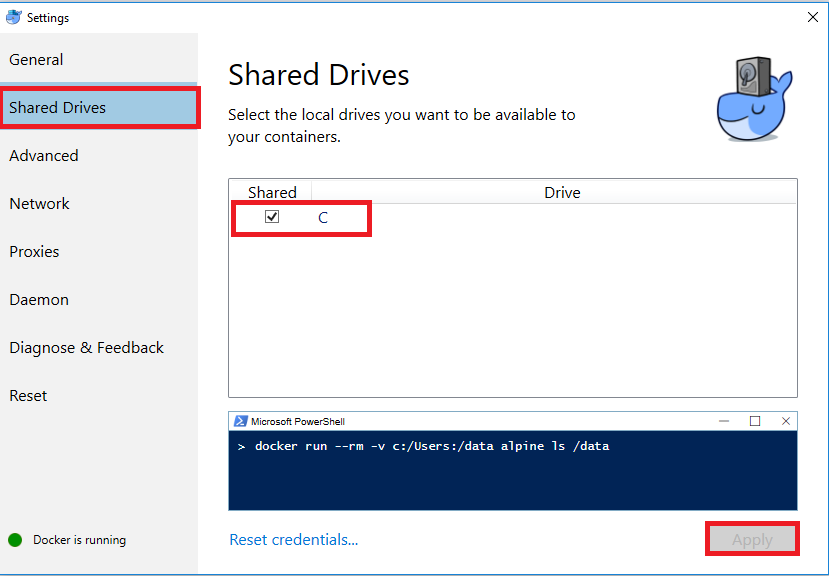
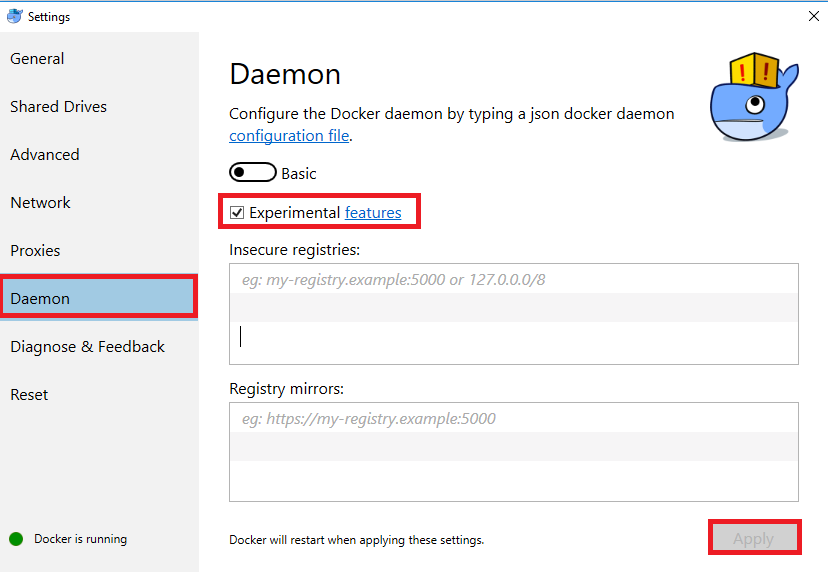
Docker for Windows require additional steps to make it working locally. Share the volume and turn on the daemon experimental feature.
Open Docker Settings and check the local drive to share and click apply:
Open Docker Settings and check the Experimental Features and click apply:
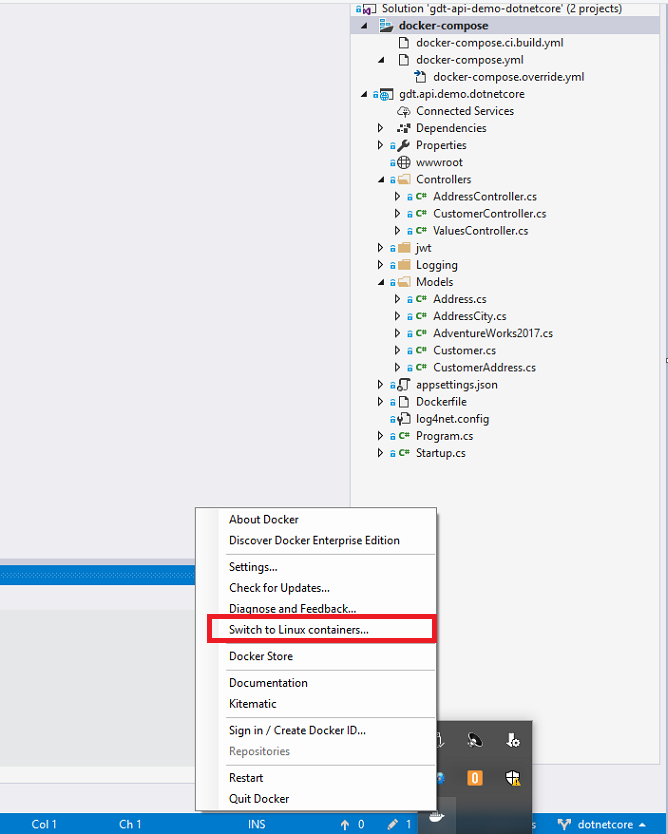
If Docker is running Windows Container, Switch to Linux. You can run Windows Container but it will not work with Kubernetes. Make sure you imported and configured Ubuntu as described above. Your project will not compile to Linux Container unless you have the base!!
ASP.NET Core with Entity Framework Core for data access to SQL Server
Open dotnetcore solution in Visual Studio. I am using VS 2017 Enterprise for maximum productivity. If you have not added docker support yet, right click the dotnetcore project and click Add. It would bring Docker Support menu. Docker Support would add a dockerfile to dotnotcore project (root) and it would add docker-compose project to the solution.
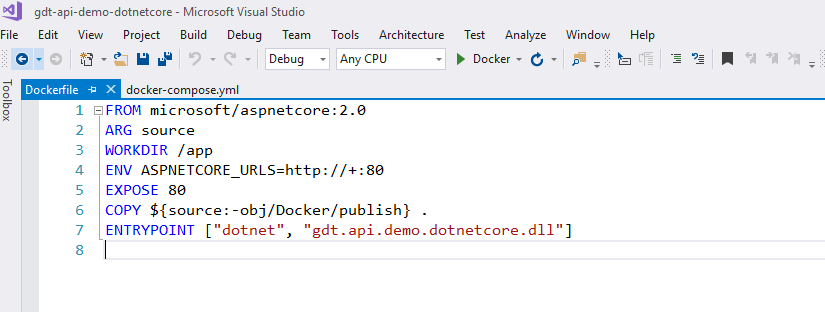
Example of dockerfile:
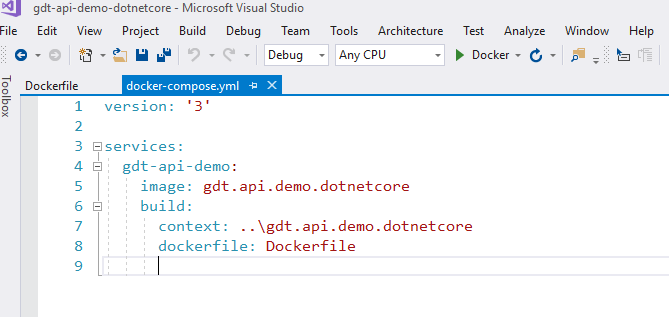
Example of docker-compose.yml (context is using relative path):
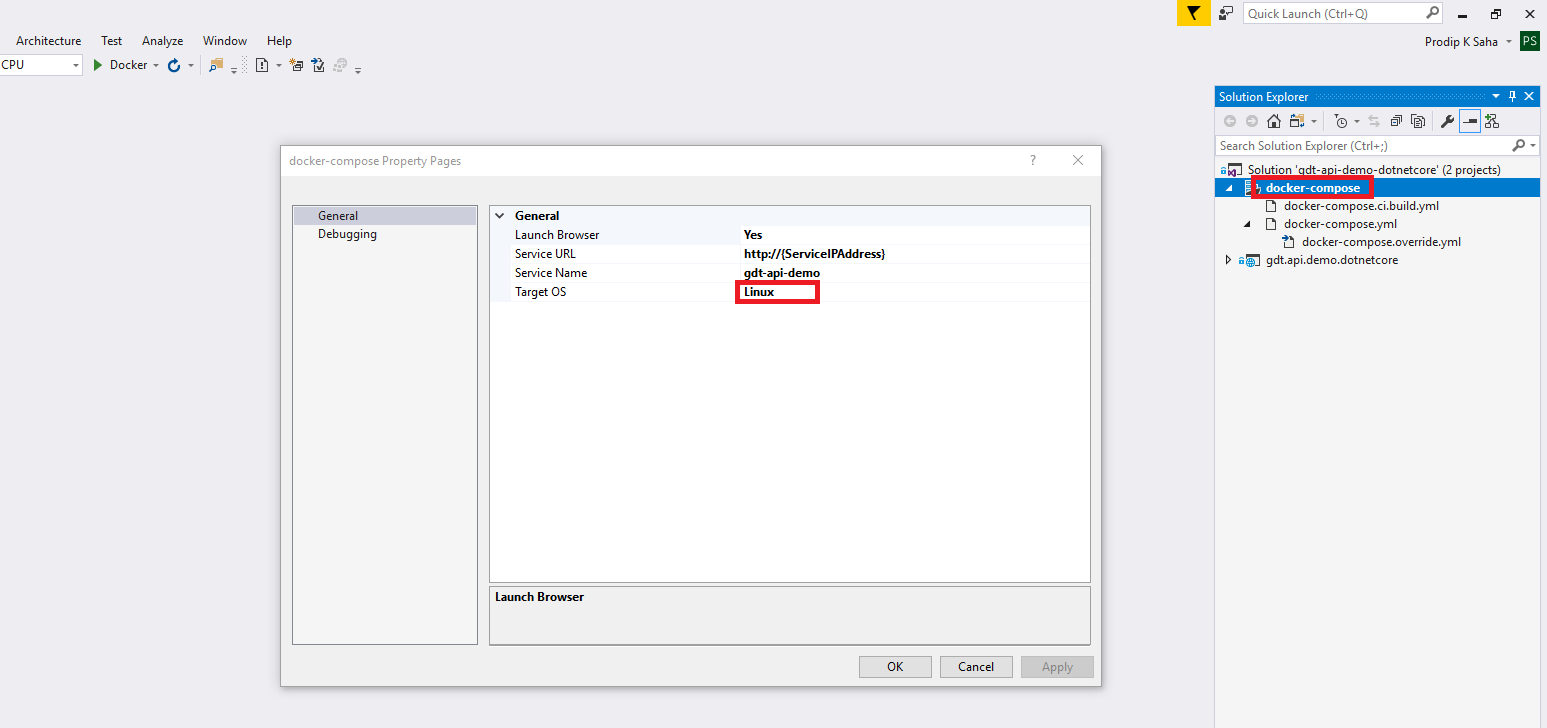
Open the property of docker-compose project and change the Target OS to Linux (from Windows).
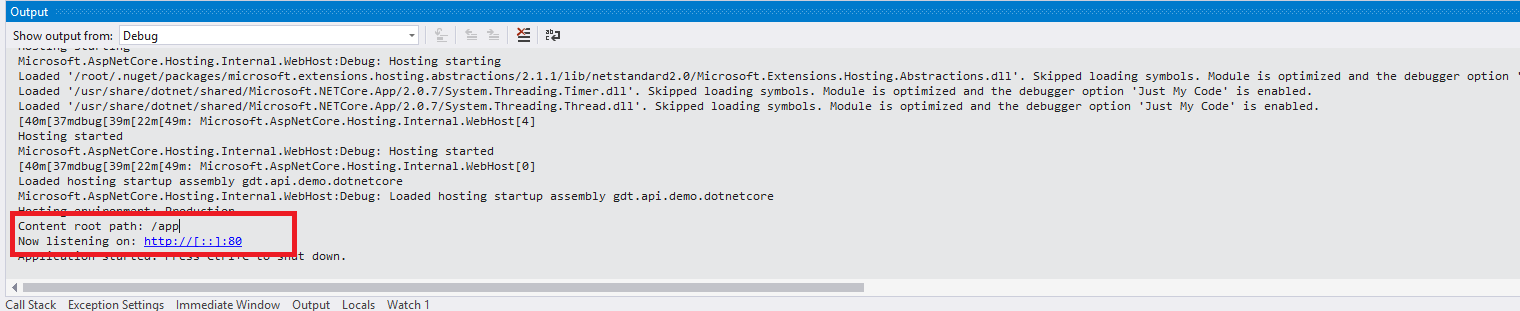
Make the docker-compose as the startup project and you are ready to run and debug you app in docker Linux container on Windows! Yahoo!
Note- if you get error like- “Error starting userland proxy: mkdir /port/tcp:0.0.0.0:32779:tcp:172.18.0.2:80: input/output error”, it’s likely that your credential is not set. Go back to docker settings > Shared Drive and Reset Credentials. You must check the drive and apply after you fix the credentials. if that does not fix the problem, you may restart docker.
Oh, wait, the app is running but how do you access the app? Open command prompt and run: docker ps. You will get to know the host proxy port which is what you need to access the app. App is running on port 80 but that’s inside the container and you can’t access it directly.
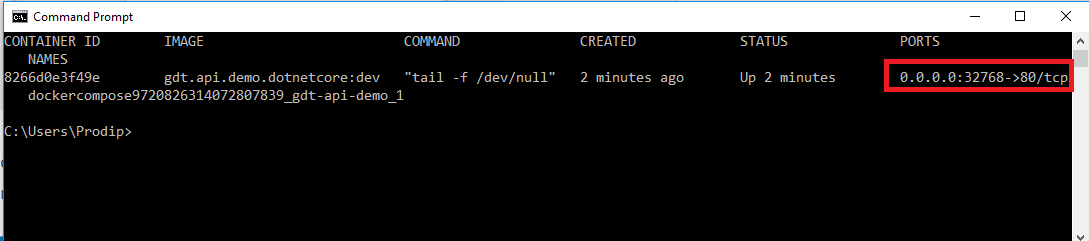
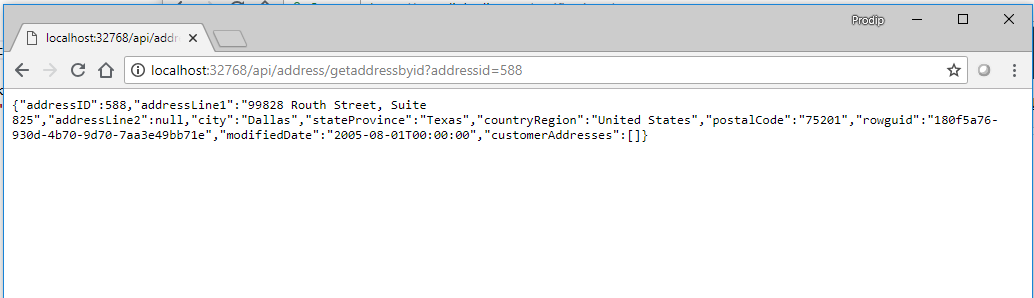
You can access the api on host port 32768. Keep in mind, this port can change. So, be sure to check with docker ps command. I am able to access the api locally at http://localhost:32768/api/address/getaddressbyid?addressid=588.
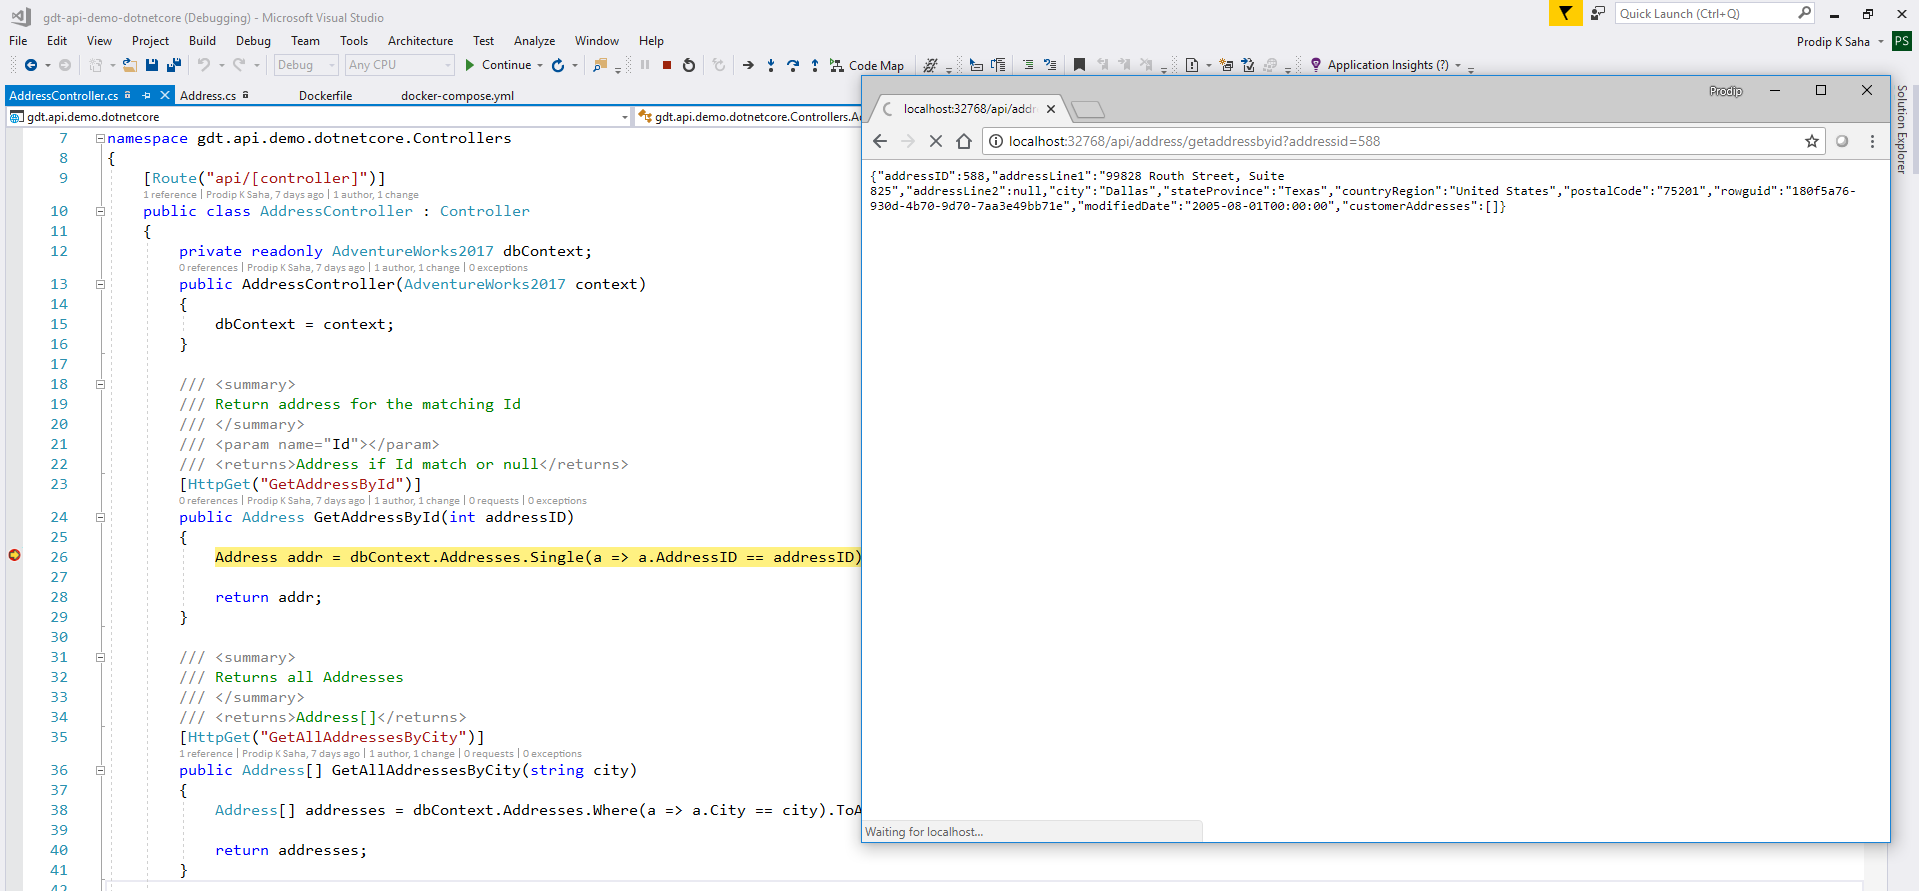
So far so good! We are running our API app in Linux Container on Windows 10 machine locally. We would not plan to deploy on the server until and unless we have the opportunity to test/debug locally. How do you debug docker container app? Good news is- you don’t have to do anything, just insert a break point to your code and it will hit! Let’s give a try while the application is still running in debug mode-
Okay, we can compile and build docker container image with Linux OS on Windows. We can debug the code too! Our next step is to upload the docker image to a private container repository. We are going to use Azure Container Registry to park our images. Visual Studio is great for coding, building and debugging locally but we are about to step outside the boundary of VS. We are going to use command line tools to do the rest. Let’s do a release build of docker-compose project and it would create our docker image to be published.
Azure Container Registry (ACR) to store docker images
Upload the docker container image to ACR. Open command prompt or powershell as administrator and follow the steps to upload container image to ACR.
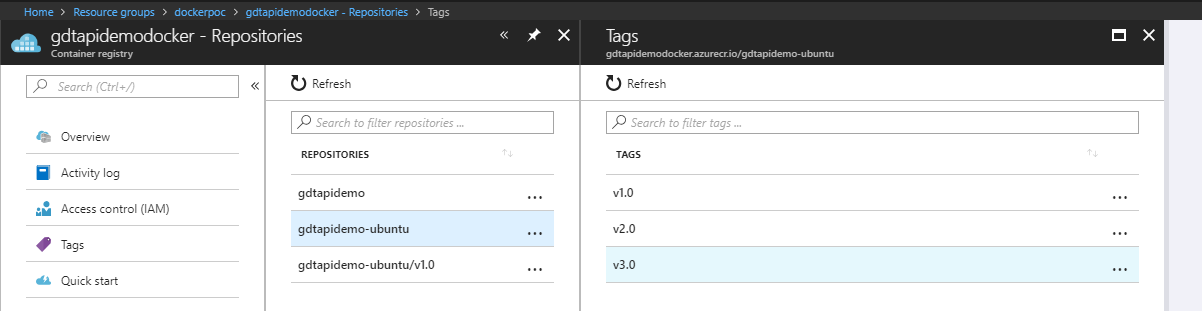
#login to azure, follow the instruction as directed az login #find docker images docker images #tag the latest image docker tag gdt.api.demo.dotnetcore:latest gdtapidemodocker.azurecr.io/gdtapidemo-ubuntu:v3.0 #push the image to ACR docker push gdtapidemodocker.azurecr.io/gdtapidemo-ubuntu:v3.0 |

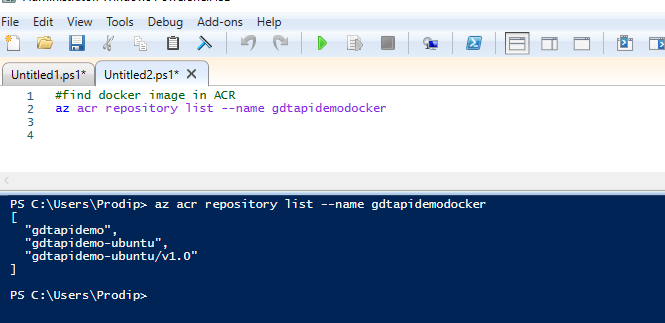
Let’s check ACR in Azure Portal to see if our image is uploaded. You can check the same using Azure Cli. Yeps, our image gdtapidemodocker.azurecr.io/gdtapidemo-ubuntu:v3.0 is in ACR!
Okay, we are getting there! Quick recap- we compiled the container image in Visual Studio, tagged it and pushed the image to ACR with docker. Our next step is to deploy the image in Kubernetes cluster in Azure.
Azure Kubernetes Service (AKS) connected to Azure vNET to deploy container image from ACR to multiple PODs on multiple Nodes
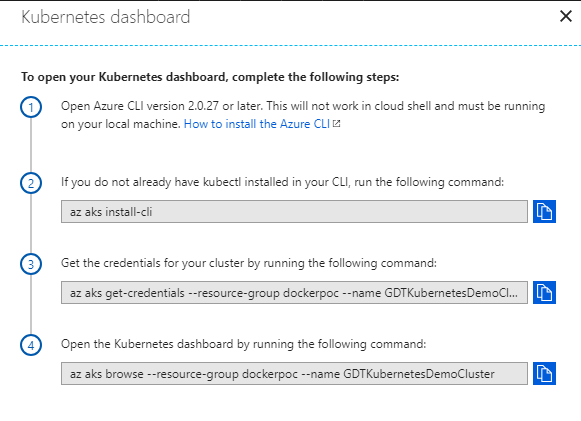
I assume you already created a Kubernetes cluster in Azure with a private vNET. Just for simplicity, I am connecting to vNET with Point-to-Site (client certificate based vpn connection). Let’s connect to Kubernetes cluster but how? Go to Kubernetes Service in Azure Portal and click View Kubernetes Dashboard. This will provide instructions to connect to Kubernetes. Use those cli commands in Powershell. Be sure to change the resource name, cluster name, etc!
I don’t run the last command to open the browser locally. Instead, I connect to Kubernetes proxy.
kubectl proxy –port=8099
Once proxy is listening, you can run the following url in browser to get the IP/Port of Kubernetes dashboard in Azure. Use the Azure url to get to the dashboard and it’s more responsive than the local one.
http://localhost:8099/api/v1/namespaces/kube-system/services/https:kubernetes-dashboard:/proxy/

For some reason, https is not working but I am able to access dashboard with http://198.127.7.72:9090. Keep in mind that this proxy IP address may change if/when you restart the nods.
If your Kubernetes instance in connected to vNET, you must connect to vNET before connecting to Kubernetes dashboard in Azure.
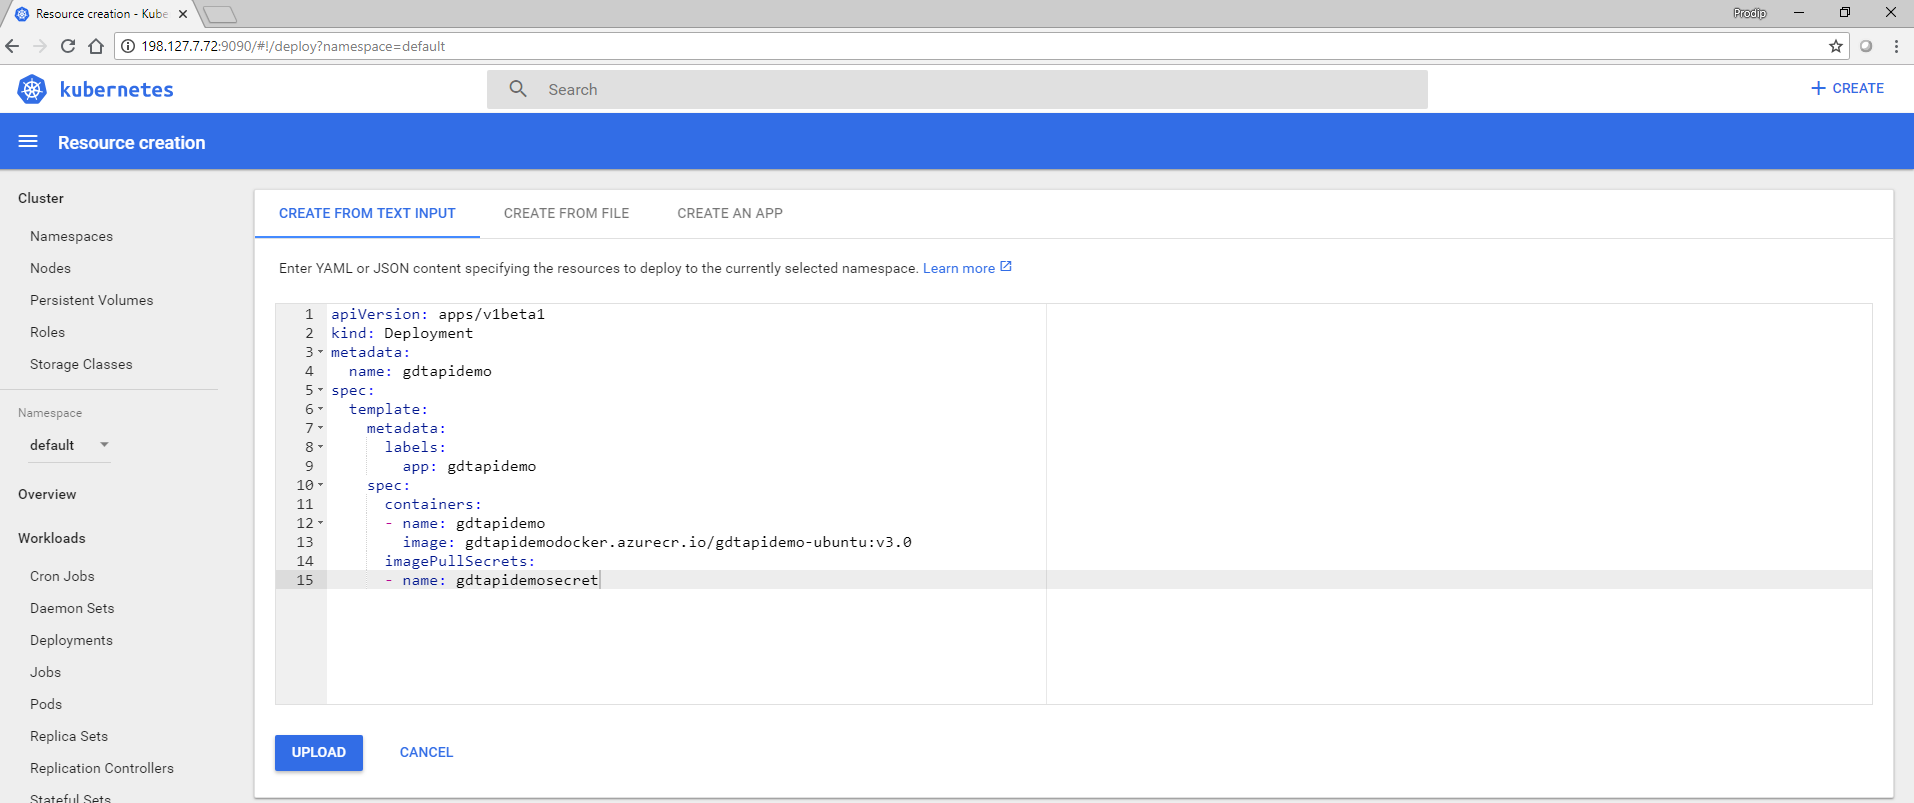
While we can deploy our container image using kubctl cli, we would do the initial deployment via dashboard to understand the full schema.
It’s very important that you specify the imagepullsecrete without which Kubernetes can’t pull image from private registry. Also, the Service Principal (SP) associated with Kubernetes must have Contributor rights for the required resources. Add the SP as Contributor to Azure Container Registry. This is required to pull image (for some reason read permission did not work but I have some doubt why elevated permission is required). Add the SP as Contributor to vNET. This is required if you want to expose the service with InternalLoadBalancer. You can read the details on – Authenticate with Azure Container Registry from Azure Kubernetes Service.
You can do the same using kubctl cli. The command below assumes gdtapidemo.yaml is in the current directory and you have created the imagePullSecretes.
kubectl create -f gdtapidemo.yaml
apiVersion: apps/v1beta1 kind: Deployment metadata: name: gdtapidemo spec: template: metadata: labels: app: gdtapidemo spec: containers: - name: gdtapidemo image: gdtapidemodocker.azurecr.io/gdtapidemo-ubuntu:v3.0 imagePullSecrets: - name: gdtapidemosecret |
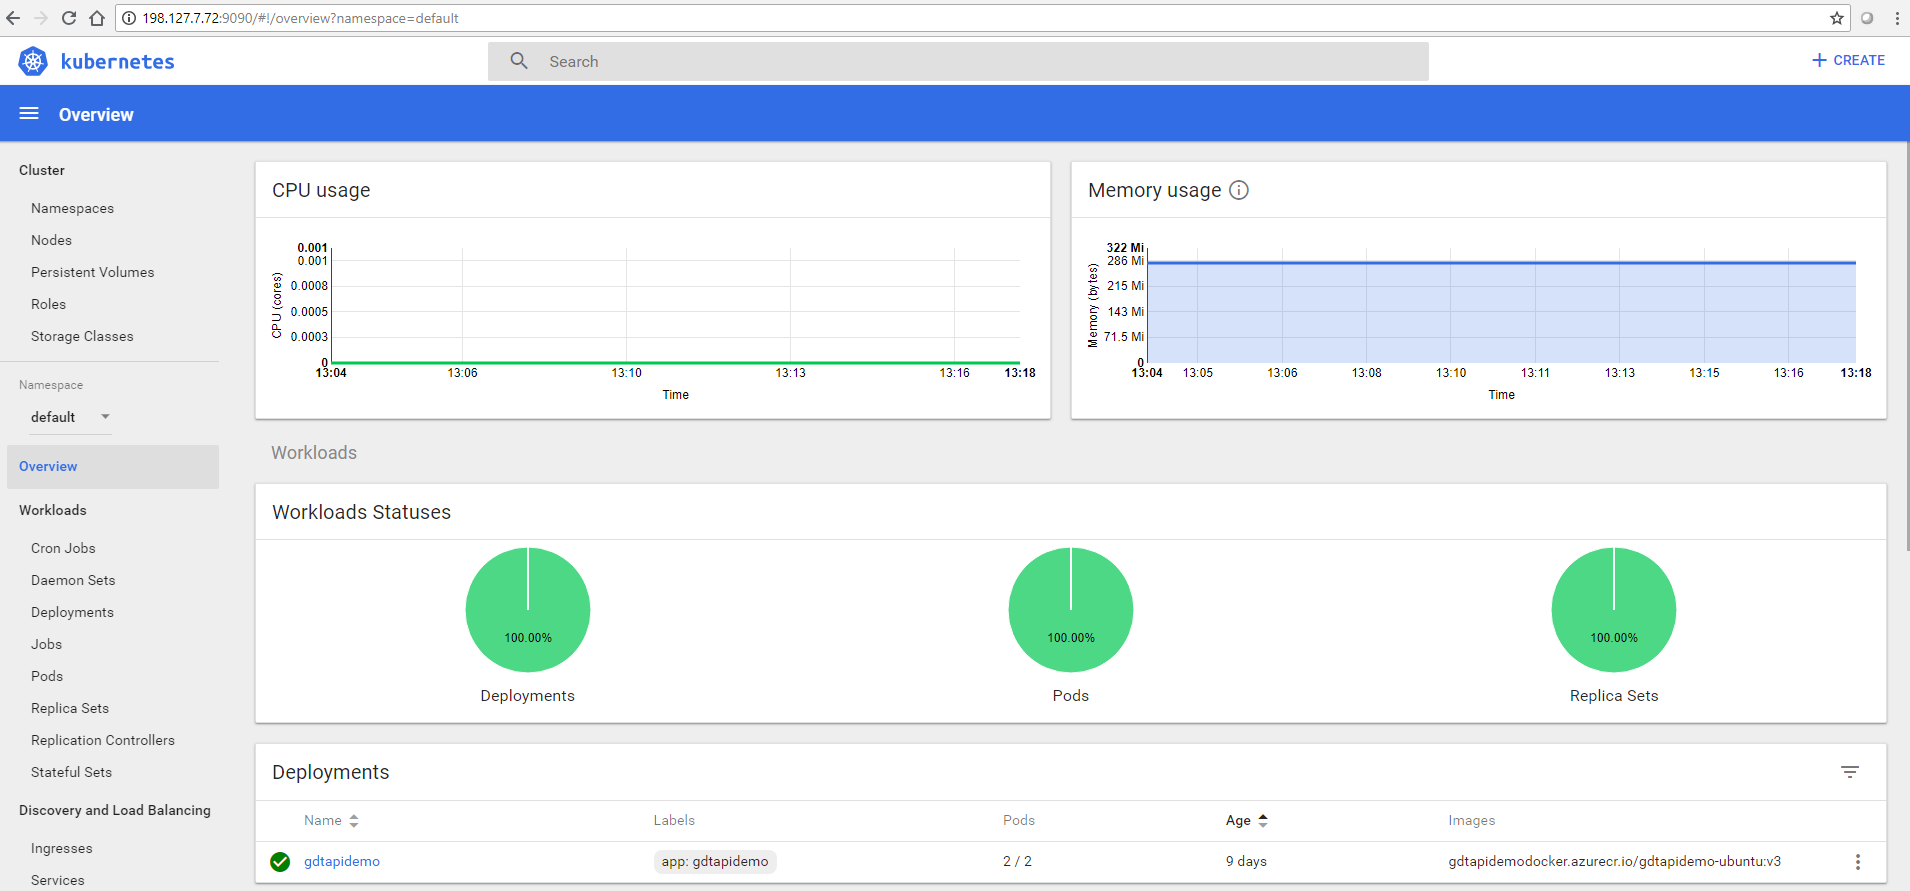
You can find deployment status and possible error in Kubernetes dashboard-
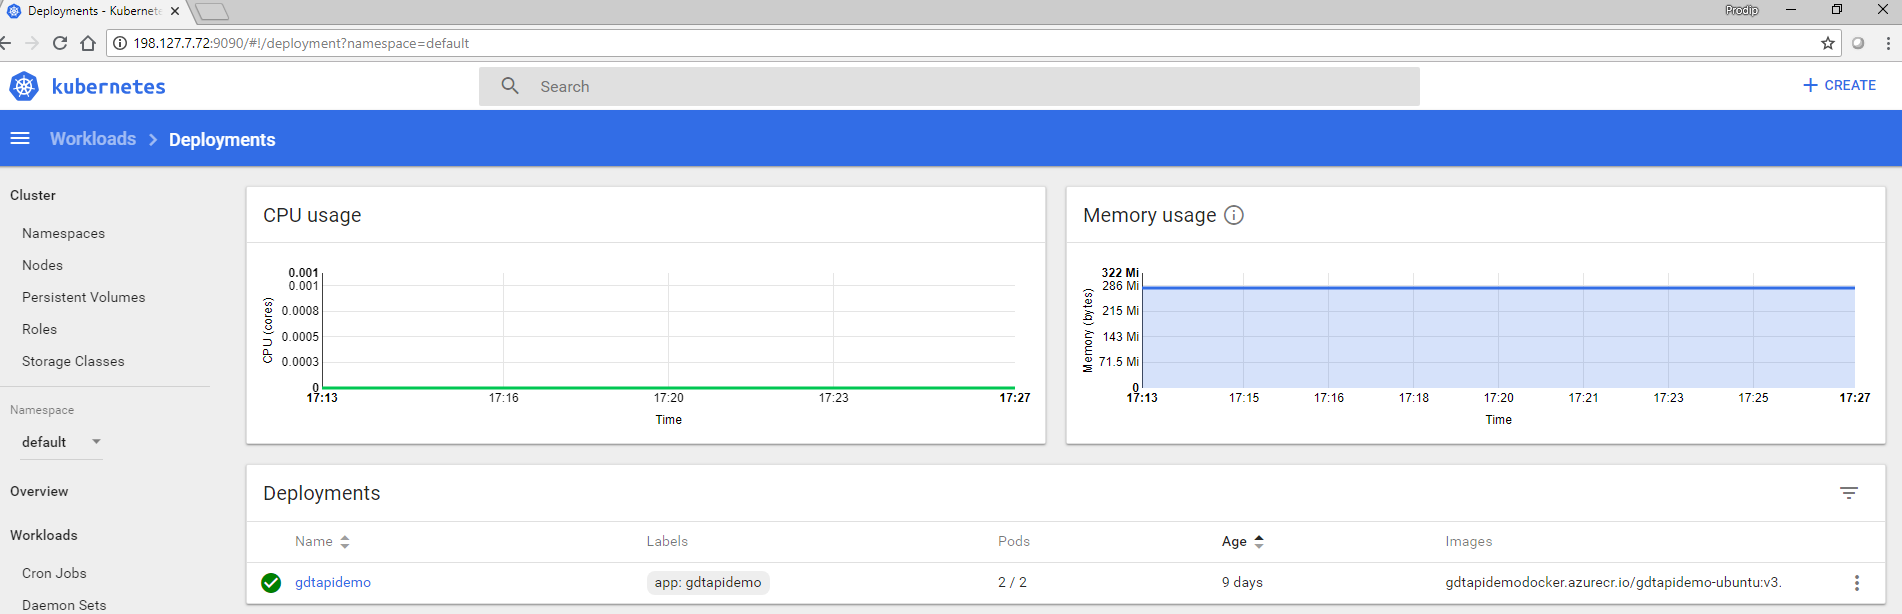
You can find deployment status at the command prompt as well-
kubectl get deployment gdtapidemo
kubectl describe deployment gdtapidemo
Okay, we have our Linux container image deployed in Kubernetes but we are not ready to access from outside. Recall our design goals- API must scale and API must be on internal network. To achieve those goals, we deployed the image to two PODs for scalability and we need to create a service of internal load balance type to distribute the loads.
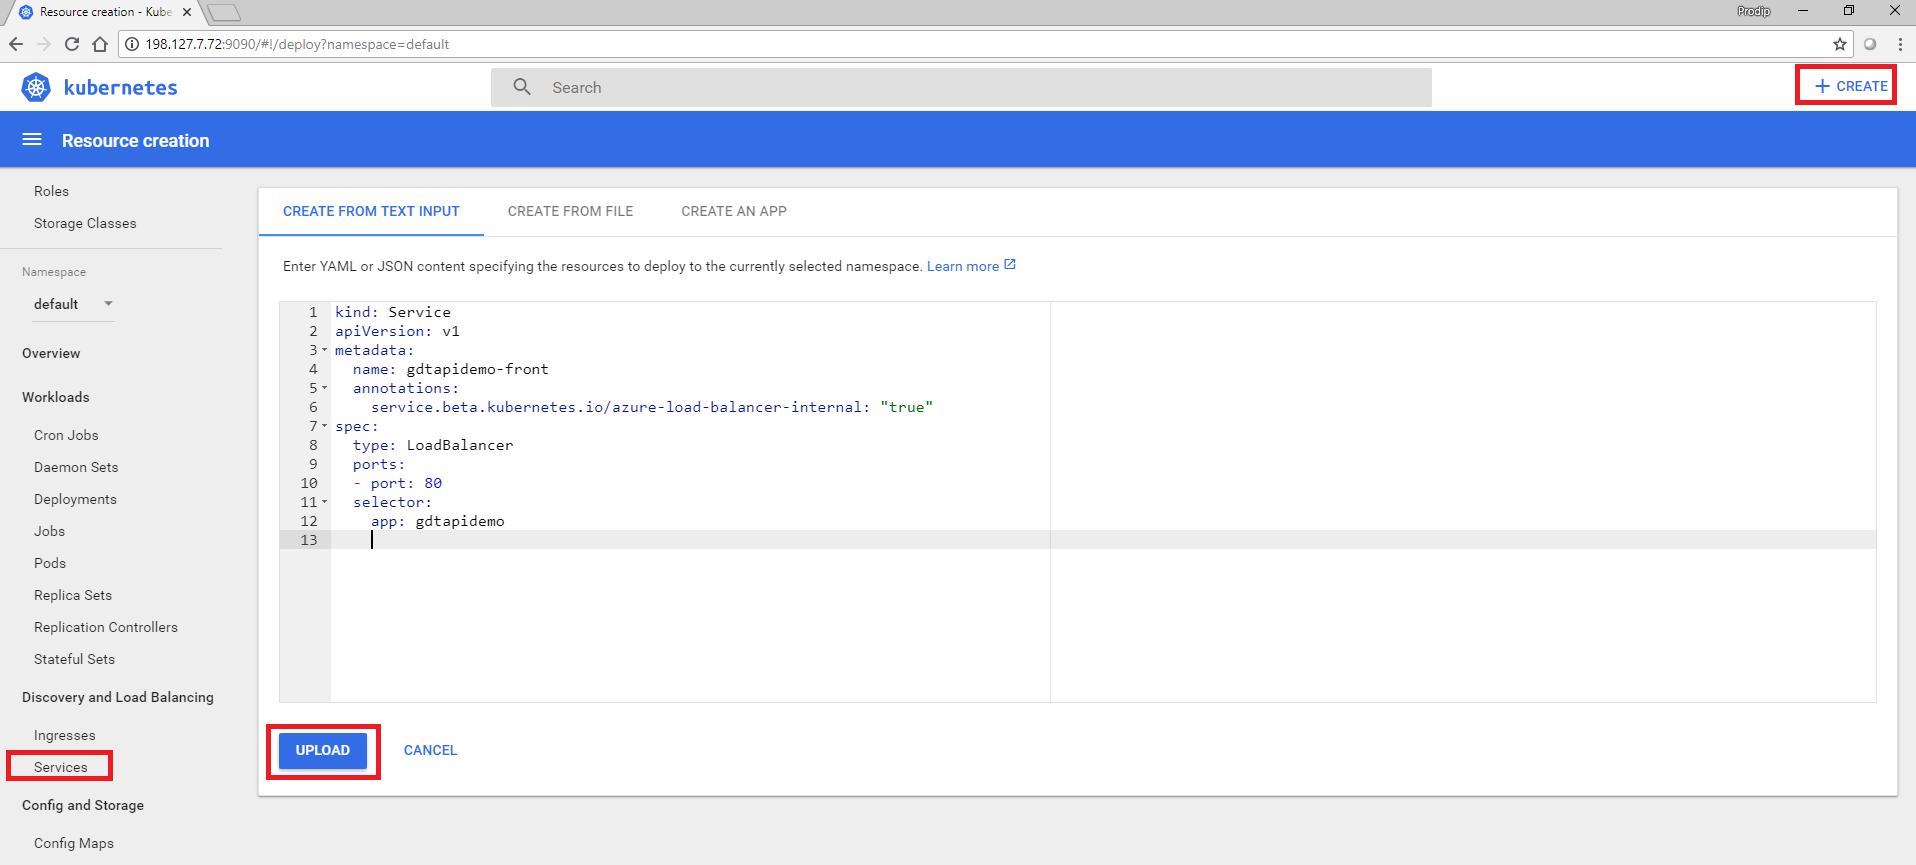
You can create/update Kubernetes Service using yml/yaml file at the command prompt as well-
kubectl create -f gdtapidemo-service.yaml
kind: Service apiVersion: v1 metadata: name: gdtapidemo-front annotations: service.beta.kubernetes.io/azure-load-balancer-internal: "true" spec: type: LoadBalancer ports: - port: 80 selector: app: gdtapidemo |
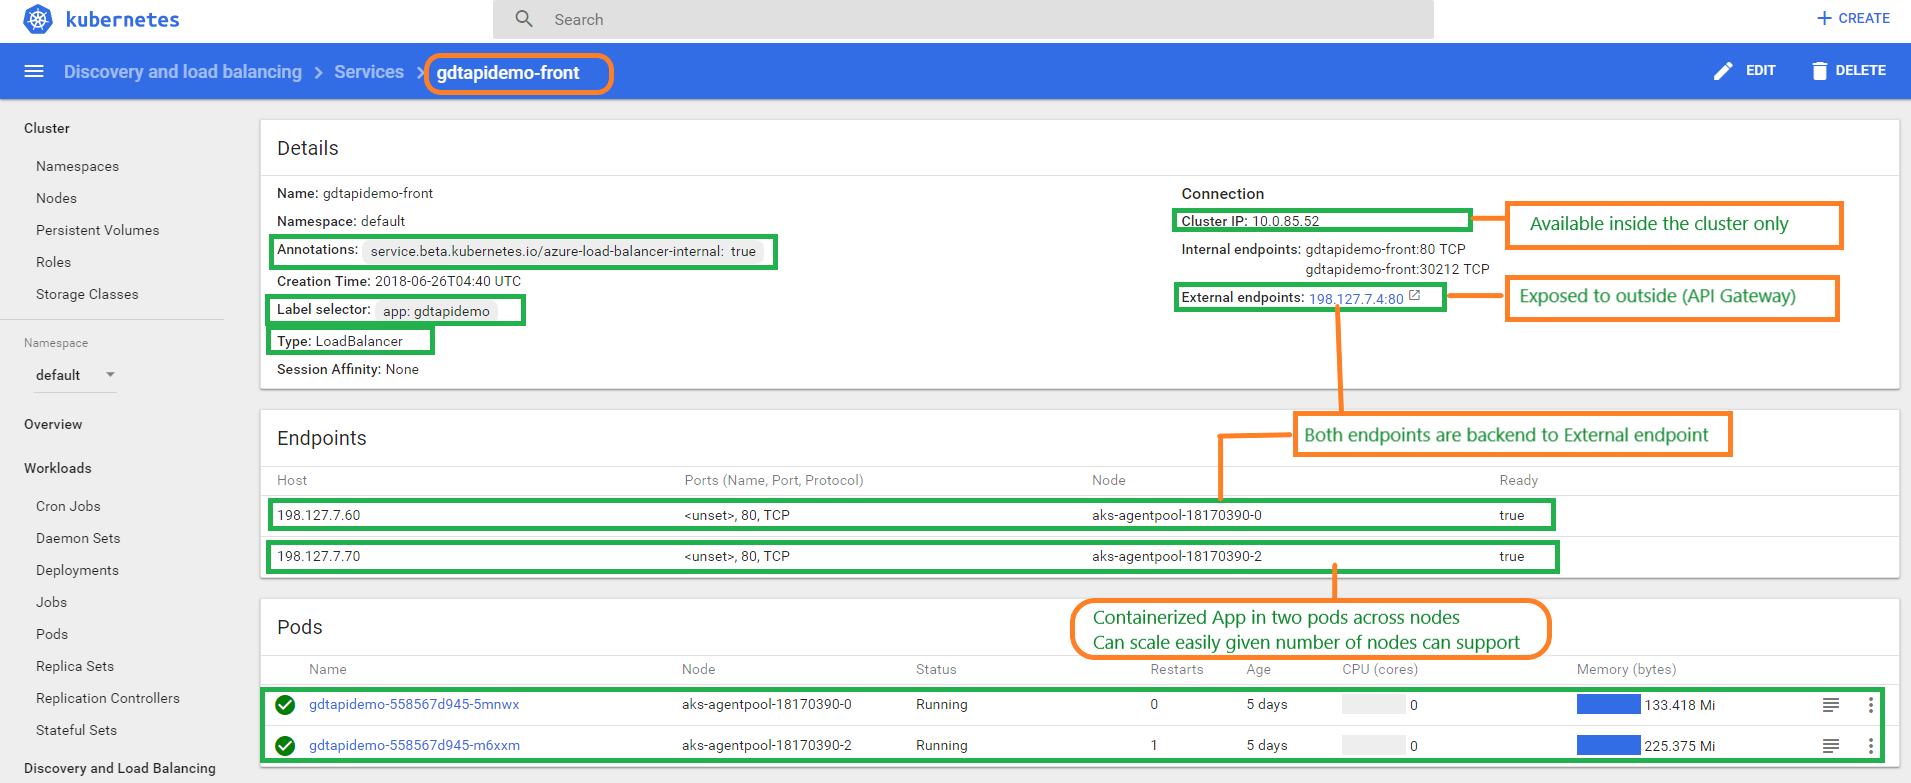
You can find service status and possible error in Kubernetes dashboard-
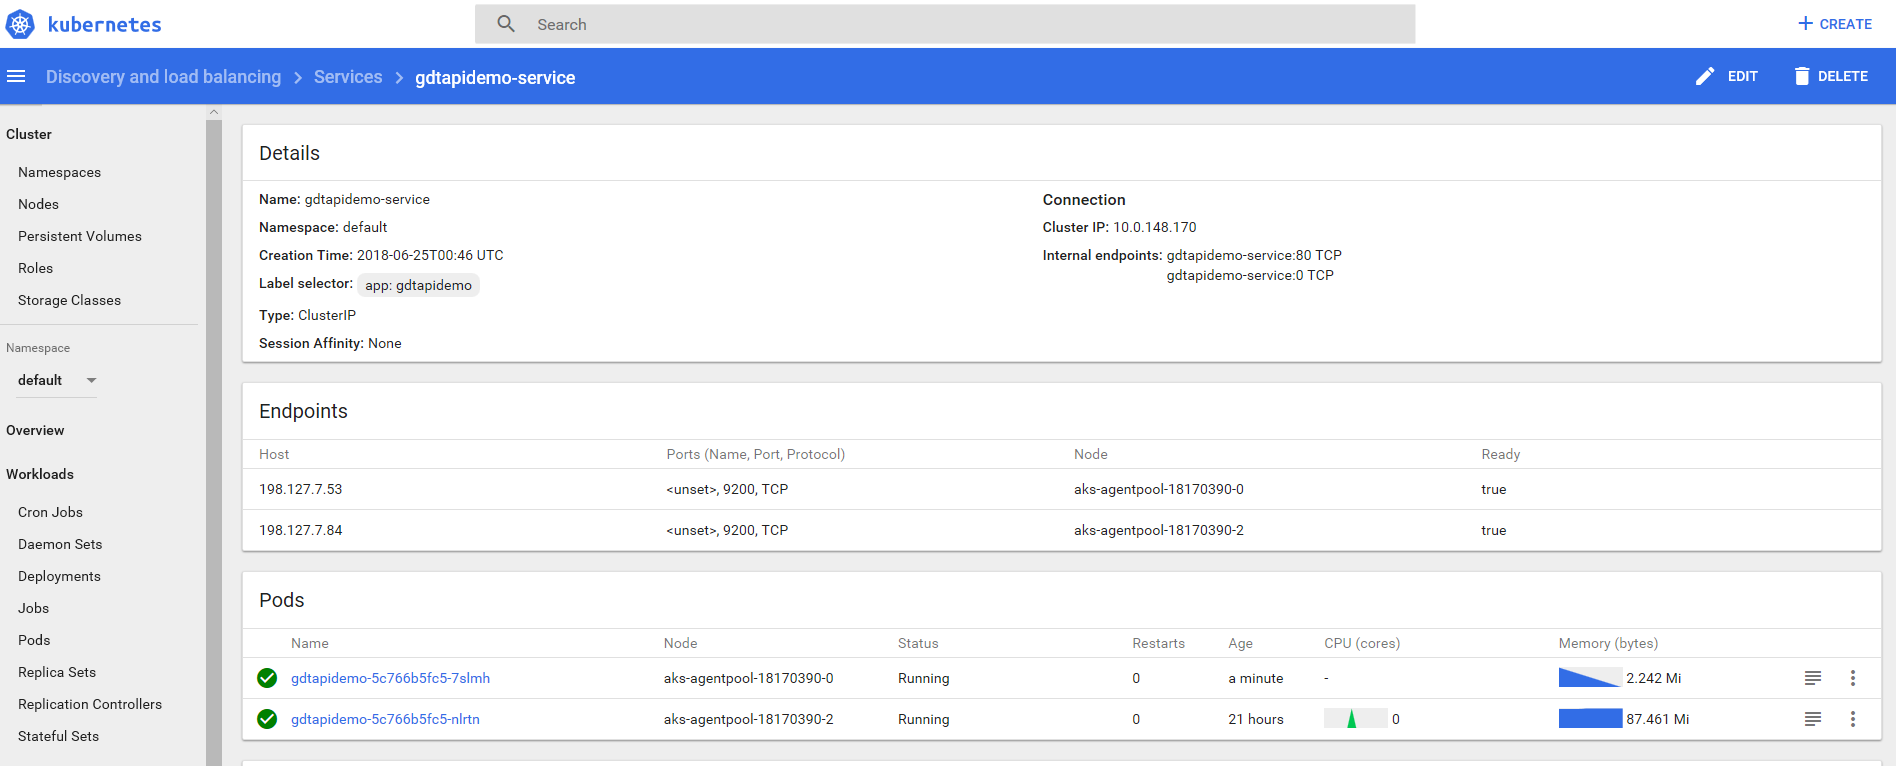
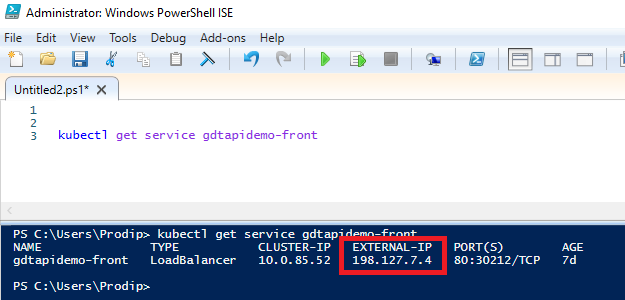
You can find service status at the command prompt as well. Take note of the external-ip address. This is the address that we would be using to access the API. This IP is an internal IP and we must connect to vNET using VPN before we can access the API.
kubectl get service gdtapidemo-front
kubectl describe service gdtapidemo-front
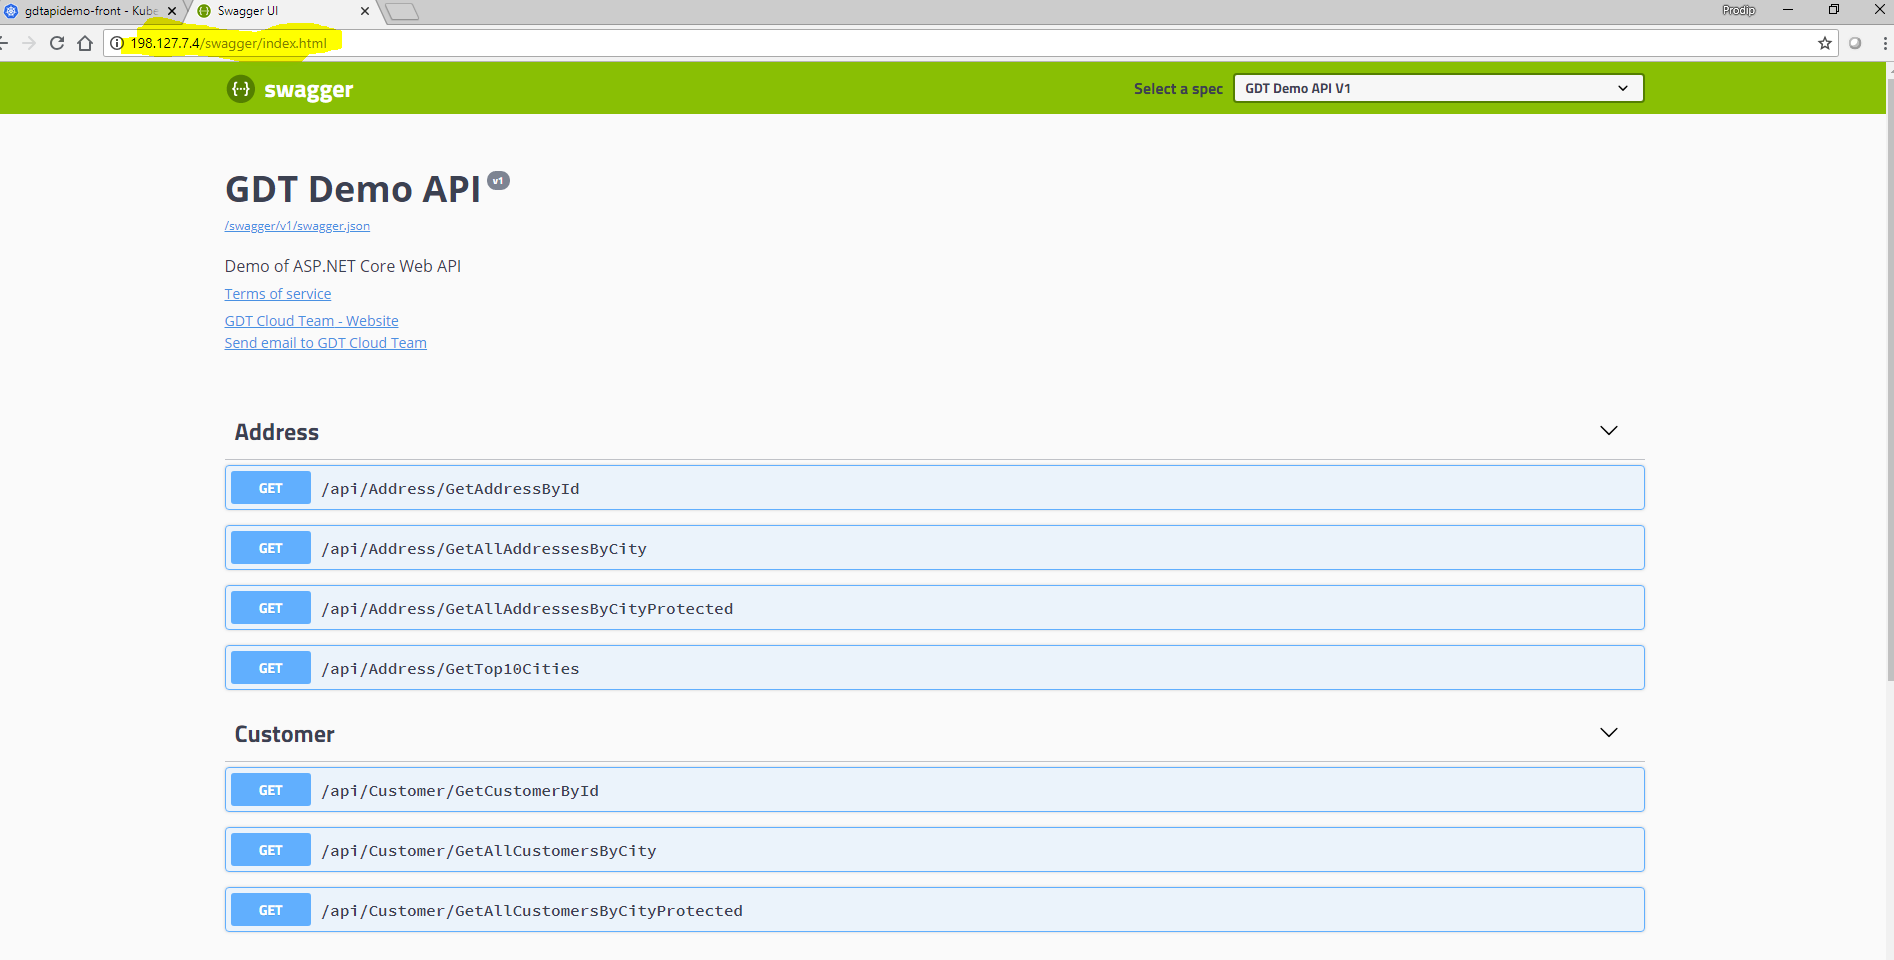
Access API via internal IP address. Let’s find the definition of our API!
Almost there! We have the API running in two PODs and they are exposed via internal ip address. By design, the API app is not accessible from outside (internet). What’s the point of all these works unless we can use the app? This question leads us to Azure API Gateway.
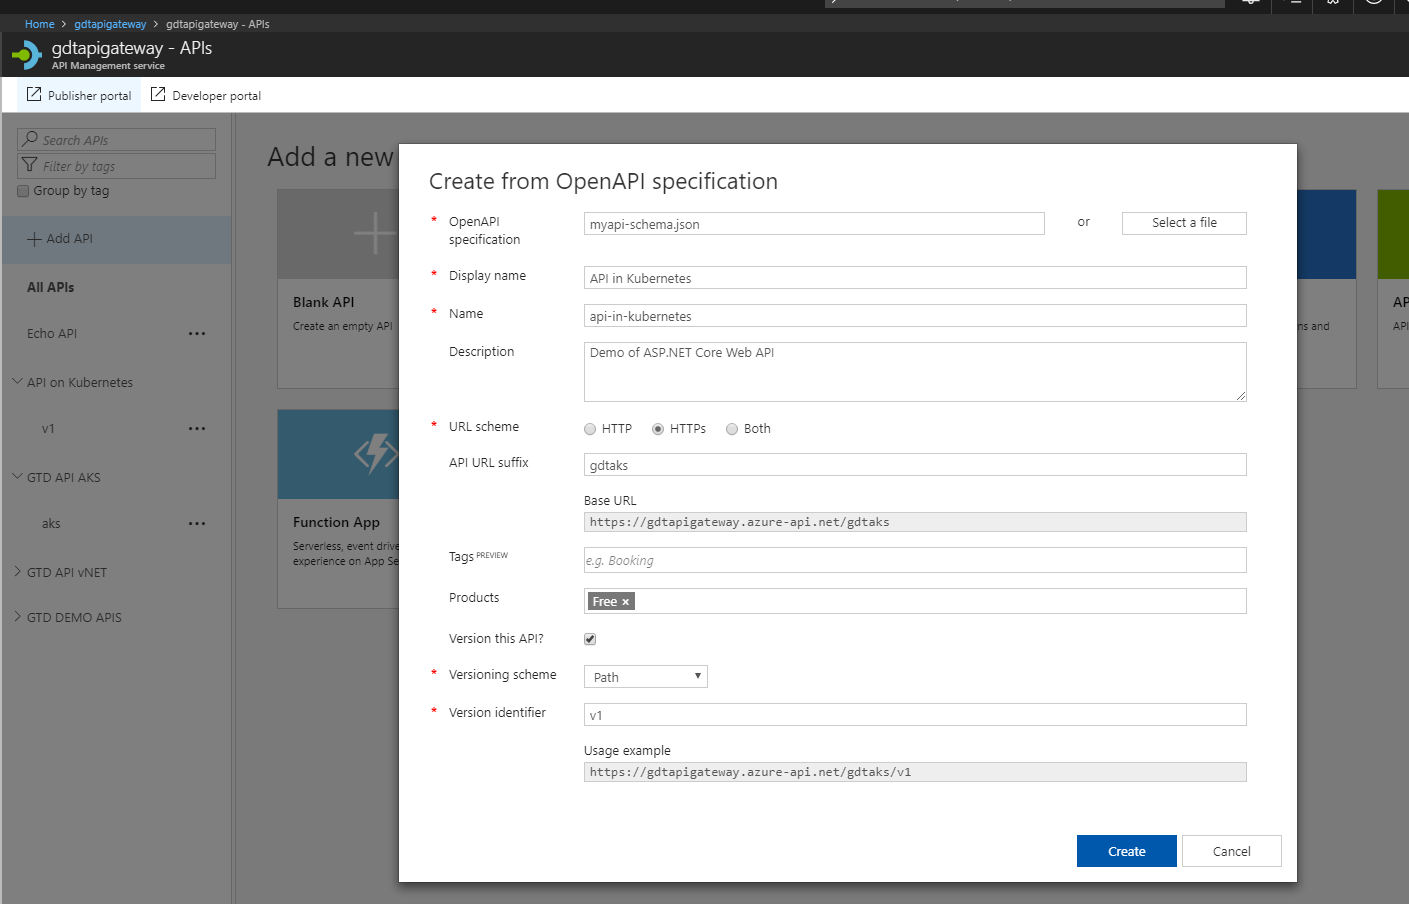
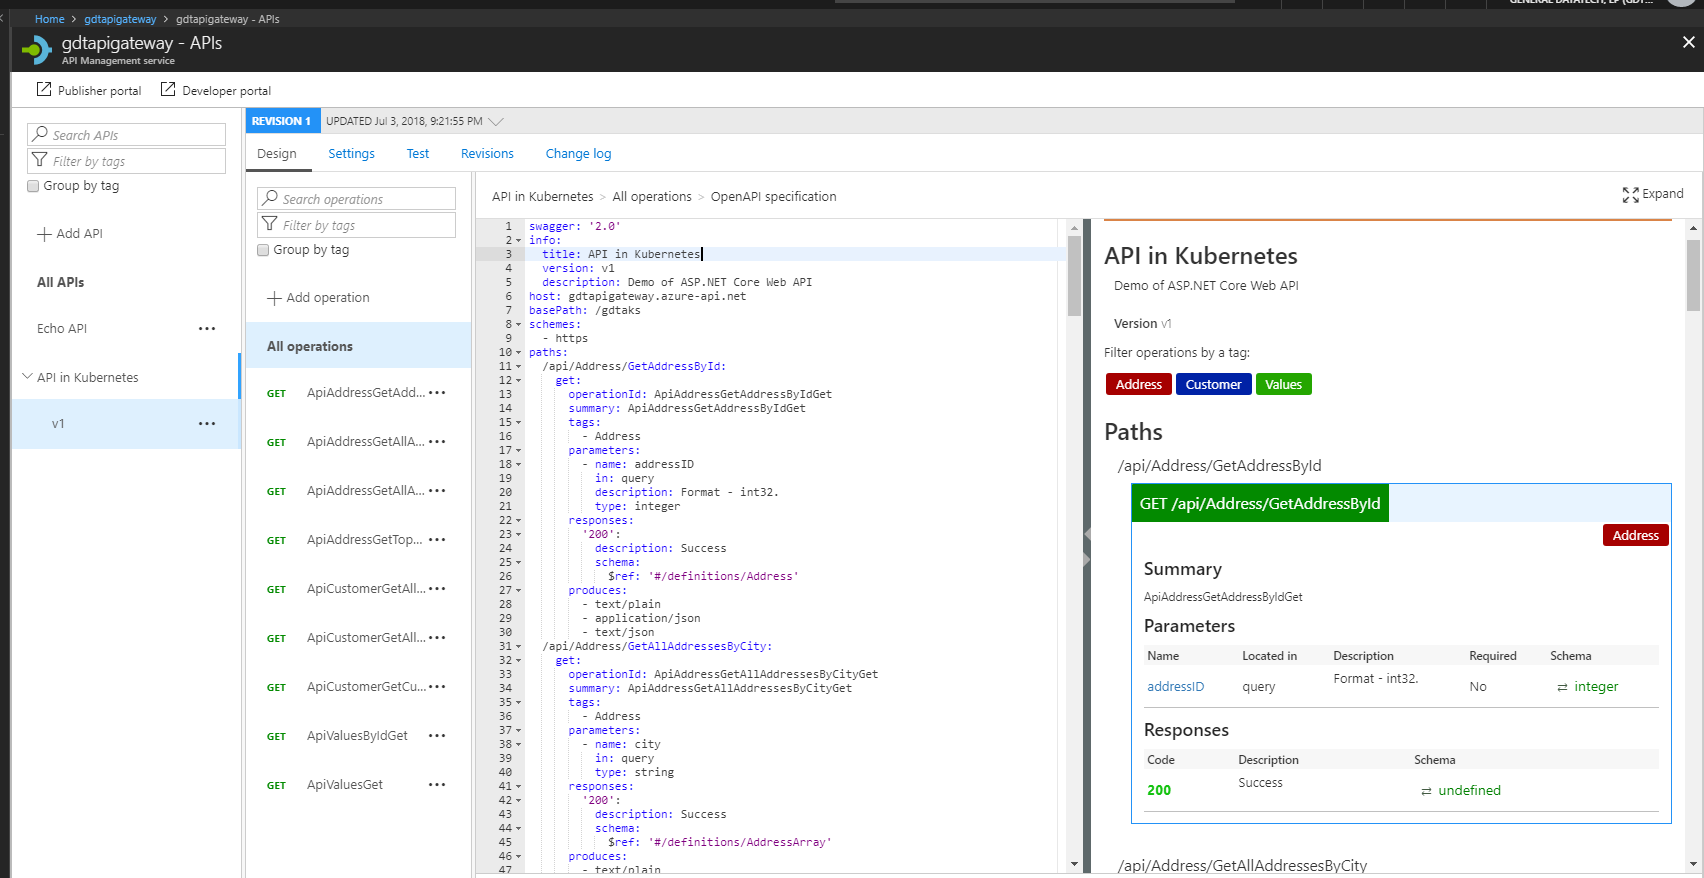
Publish API definition from AKS to Azure API Gateway
I should have been able to use the json schema directly from http://198.127.7.4/swagger/v1/swagger.json but, as of this writing, Azure Portal is not accepting the url even when I am connected to vNET. Workaround is- save the schema to a file and you would be able to add the api at the gateway.
Finally, we have accomplished our design goals with the milestones defined at the beginning and clients can access the API from Azure Kubernetes Service via API Gateway. You may try some API Operations-
- GetAddressById
- GetTop10Cities
- GetAllAddressesByCityProtected (this one will fail, it requires valid jwt token)
Summary
Kubernetes is a portable, extensible open-source platform for managing containerized workloads and services, that facilitates both declarative configuration and automation. Kubernetes services, support, and tools are widely available. Google open-sourced the Kubernetes project in 2014 and Kubernetes is supported by the major cloud providers (Azure, AWS, Google). I am an Azure Application Architect with vast knowledge of Microsoft technologies and tools. It makes natural choice for me to try Kubernetes in Azure but you can deploy Kubernetes cluster to your choice of provider.
Thank you for reading my post and let me take this opportunity to do little bit of selling! Planning to design/deploy your API or Micro-services into Kubernetes? How far are you into cloud readiness? GDT can help you on Discovery (Applications and Hardware), Migration Planning, Implementation and Managed Services (Monitoring Cloud Resources and Applications). Contact GDT’s Cloud Experts at cloudteam@gdt.com. They would love to hear from you.
References
- Authenticate with Azure Container Registry from Azure Kubernetes Service
- Kubernetes Services-Networking
- Run Docker containers on Windows 10 and Windows Server, leveraging Ubuntu as a hosting base
- Quickstart: Deploy an Azure Kubernetes Service (AKS) cluster
- Visual Studio Tools for Docker with ASP.NET Core
- Install Docker for Windows