You may have read my previous posts on Azure Kubernetes, Deploy ASP.NET Core Application in Linux Container in Azure Kubernetes Service (AKS) or Monitor Kubernetes Cluster and Containerized Applications with AppDynamics. In this post, let’s see how to create and use a persistent volume (ReadWriteMany access mode) with Azure Files to write application logs using log4net. Yes, you heard it right! We will write logs to the same log4net file concurrently from multiple PODs across multiple Nodes in a Kubernetes Cluster. Before we go to the details, let me share the high level application architecture and we will explore the details in a moment-
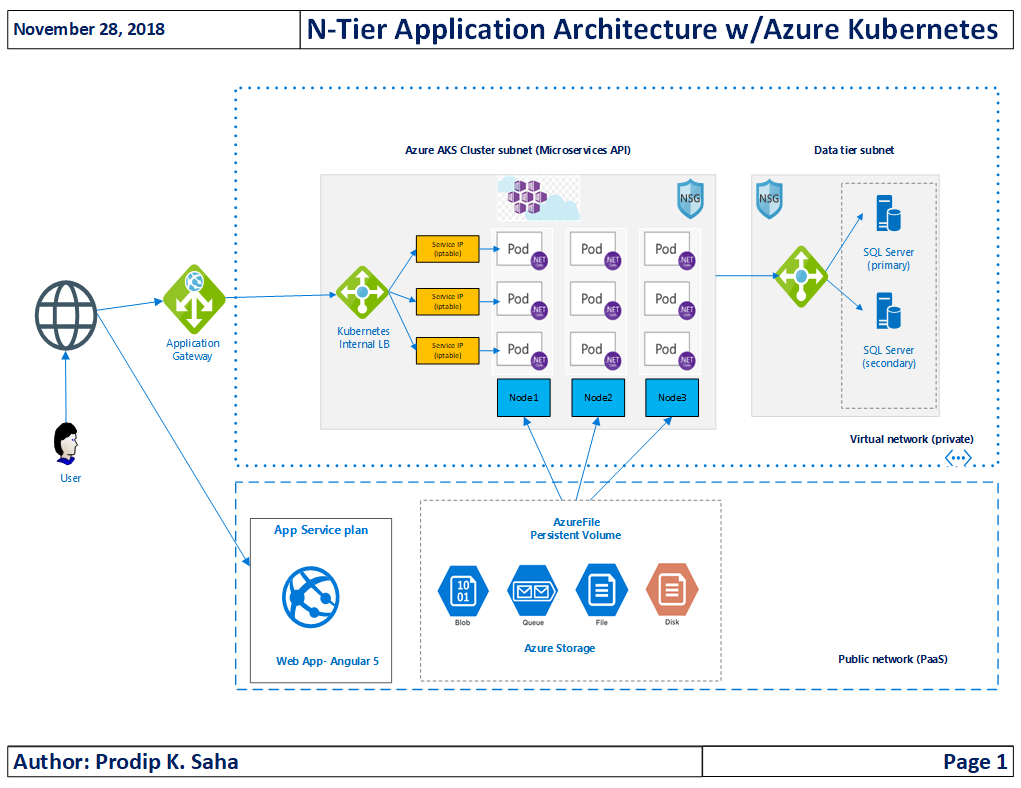
Okay, that’s a logical architecture diagram and you have seen similar ones many times! Let me share a physical architecture from Kubernetes service dashboard to connect the dots!
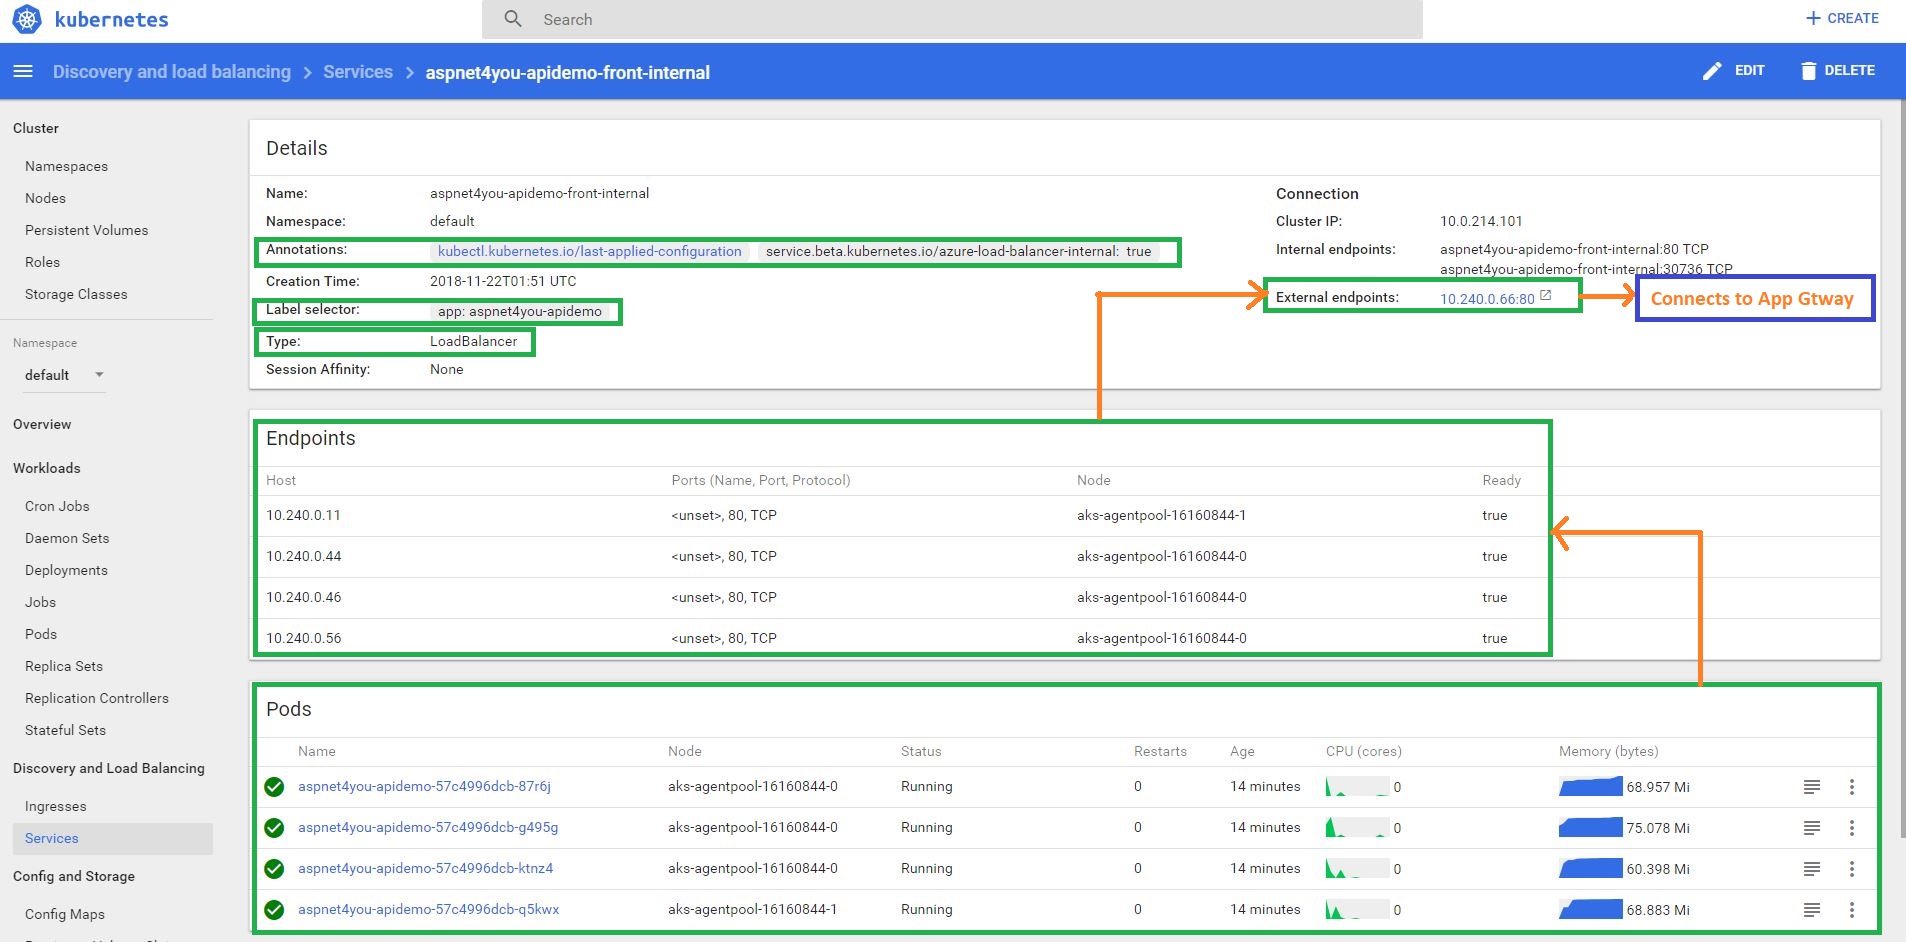
Application is running in a Container inside a POD and multiple PODs are running per Nodes (Linux VM). PODs are exposed as service Endpoints and those endpoints are exposed with an External Endpoint of type Internal Load Balancer. External Endpoint is what exposed to client applications. Security is important and we don’t want to expose our business microservice to internet directly. So, the external endpoint, in our design, is exposed to an IP address that is private (under the vNET). Since the external endpoint is private, how do we expose to outside world(clients)? We have multiple options but Azure Application Gateway would better fit our security requirement (layer 7 routing, load balancing and web firewall).
Okay, enough of application architecture! Let’s get back to our topic- write log files to Azure File Share using log4net from AKS.
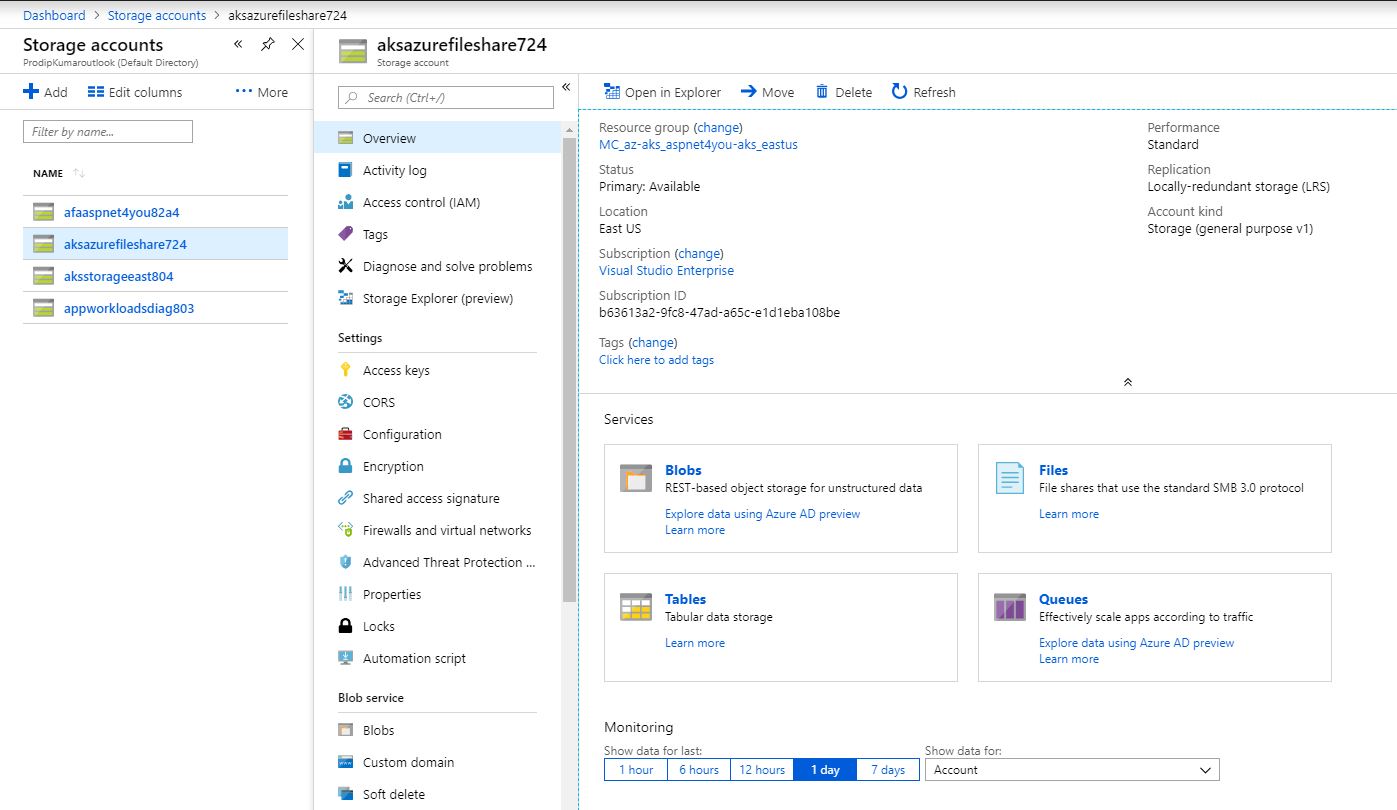
Create Storage Account
First, we need a Storage Account and we can create one on Azure Portal (or using scripts). Note that storage account should be created under Kubernetes resource group (MC_az-aks_aspnet4you-aks_eastus in my case).
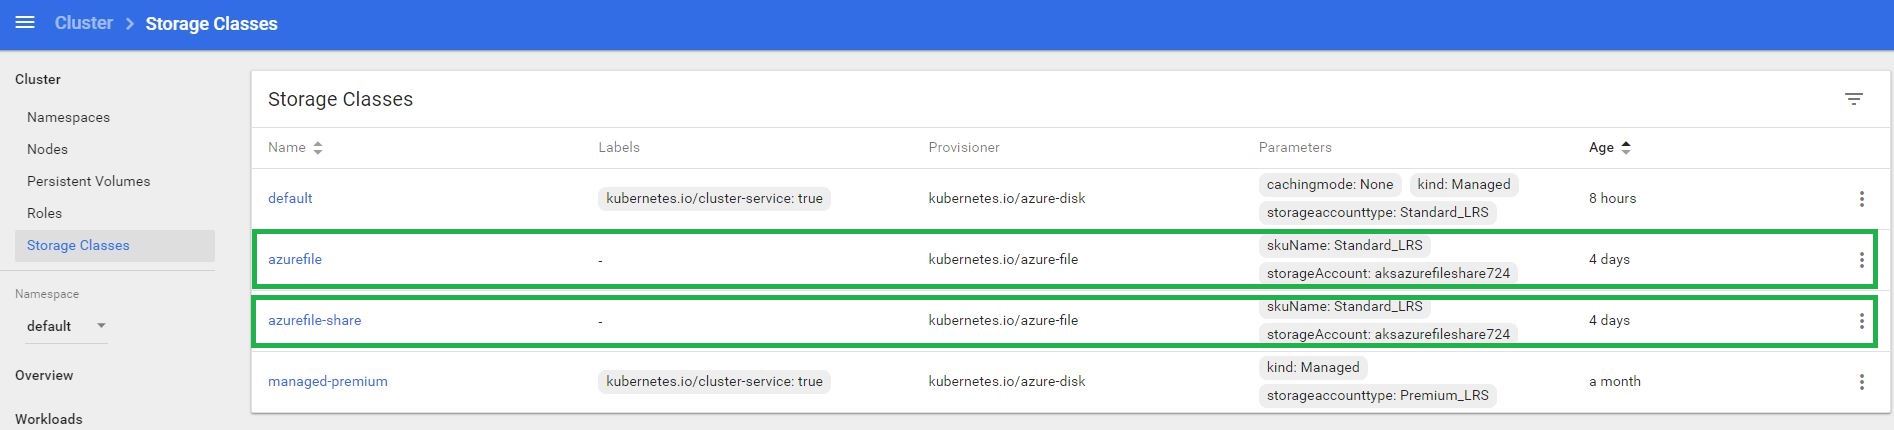
Create a storage class
Create a file named azure-file-sc.yaml and copy in the following example manifest. Update the storageAccount value with the name of your storage account created in the previous step.
kind: StorageClass apiVersion: storage.k8s.io/v1 metadata: name: azurefile provisioner: kubernetes.io/azure-file mountOptions: - dir_mode=0766 - file_mode=0766 - uid=1000 - gid=1000 parameters: skuName: Standard_LRS storageAccount: aksazurefileshare724 |
Create the storage class with the kubectl apply command:
kubectl apply -f azure-file-sc.yaml
Verify the storage class at the dashboard or using kubectl cli.
Create a cluster role and binding
Create a ClusterRole and ClusterRoleBinding. Create a file named azure-pvc-roles.yaml and copy in the following YAML:
--- apiVersion: rbac.authorization.k8s.io/v1 kind: ClusterRole metadata: name: system:azure-cloud-provider rules: - apiGroups: [''] resources: ['secrets'] verbs: ['get','create'] --- apiVersion: rbac.authorization.k8s.io/v1 kind: ClusterRoleBinding metadata: name: system:azure-cloud-provider roleRef: apiGroup: rbac.authorization.k8s.io kind: ClusterRole name: system:azure-cloud-provider subjects: - kind: ServiceAccount name: persistent-volume-binder namespace: kube-system |
Assign the permissions with the kubectl apply command:
kubectl apply -f azure-pvc-roles.yaml
Verify the cluster role at the dashboard or using kubectl cli.

Create a persistent volume claim
Create a file named azure-file-pvc.yaml and copy in the following YAML. Make sure that the storageClassName matches the storage class created in the previous step (create storage class):
apiVersion: v1
kind: PersistentVolumeClaim
metadata:
  name: azurefile
spec:
  accessModes:
    - ReadWriteMany
  storageClassName: azurefile
  resources:
    requests:
storage: 5Gi |
Create the persistent volume claim with the kubectl apply command:
kubectl apply -f azure-file-pvc.yaml
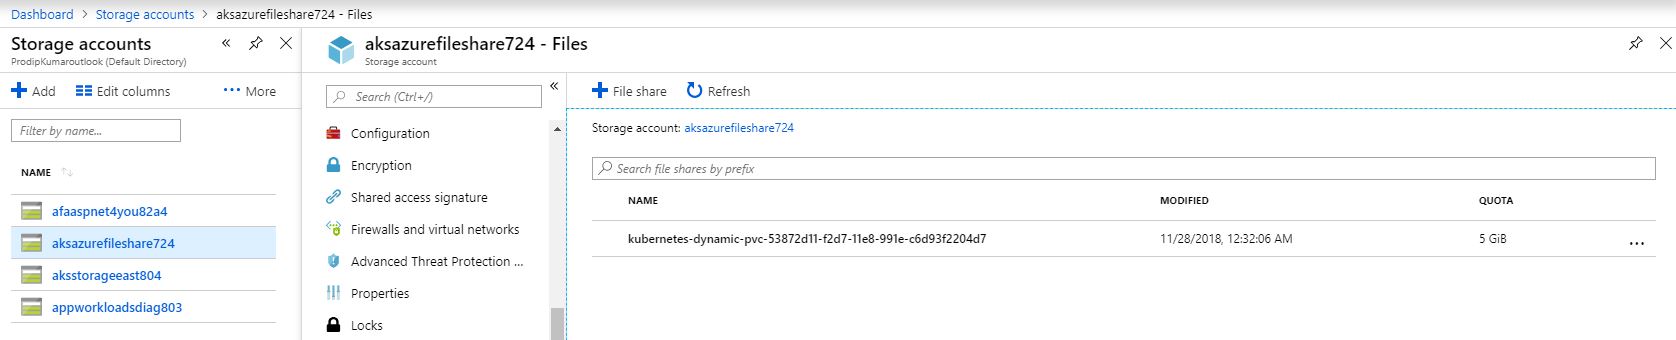
Verify the volume at the dashboard or using kubectl cli. We would very the volume is created at the Azure Portal as well!

Use the persistent volume
Okay, we have the volume created and it’s time to update the ASP.NET Core API application to use the file share. Let me share my yaml file (aspnet4youapidemo.yaml) that I am using to deploy the container.
apiVersion: apps/v1beta1 kind: Deployment metadata: name: aspnet4you-apidemo spec: replicas: 4 template: metadata: labels: app: aspnet4you-apidemo spec: containers: - name: aspnet4you-apidemo image: aspnet4you.azurecr.io/api-dotnetcore:v3.0 volumeMounts: - name: volume mountPath: /mnt/azure-file-share imagePullSecrets: - name: aspnet4youapidemosecret volumes: - name: volume persistentVolumeClaim: claimName: azurefile |
Deploy the docker image from Azure Registry to Kubernetes Cluster
kubectl apply -f aspnet4youapidemo.yaml
Wow! We have 4 PODs running in the cluster. :)- How do we know it’s writing to Azure File Share? Continue reading!
I needed to modify the startup of ASP.NET Core to wire-up log4net. Here is little code snippet-
// This method gets called by the runtime. Use this method to configure the HTTP request pipeline.
        public void Configure(IApplicationBuilder app, IHostingEnvironment env, ILoggerFactory loggerFactory)
        {

            loggerFactory.AddLog4Net(Configuration.GetValue("Log4NetConfigFile:Name"));

            if (env.IsDevelopment())
            {
                app.UseDeveloperExceptionPage();
            }

            // Enable middleware to serve generated Swagger as a JSON endpoint.
            app.UseSwagger();

            // Enable middleware to serve swagger-ui (HTML, JS, CSS, etc.),
            // specifying the Swagger JSON endpoint.
            app.UseSwaggerUI(c =>
            {
                c.SwaggerEndpoint("/swagger/v1/swagger.json", "ASPNET4YOU Demo API V1");
            });

            app.UseAuthentication();
            app.UseMvc();
        }
Updated log4net configuration to use file share path-
<?xml version=”1.0″ encoding=”utf-8″?>
<log4net>
<appender name=”RollingLogFileAppender” type=”log4net.Appender.RollingFileAppender”>
<file value=”/mnt/azure-file-share/logfile.txt” />
<appendToFile value=”true” />
<rollingStyle value=”Composite” />
<datePattern value=”yyyyMMdd” />
<maxSizeRollBackups value=”10″ />
<maximumFileSize value=”5MB” />
<layout type=”log4net.Layout.PatternLayout”>
<conversionPattern value=”%date [%thread] %-5level %logger [%property{NDC}] – %message%newline” />
</layout>
</appender>
<appender name=”ConsoleAppender” type=”log4net.Appender.ConsoleAppender”>
<layout type=”log4net.Layout.PatternLayout”>
<conversionPattern value=”%date [%thread] %-5level %logger [%property{NDC}] – %message%newline” />
</layout>
</appender>
<root>
<level value=”ALL”/>
<appender-ref ref=”RollingLogFileAppender”/>
</root>
</log4net>
Also, updated the controller to add logging statements-
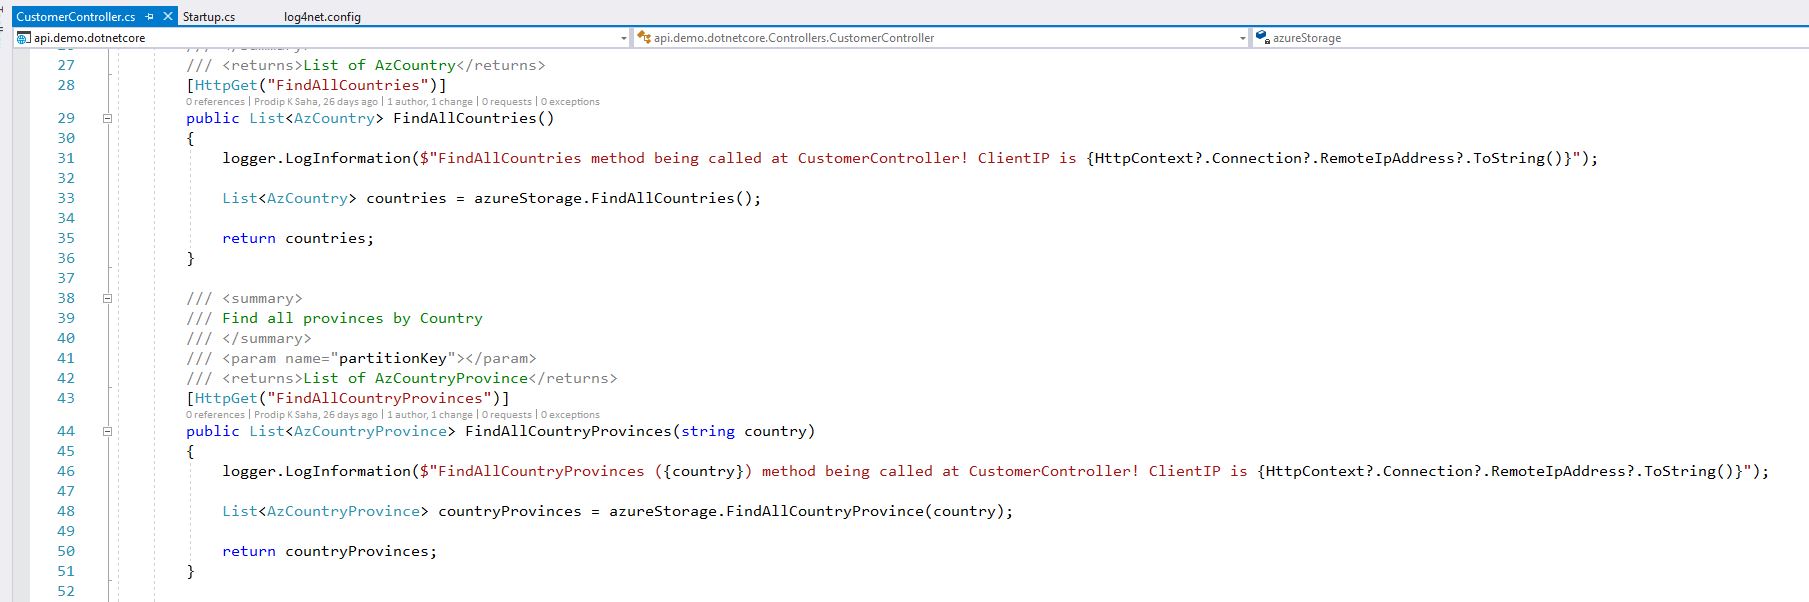
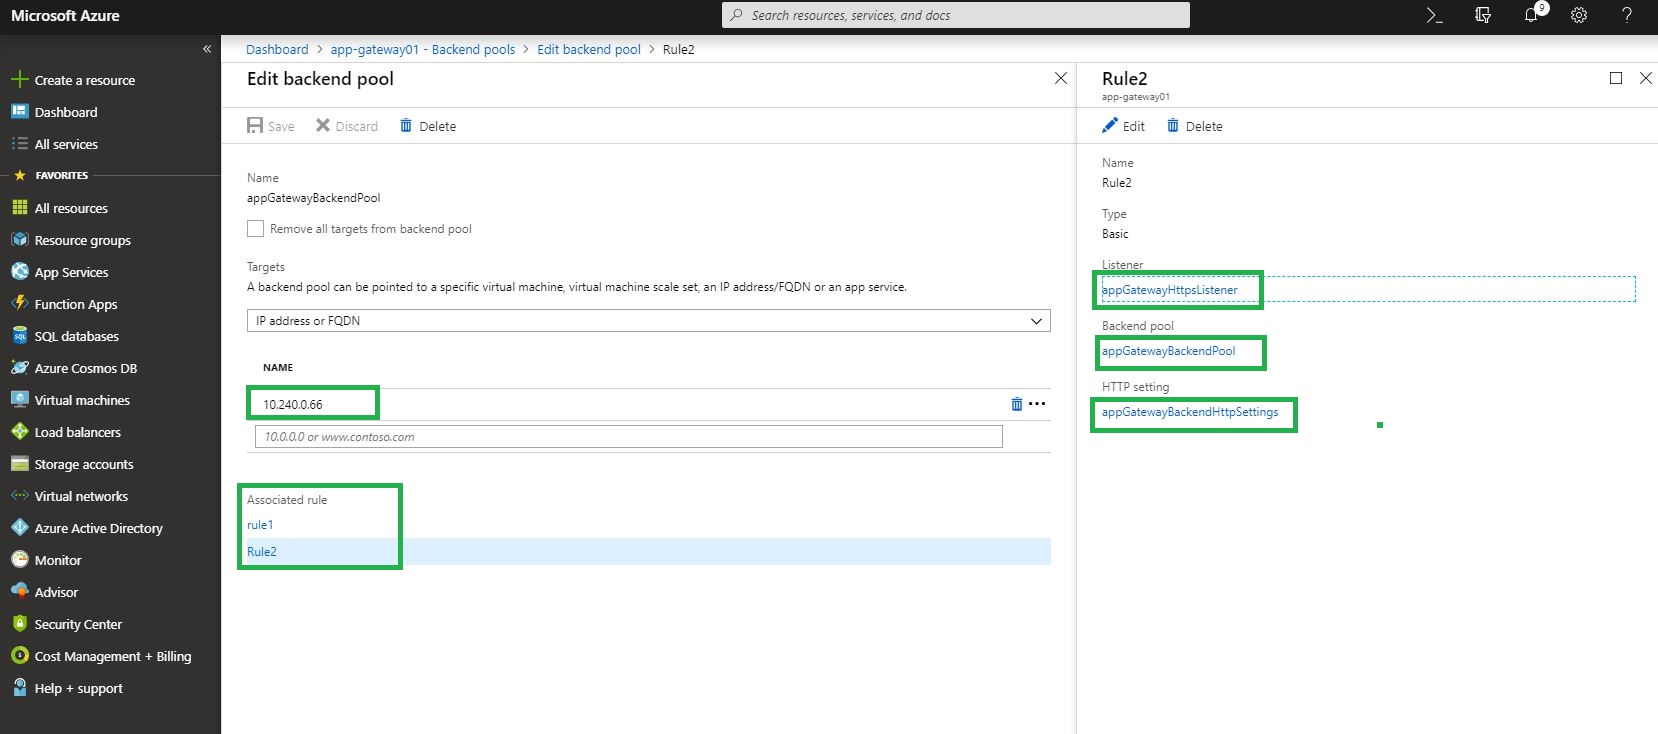
Okay, we got the application updated for logging to Azure file share and the container is deployed. Let’s configure Application Gateway to configure it’s backendpool to use Kubernetes External Endpoint IP address.
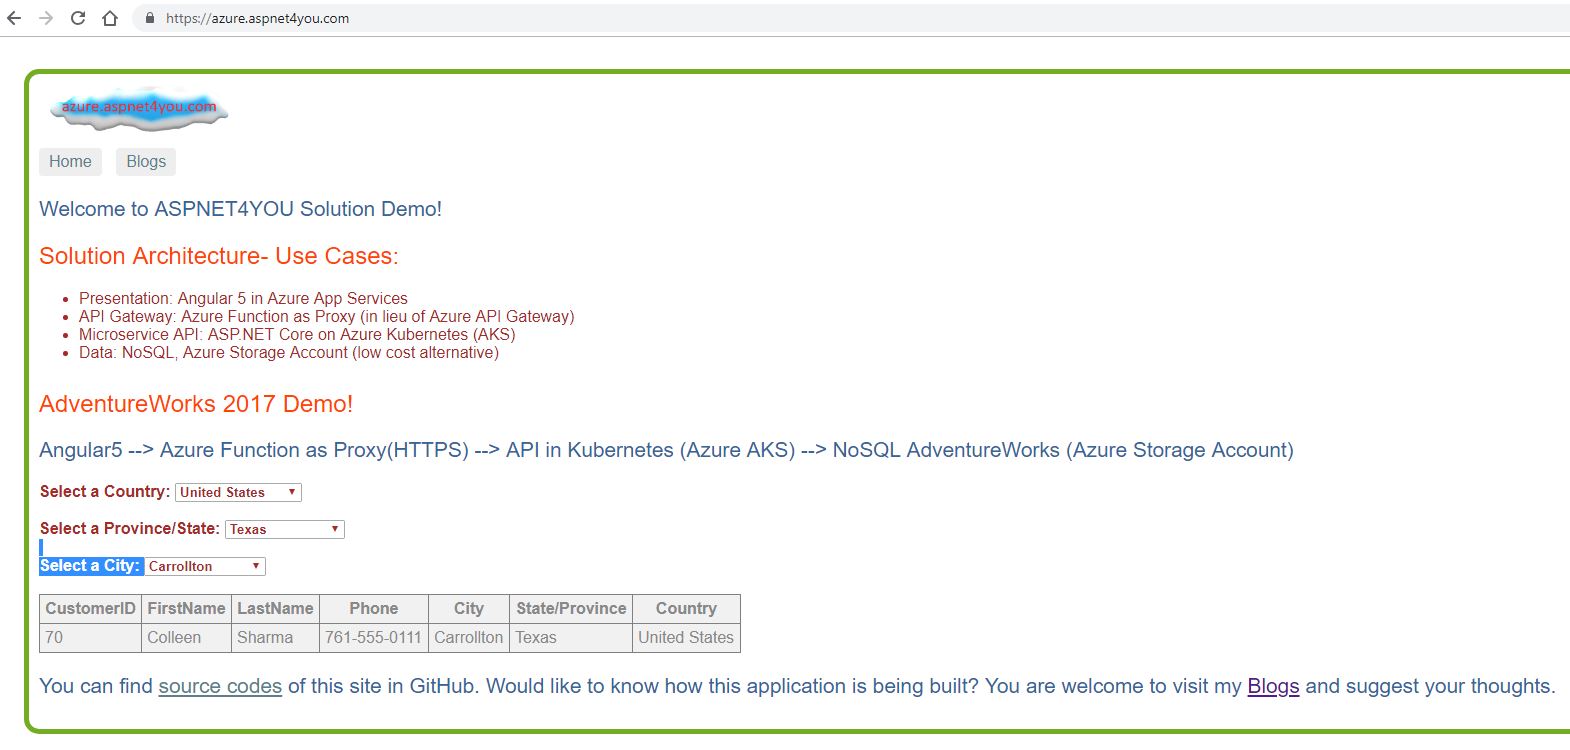
Almost there! Let’s use our Angular 5 UI application to call the API via Application Gateway or you can try the api in the browser- http://23.100.30.223/api/customer/findallcountries or https://23.100.30.223/api/customer/findallcountries!
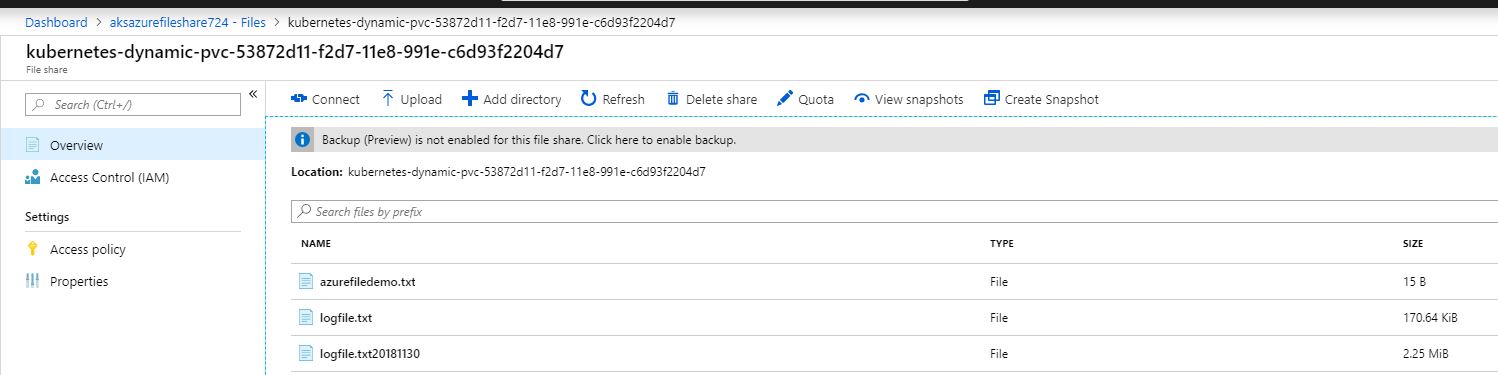
Let’s verify our file share in Azure. Yea, there are our logs!
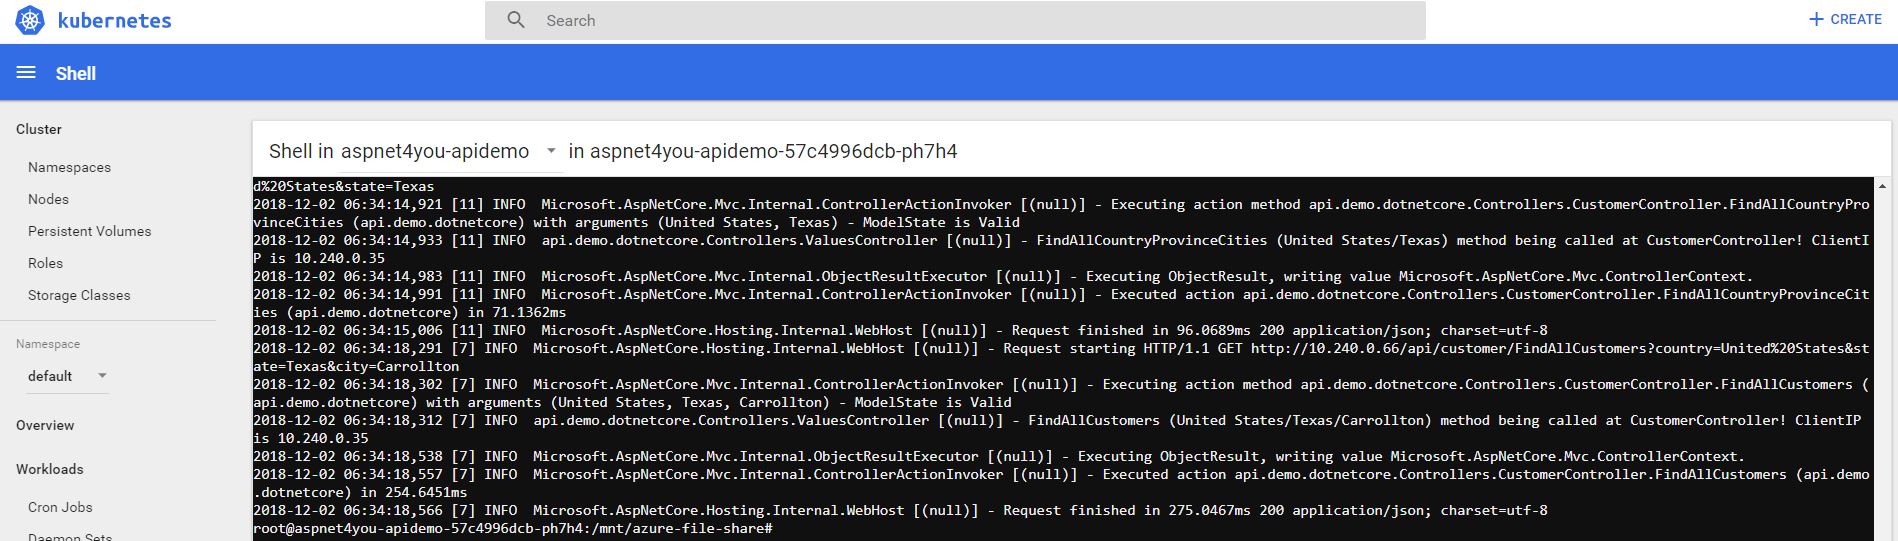
Let’s shell into one of the POD and verify the log files. Yep, it’s there and I can see custom logs!
Conclusion
Creating and using Azure File Share is relatively easier and you can read/write to file share from multiple PODs concurrently. Azure Disk as volume does not support read/write from multiple PODs. Microsoft says you can write to Azure Disk from single POD but I was able to write from two PODs (incidentally, both the PODs were on same node). If you are looking for high IOPS, Azure Disk is best for you. My attempt to create Azure File from vNET joined storage account failed. You want the storage account available from vNET only for security but I had to remove vNET to successfully provision Persistent Volume Claim (PVC)!
References and Acknowledgements-
- Dynamically create and use a persistent volume with Azure Files in Azure Kubernetes Service (AKS)
- Deploy ASP.NET Core Application in Linux Container in Azure Kubernetes Service (AKS)
- Kubernetes Services and Networking