This would be my second post since I joined Fannie Mae and like many other companies Fannie Mae is big into AWS cloud. Join the bandwagon! I am not new to AWS and I have been deeply invested into Microsoft Azure cloud. Most of my hands-on work with Kubernetes are implemented with services offered by Azure including AKS and deployed in Azure. I thought it would be nice to do some hands-on with Kubernetes but do it in AWS, precisely AWS EKS, just to see the differences while keeping the architecture similar to what I have in Azure. Let’s roll the sleeves!
AWS is nice to offer free tier for people like us but it’s not entirely free. Not all resources are covered by free tier and eks is one of them but you can minimize the cost if you do the home work and delete the resources at the end of poc. One of the big one not covered by free tier is, NAT Gateway for outbound internet connection from private subnet but good news is, you can use NAT Instance. In my case, NAT instance (t2.micro) is the only EC2 compute I have for this POC and it’s free. As for hands-on exercise, I would like to have complete control (root account) over the cloud resources and I don’t mind spending few dimes for my own learning!
Enough of the intro, let’s get started! So, where do you start the journey to AWS EKS? Getting Started with Amazon EKS is the place to start. I already have my machine setup with chocolatey and kubectl as part of accessing clusters in AKS but I don’t have eksctl. Also, my version of kubectl was old and I needed to update it. So, I followed the Getting Started with eksctl since I needed to install and configure other aws tools. Here are the sequence that I followed to prep my Windows 10 (64 bits) machine for access to eks-
- Install the AWS CLI version 1 Using the MSI Installer
- Configure Your AWS CLI Credentials. You can follow the instructions on Getting Started with eksctl
- Install or upgrade eksctl on Windows using Chocolatey
- Install/upgrade and Configure kubectl for Amazon EKS. I picked the latest v1.14. This upgrade was needed because I was getting prompt to enter user name and password! Upgrade fixed it.
- Make sure all the install folders are in your path environment variable.
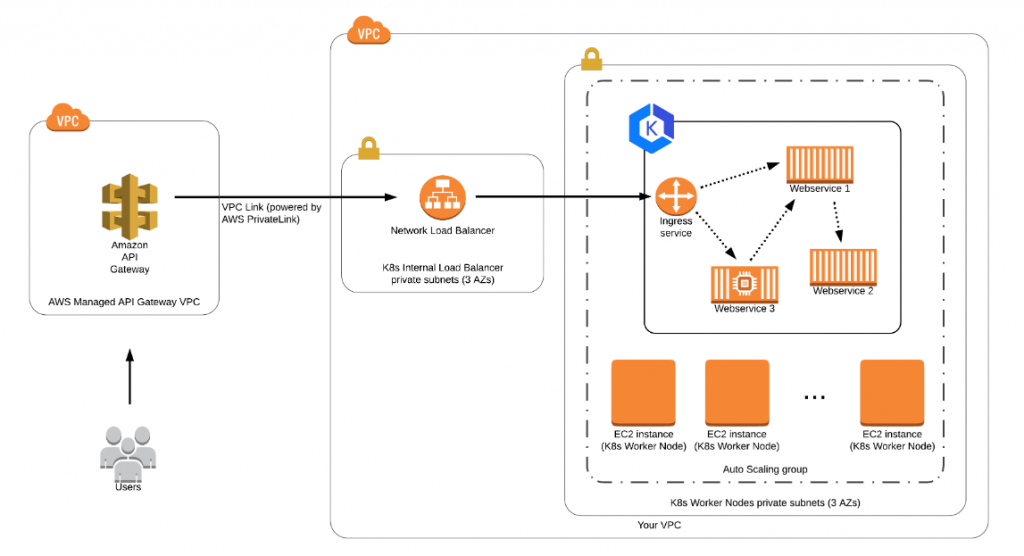
Before you get into EKS, it’s very important that you put thoughts into VPC network architecture. Integrating EKS with other AWS Services is one of the very resourceful post you can find on networking with EKS. Luc van Donkersgoed– you have done a great job documenting the challenges and the alternative solutions- thanks for sharing. As security best practice, you want to run the EKS nodes in a private subnet and expose the Kubernetes service with an internal load balancer. Then, we need to figure out how to expose the internal load balancer to internet. Let me summarize some of the networking requirements-
- Create a VPC with public and private subnets. Resiliency is not important for poc but I would like to have two az’s for public and private subnets.
- Public subnets are connected to internet gateway.
- Private subnets will not accept inbound internet connection but EKS nodes need to connect to internet for various reasons. As poor man’s solution, we will use NAT instance in lieu of NAT gateway.
- NACLs and Security Groups to allow traffic from trusted source.
- Tag the private subnets with kubernetes.io/cluster/[your cluster id]: shared and kubernetes.io/role/internal-elb: 1. You need these tags for successful creation of Kubernetes service with internal load balancer.
- Tag the public subnet with with kubernetes.io/cluster/[your cluster id]: shared and kubernetes.io/role/elb: 1. You need these tags if you want to create external load balancer. This is not a requirement for me because I don’t want to expose kubernetes service with public ip.
Okay, we got the environment setup with all the tools. Let’s create the EKS cluster. My attempt to use eksctl to create cluster failed and aws rolled back automatically. I think it had to do with my choice of node-type. t2.micro is not an option I discovered when I switched to Getting Started with the AWS Management Console. As a beginner, you can use aws console to create the cluster and node group. You still need all the tools on local machine and, for that matter, follow getting started with eksctl.
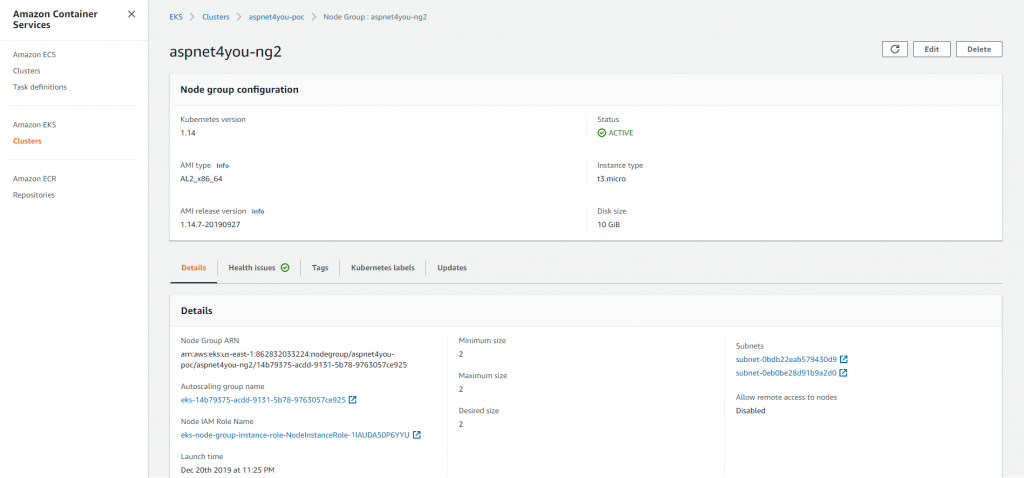
eksctl create cluster --name aspnet-eks-poc2 --version 1.14 --region us-east-1 --vpc-private-subnets subnet-0bdb22eab579430d9,subnet-0eb0be28d91b9a2d0 --nodegroup-name standard-workers --node-type t2.micro --nodes 2 --nodes-min 1 --nodes-max 2 --managed
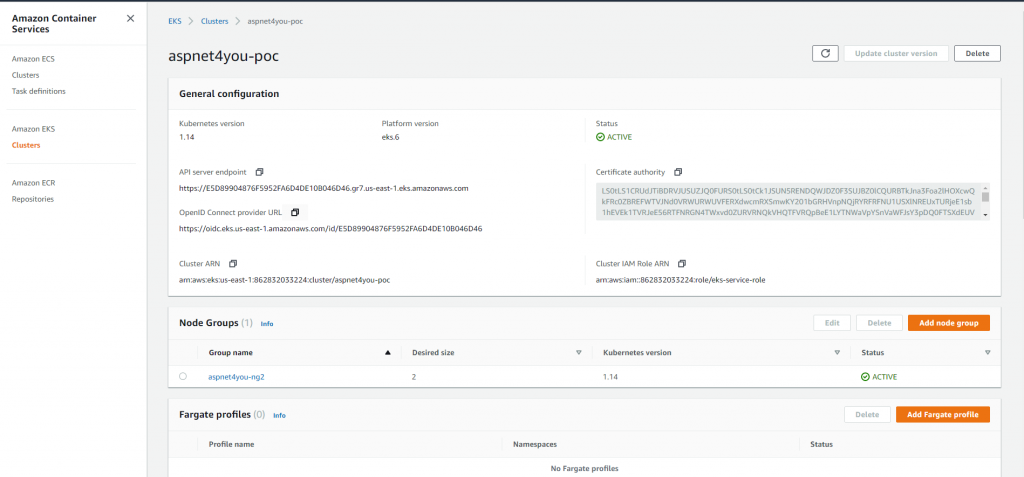
You will need to create two IAM roles- one for EKS and another one for Node Group. I was able to create EKS Service role easily but I had trouble creating node group role based on the instruction at getting started with management console. Followed instruction at Creating the Amazon EKS Worker Node IAM Role and it worked. It takes about 10-15 minutes to create the cluster and about the same time to create node group.
EKS cluster and nodes are up and running. Now is the time to deploy an application. Where do we get the container image that is trusted? This exercise is not so much about the app but to validate the network architecture. I already have my container image (api.demo.dotnetcore) in ACR and why not pulling it from Azure to save some time? I could have used ECR which is the natural and native choice for container repository to be used by EKS. api.demo.dotnetcore is a dotnet core app and it uses resources in Azure. In understand that there would be latency and I am going to lose some performance but performance is secondary to this poc. To pull the image, I am going to need the imagepullsecrets in newly created cluster in EKS and I can easily create it using kubectl. Kubectl tool is our friend and we would be using a lot from now on!
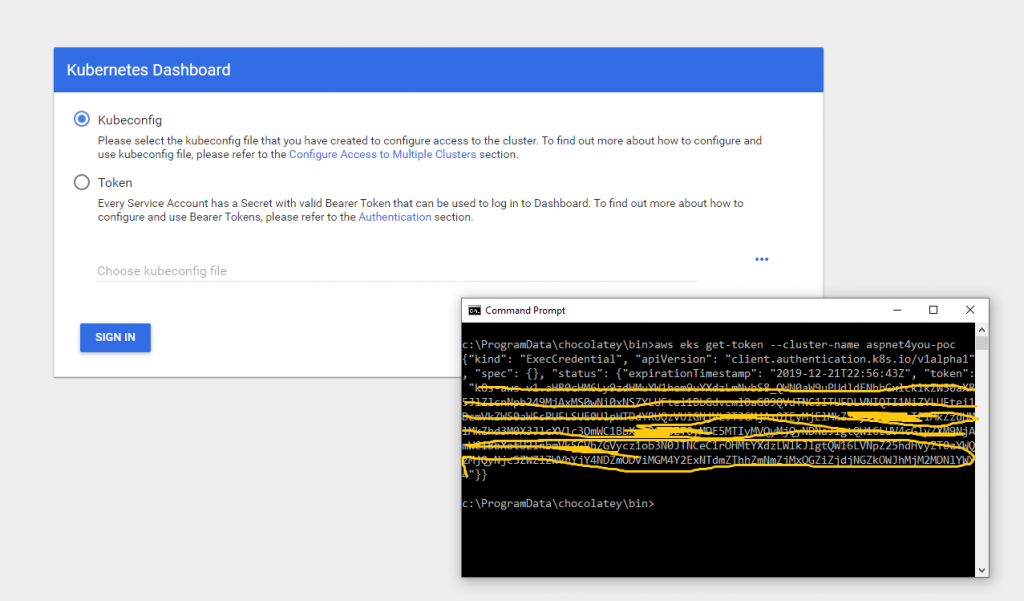
Kubectl tool uses configuration file where we store connections and credentials. Be sure to update the config with aws eks cluster, context and user. You can use the following command to update the config and it will add eks to your existing list and set the current-context to eks cluster. Also, make sure you can get temporary token. You will need this token to login to Kubernetes dashboard.
aws eks --region us-east-1 update-kubeconfig --name aspnet4you-poc
aws eks get-token --cluster-name aspnet4you-poc
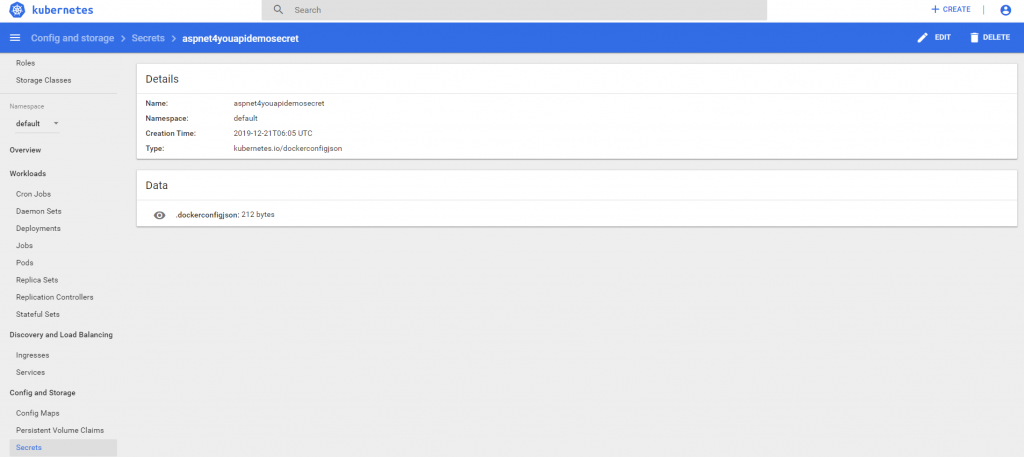
We are ready to deploy in EKS but we need to create the secret and persistent volume claim(pvc) that are referenced in deployment yaml file. We will run kubectl to create the secret and here is a sample-
kubectl create secret docker-registry {your-secrete-name, example: aspnet4youapidemosecret} --namespace=default --docker-server={your-docker-server, example: aspnet4you.azurecr.io} --docker-username={username} --docker-password={password} --docker-email={email}
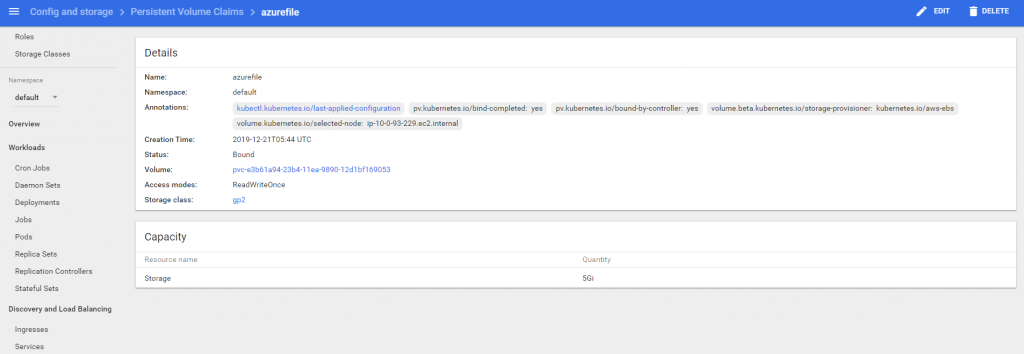
My container app is using file system for logging with log4net and I am going to need a persistent volume and claim the volume. Good news is, aws auto configure a storage class with kubernetes.io/aws-ebs as provisioner and it works for my use case. All I need to do is, create a persistent volume claim and create rbac to allow access to it.
apiVersion: v1
 kind: PersistentVolumeClaim
 metadata:
   name: azurefile
 spec:
   accessModes:
     - ReadWriteOnce
   volumeMode: Filesystem
   storageClassName: gp2
   resources:
     requests:
       storage: 5Gi
 apiVersion: rbac.authorization.k8s.io/v1
 kind: ClusterRole
 metadata:
   name: system:aws-cloud-provider
 rules:
 apiGroups: ['']
 resources: ['secrets']
   verbs:     ['get','create']
 apiVersion: rbac.authorization.k8s.io/v1
 kind: ClusterRoleBinding
 metadata:
   name: system:aws-cloud-provider
 roleRef:
   apiGroup: rbac.authorization.k8s.io
   kind: ClusterRole
   name: system:aws-cloud-provider
 subjects:
 kind: ServiceAccount
 name: persistent-volume-binder
 namespace: kube-system
 kind: User
 name: {your-email}
 namespace: kube-system
You may ask, why the name is azurefile! That’s because my dotnet core application configuration is using that name and I don’t want to change and rebuild the image. Run the above definitions with kubectl apply -f {name-of-the-file}.
Okay, we are ready to deploy! Let’s create a yaml file with deployment definitions and run it with kubectl command.
apiVersion: apps/v1beta1
 kind: Deployment
 metadata:
   name: aspnet4you-apidemo
 spec:
   replicas: 1
   template:
     metadata:
       labels:
         app: aspnet4you-apidemo
     spec:
       containers:
       - name: aspnet4you-apidemo
         image: aspnet4you.azurecr.io/api.demo.dotnetcore:77
         volumeMounts:
         - name: volume
           mountPath: /mnt/azure-file-share
       imagePullSecrets:
       - name: aspnet4youapidemosecret
       volumes:
       - name: volume
         persistentVolumeClaim:
           claimName: azurefile
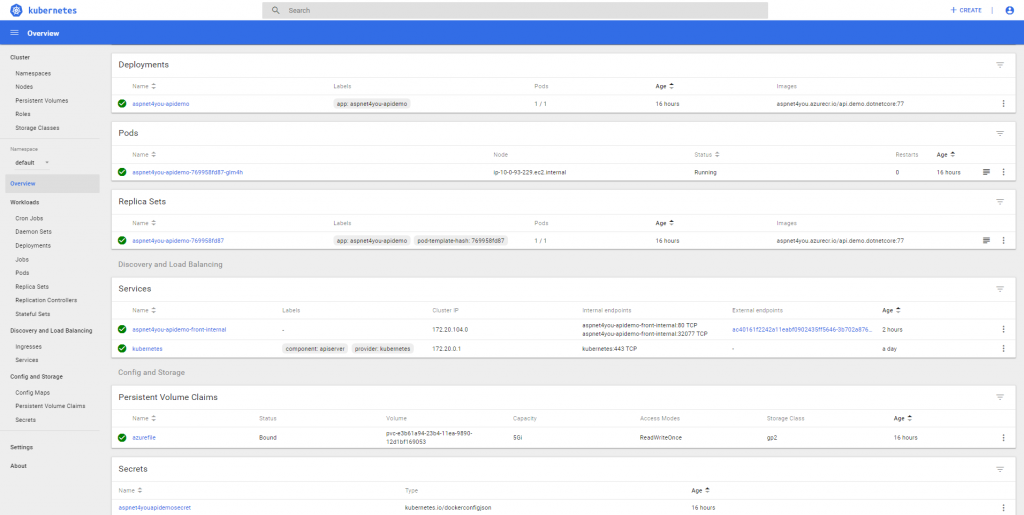
You may notice I set the replica to 1. This is because I got this error- 0/2 nodes are available: 2 Insufficient pods. Apparently, aws eks enforces POD capacity limit or some sort which I am yet to investigate. Yea, I can’t live with single pod of the app in the cluster!
Let’s login to eks dashboard to see the Kubernetes objects. Oh wait, there is none! When you create an eks cluster it does not come with a dashboard! AKS is better in this respect where a ready to go dashboard is configured for you and you can elevate the permission via rbac (if you need to). Go straight to Step 2: Deploy the Dashboard and you can create the dashboard in no time. This link also provides you info on how to connect to dashboard using token (short lived).
- Start a proxy: kubectl proxy –port=8080
- Use browser to login to dashboard: http://localhost:8080/api/v1/namespaces/kube-system/services/https:kubernetes-dashboard:/proxy/#!/login
- Get a token: aws eks get-token –cluster-name {your-cluster-name}
- Switch to Token and use the token received via get-token (see highlighted)
PODs are running in the cluster but you can’t use it! We need to expose the PODs with Kubernetes service and it very important that you pay attention to impending challenges. For security best practice, the service is exposed with an internal load balancer. AWS has so many flavors of load balancer and which one is right for our architecture? By default aws will provision CLB (classic) and it would not work for us. Why? I need to expose the service via API Gateway and AWS API Gateway does support CLB! Read Fifth challenge: deploying API Gateway in front of EKS for detailed explanation. APi Gateway needs NLB. Let’s create our service definition and run it.
kind: Service
 apiVersion: v1
 metadata:
   name: aspnet4you-apidemo-front-internal
   annotations:
    service.beta.kubernetes.io/aws-load-balancer-internal: "true"
    service.beta.kubernetes.io/aws-load-balancer-type: nlb
 spec:
   type: LoadBalancer
   ports:
 port: 80
 selector:
 app: aspnet4you-apidemo
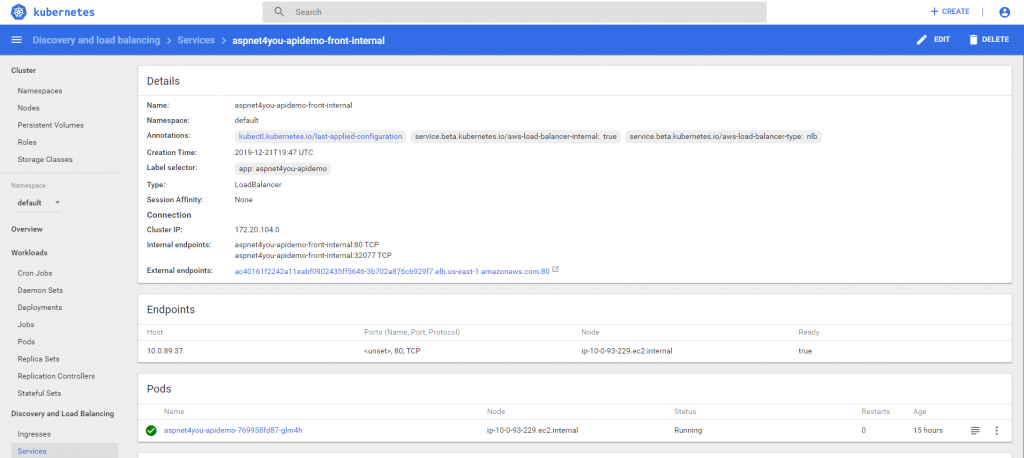
Service is ready with external endpoint. This external word is confusing because the endpoint can be consumed from your private subnet. Our next step is to create an api gateway and expose this service endpoint.
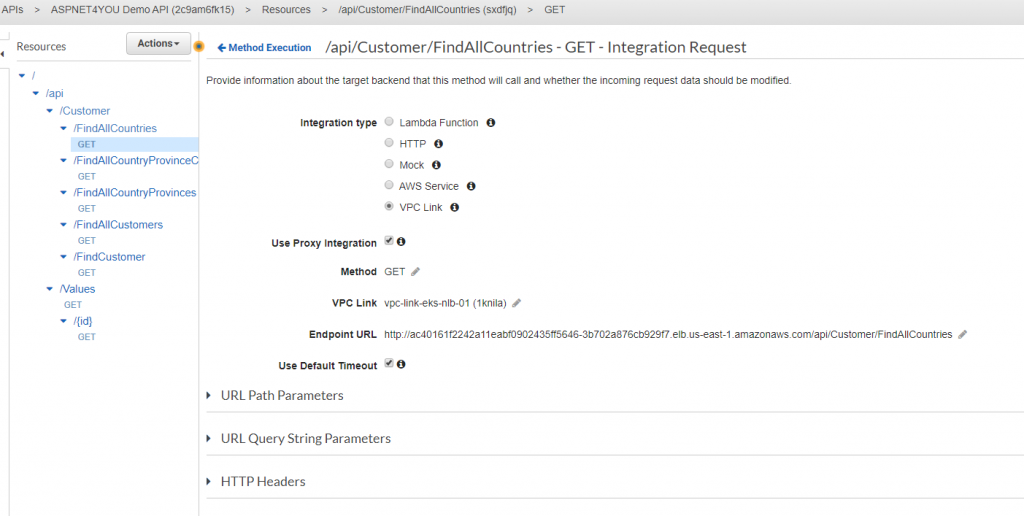
Create an api gateway and add VPC PrivateLink to the NLB. This will give you access from api gateway aws managed vpc to your vpc. I already have the api app configured with swagger and it was easy to download and import api definitions.
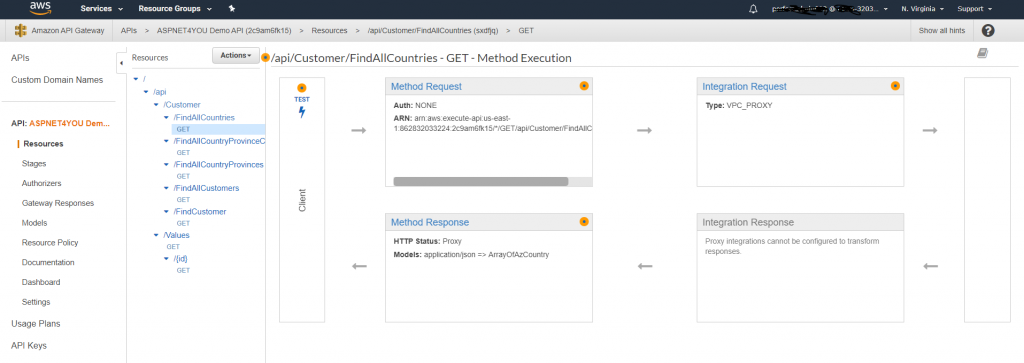
Configure the integration request and check (turn on) the Use Proxy Integration. Without this proxy, you will receive 401 response and it’s by design because user is trying to access internal resource without authentication. You don’t need this proxy if you are testing the api internally.
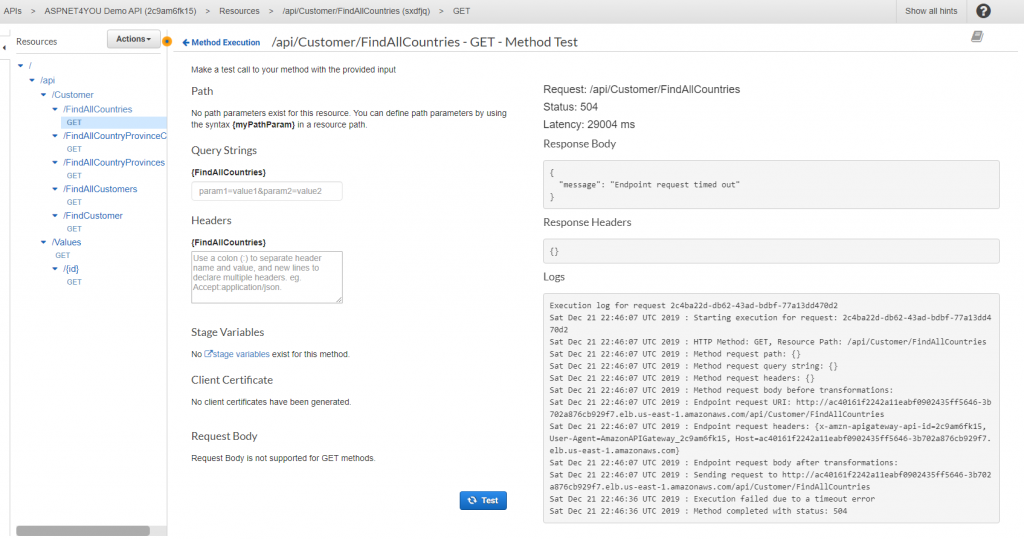
It’s time to test and do some analysis/observations! Remember, my app uses data from Azure but it is now deployed in aws eks! Let’s face the reality and expect latency! Operation timed out on the initial call but it was not bad after the app warmed up.

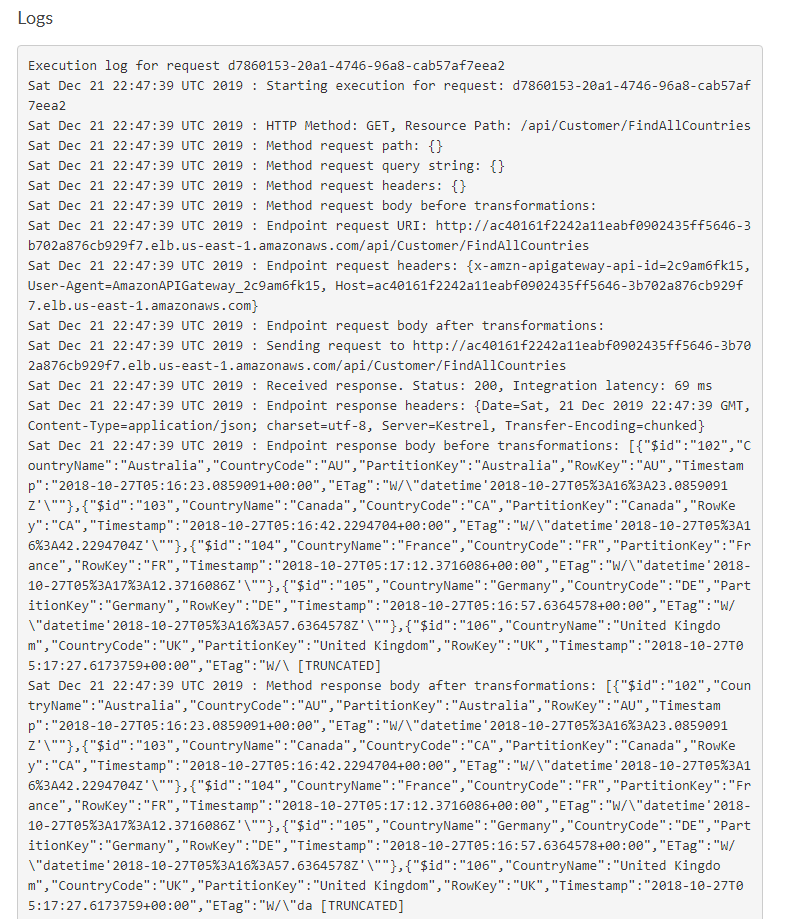
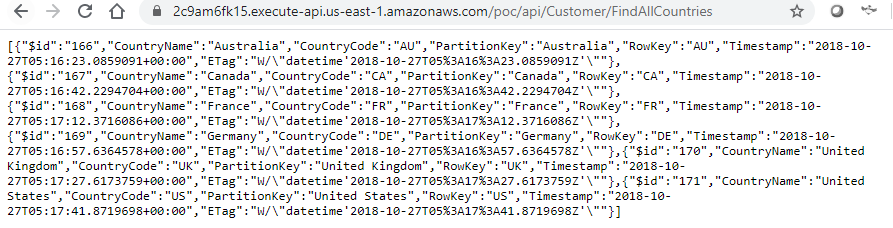
Okay, we know api works internally and we can see the logs showing request is sent to Kubernetes service endpoint. Let’s see if we can call the api from public internet. In real word scenario, I would be using custom domain at the gateway but for now we can use aws naming. https://2c9am6fk15.execute-api.us-east-1.amazonaws.com/poc/api/Customer/FindAllCountries. Don’t try this link as I would be deleting the eks cluster to save the cost!
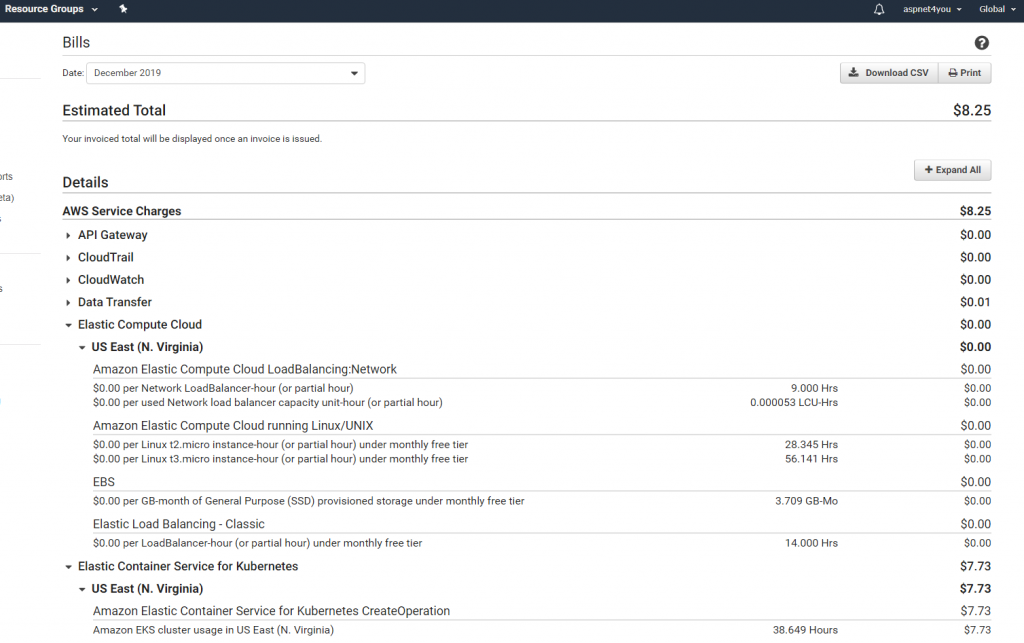
Wow, this is way cool! We got our container based microservice POC done under $10. Thanks to AWS for the free tier pricing. In this POC, we did not focus end to end security, TLS certificate and all those stuffs but those are for next post! Hope this information is helpful to you. Feel free to connect over LinkedIn if you have questions.