In this blog post, I would like to demonstrate how to use Azure AD as external identity provider (IdP) to sign-in to AWS accounts. For this exercise, we will configure two (2) AWS accounts but you can replicate the pattern on every account you own in AWS. This pattern is decentralized and it does not require any syncing for data between Azure and AWS. If you prefer centralized pattern, you may read my earlier blog post, AWS Single Sign-On (SSO) with Azure AD as External Identity Provider (IdP). Regardless which pattern you like- centralized or decentralized- you must automate the creation of IAM provider and roles in AWS, and creation of AD group and role mapping in Azure AD.
While I was researching on how to enable single sign-on for an enterprise application in Azure AD, I jumped on Quickstart: Enable single sign-on for an enterprise application and followed Azure AD SAML Toolkit example to quickly realize it will not work for enterprise use and you have to create your app from scratch without unnecessary dependencies. I thought I would share my experience with you in case you are searching for Federated Sign-in to AWS Accounts and you happened to use Azure/O365 for your workplace capability. Enough of introduction, let’s get started on what we need to do to make it happen!
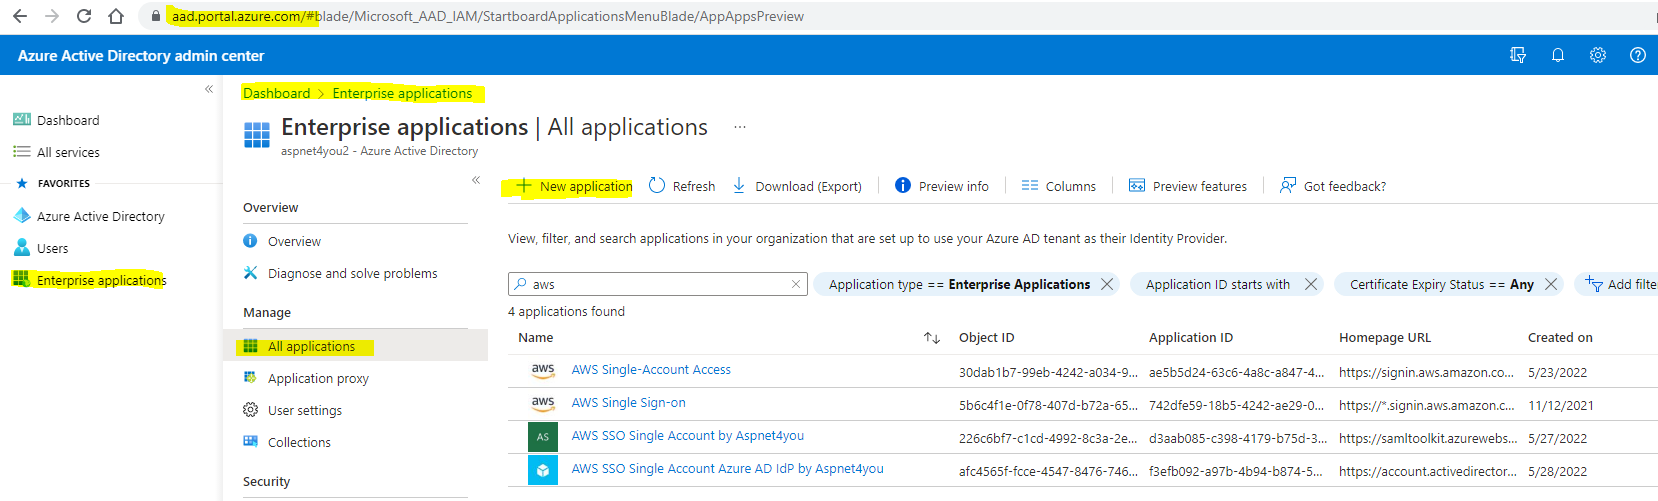
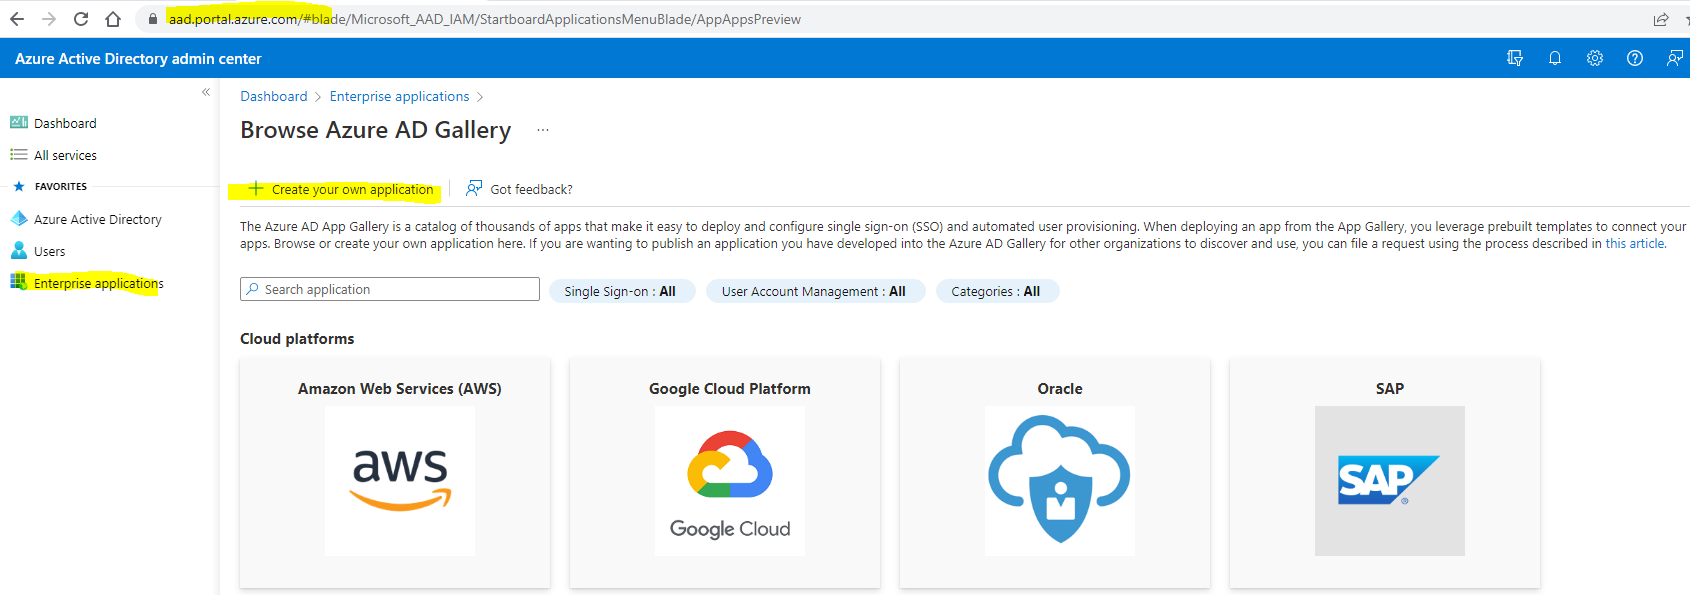
Login to Azure Active Directory Admin Center as Global Administrator and create your own application-
Enterprise applications
>> All Applications
>> New application
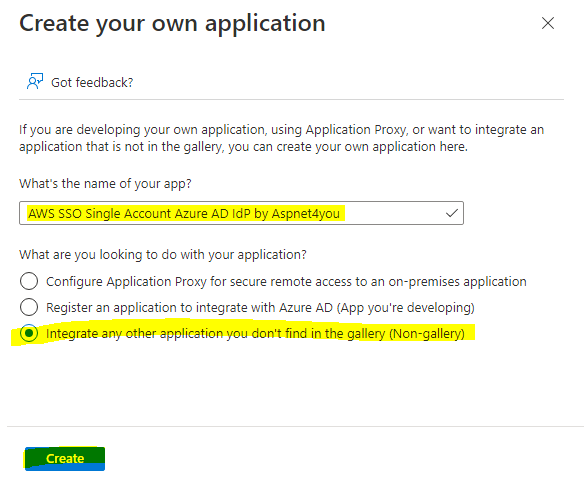
>> Create your own application (use non-gallery option), we named the application – “AWS SSO Single Account Azure AD IdP by Aspnet4you”.
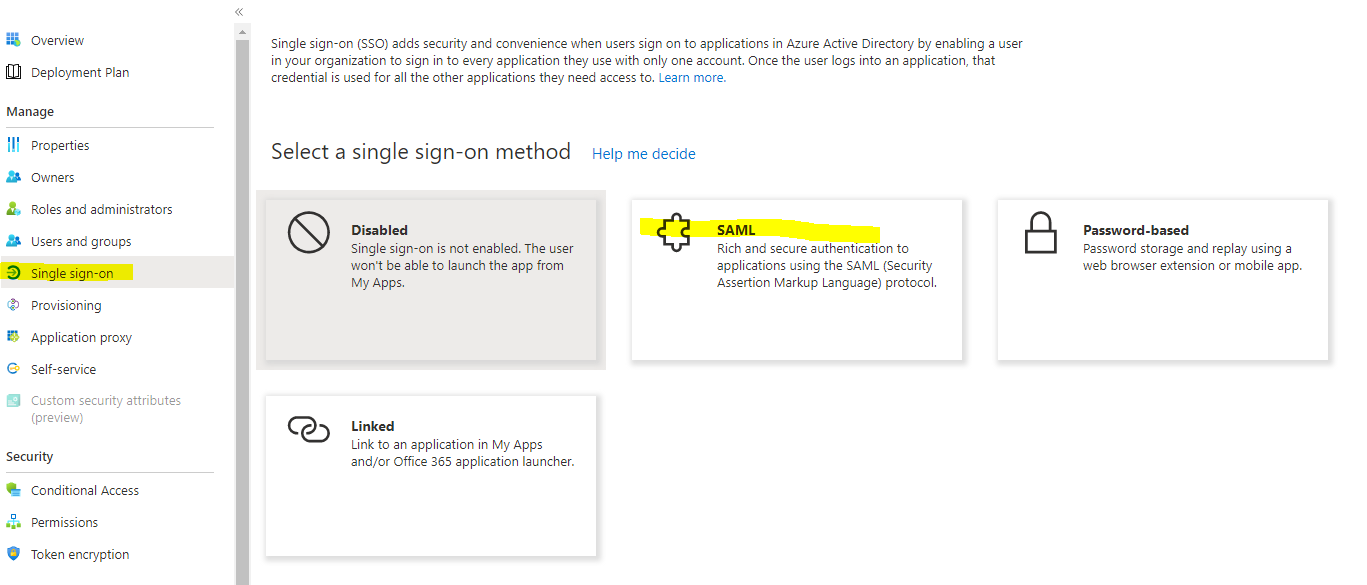
Once the app is created, you can configure SAML on Azure Active Directory Admin Center or on Azure Portal.
Enterprise applications
>> All Applications
>> AWS SSO Single Account Azure AD IdP by Aspnet4you
>> Single Sign-on
>> Basic SAML Configuration
>> Edit
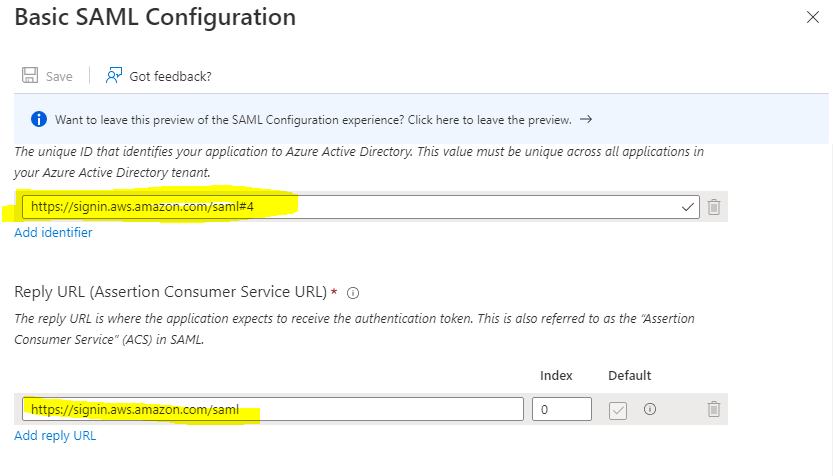
Update Basic SAML Configuration- entity id must be unique in Azure AD. I have multiple entity id with same name and they are differentiated by #number. Be sure to change the directory id to your AAD id!
- Identifier (Entity ID): https://signin.aws.amazon.com/saml#4
- Reply URL (Assertion Consumer Service URL): https://signin.aws.amazon.com/saml
- Logout Url (Optional): https://login.microsoftonline.com/c33386cf-6e11-484c-a983-b49975ce571a/saml2

Next, configure Attributes and Claims for the application. Here are pre configured claims and you don’t have to change them-
- Name:nameidentifier Namespace:http://schemas.xmlsoap.org/ws/2005/05/identity/claims Value:user.userprincipalname
- Name:emailaddress Namespace:http://schemas.xmlsoap.org/ws/2005/05/identity/claims Value:user.mail
- Name:givenname Namespace:http://schemas.xmlsoap.org/ws/2005/05/identity/claims Value:user.givenname
- Name:name Namespace:http://schemas.xmlsoap.org/ws/2005/05/identity/claims Value:user.userprincipalname
- Name:surname Namespace:http://schemas.xmlsoap.org/ws/2005/05/identity/claims Value:user.surname
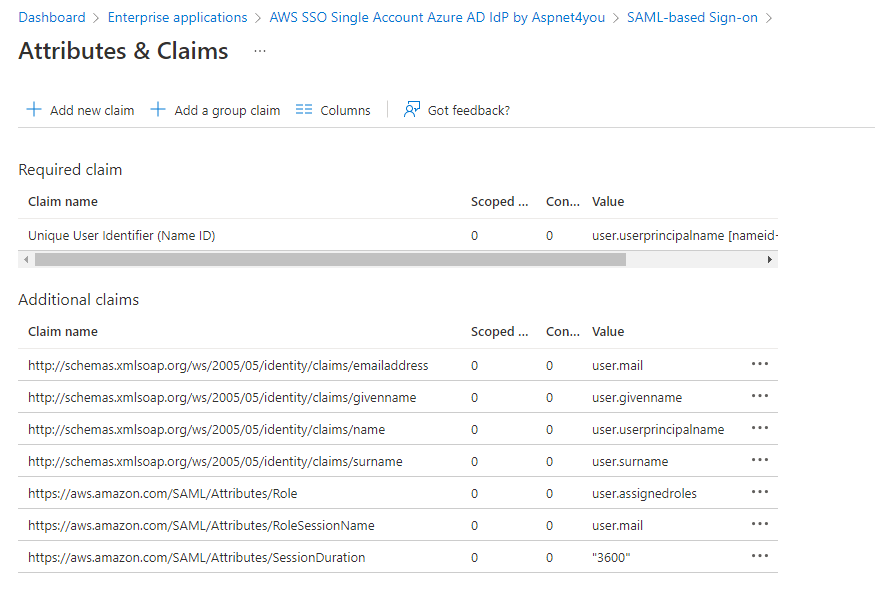
Add new claims to the app as required by AWS-
- Name:SessionDuration Namespace:https://aws.amazon.com/SAML/Attributes Value:3600
- Name:RoleSessionName Namespace:https://aws.amazon.com/SAML/Attributes Value:user.mail
- Name:Role Namespace:https://aws.amazon.com/SAML/Attributes Value:user.assignedroles
Download the Federation metadata and save it for later use. We will need this metadata to create IAM Provider in AWS.
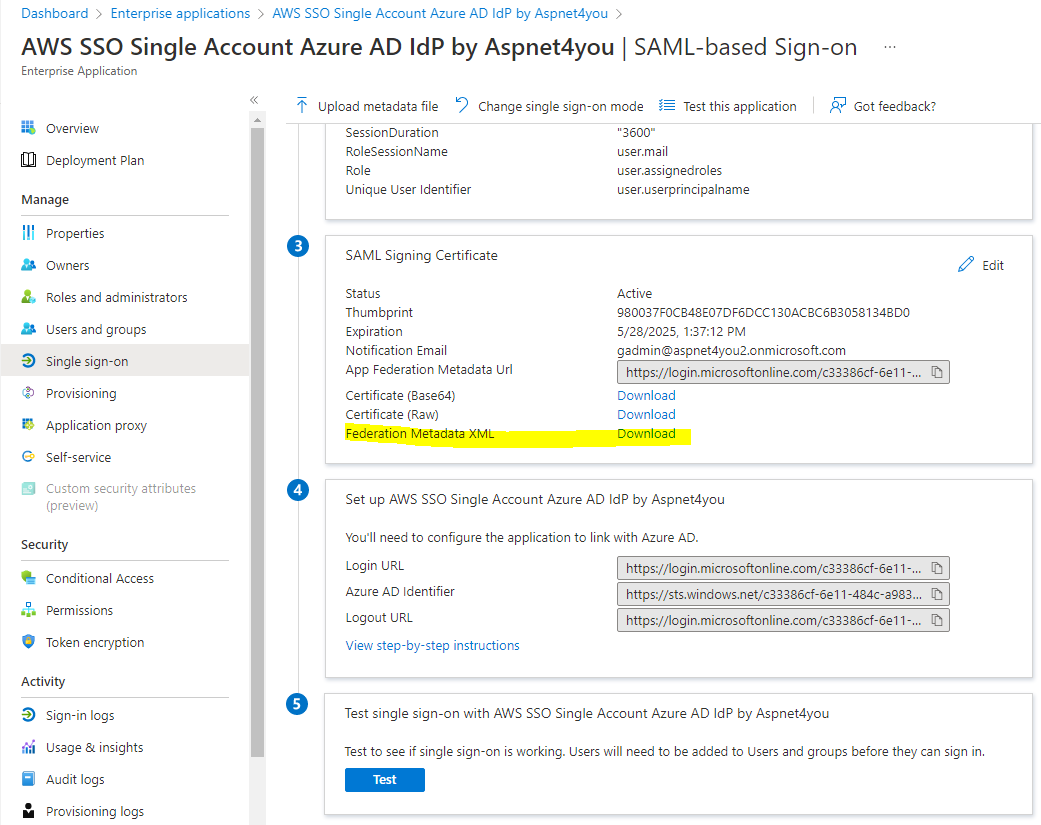
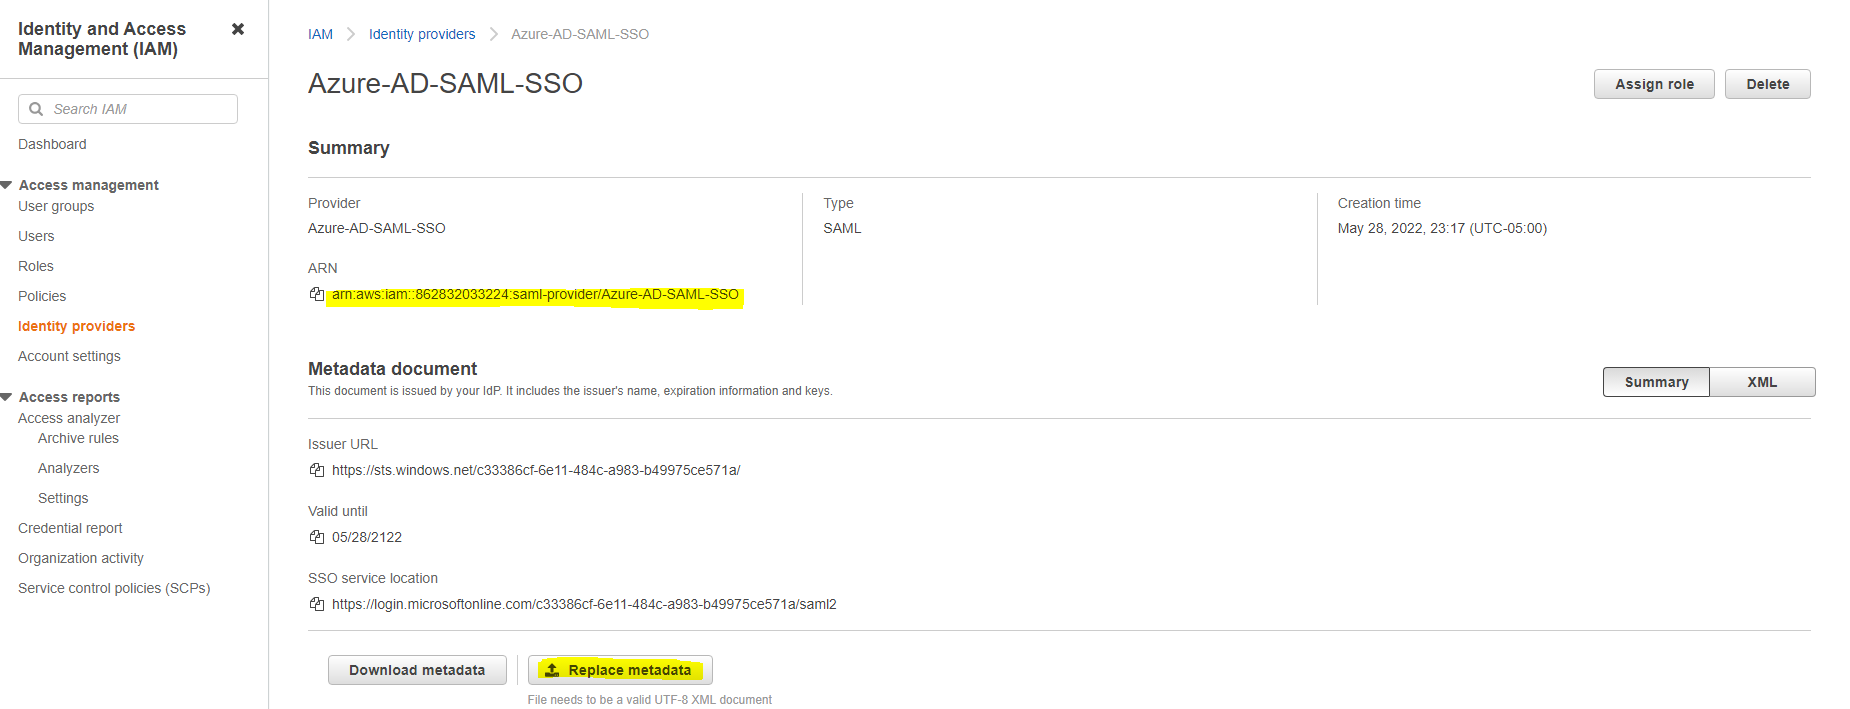
Login to AWS Console of an account with an Admin privilege. Go to IAM >> IAM Providers. Add provider of type SAML type and upload the Federation metadata xml you downloaded from Azure AD. We will name this provider as Azure-AD-SAML-SSO.


If you changed the metadata or singing certificate in Azure AD SAML application, you can update IAM provider to replace the metadata.
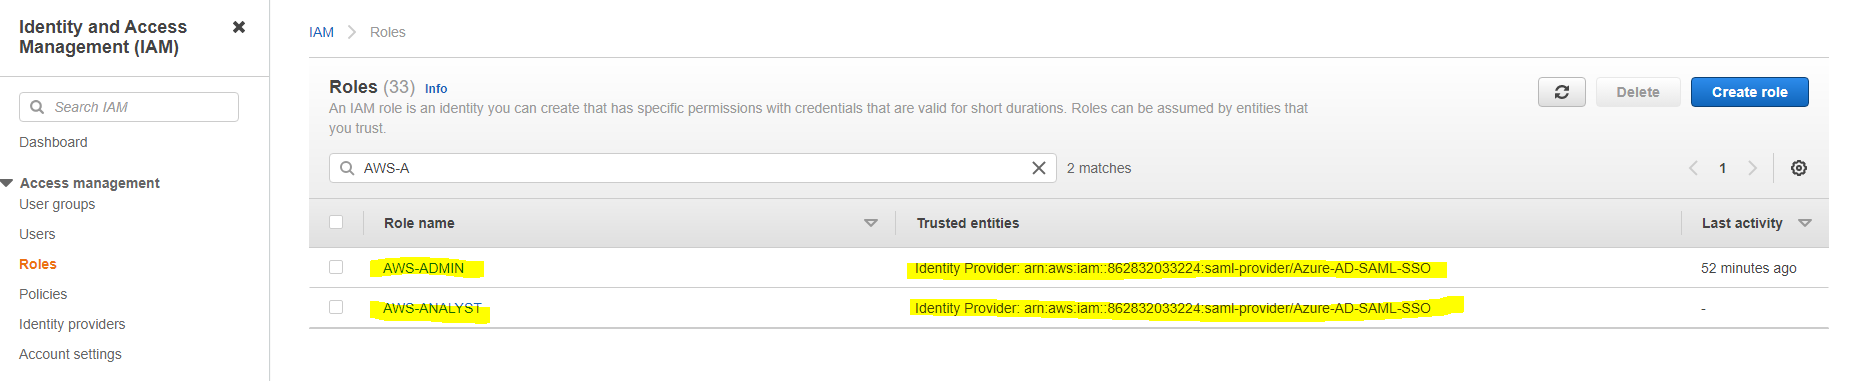
Once IAM provider is created, we can create new IAM roles using the newly created provider. Let’s create two IAM roles- AWS-ADMIN and AWS-ANALYST. You can decide what policies you would like to assign but for this exercise, we are using aws managed policy.
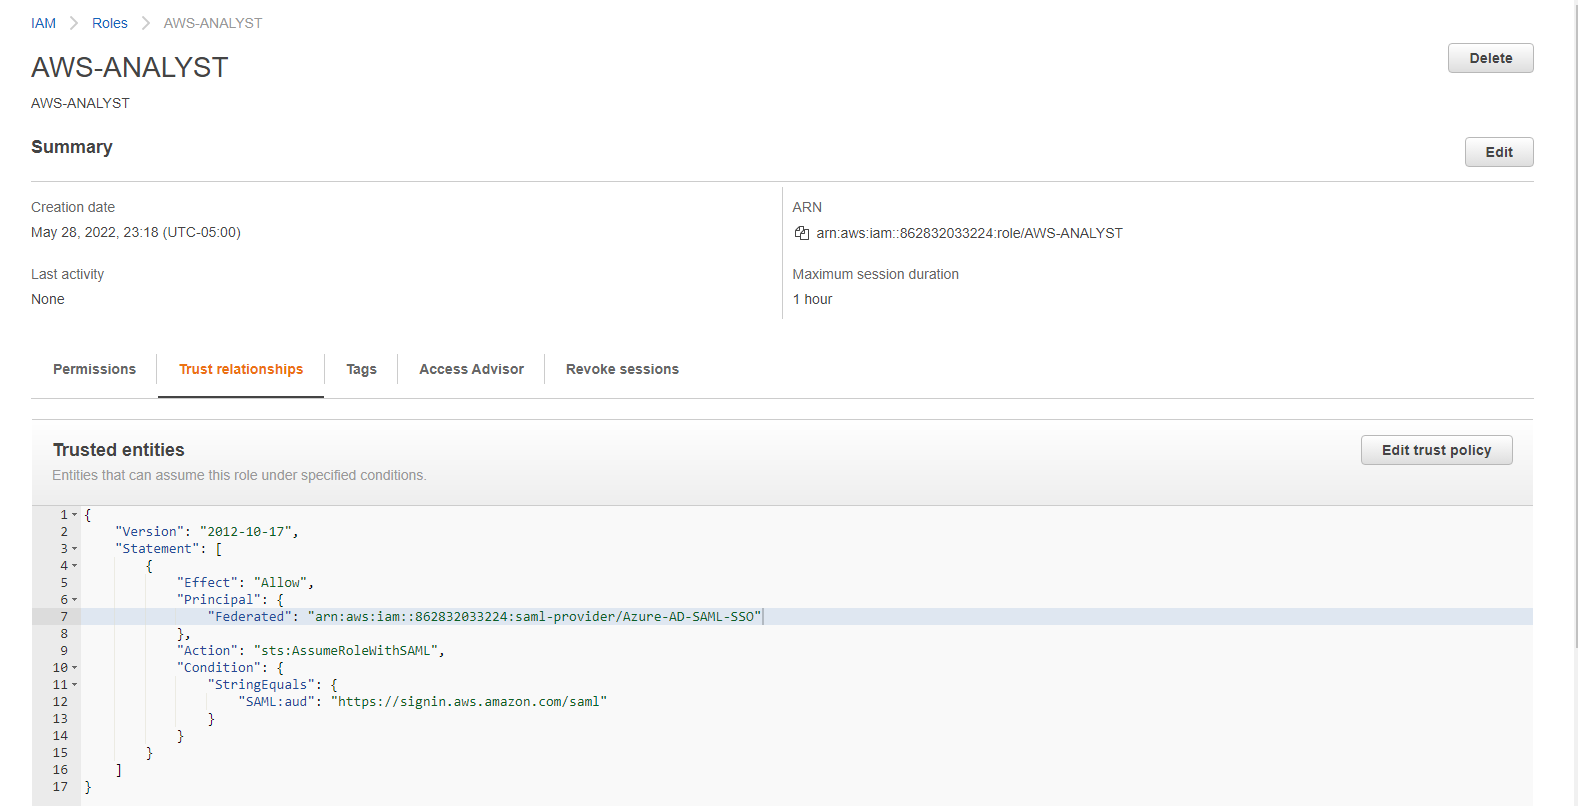
How does the trust policy look like for AWS-ADMIN and AWS-ANALYST roles?
{

    "Version": "2012-10-17",

    "Statement": [

        {

            "Effect": "Allow",

            "Principal": {

                "Federated": "arn:aws:iam::862832033224:saml-provider/Azure-AD-SAML-SSO"

            },

            "Action": "sts:AssumeRoleWithSAML",

            "Condition": {

                "StringEquals": {

                    "SAML:aud": "https://signin.aws.amazon.com/saml"

                }

            }

        }

    ]

}
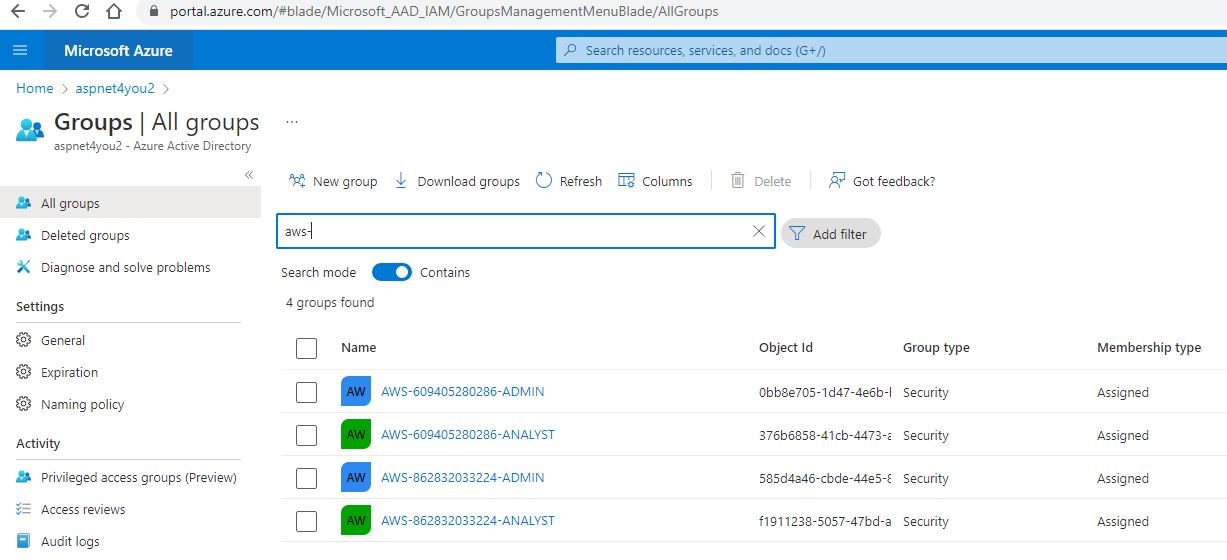
Let’s go back to Azure AD in Azure Portal and create the AD group and assign members to the groups as per job function. In enterprise environment, these groups typically created in on-premise AD and synced with Azure AD. We are going to create four (4) AD groups.
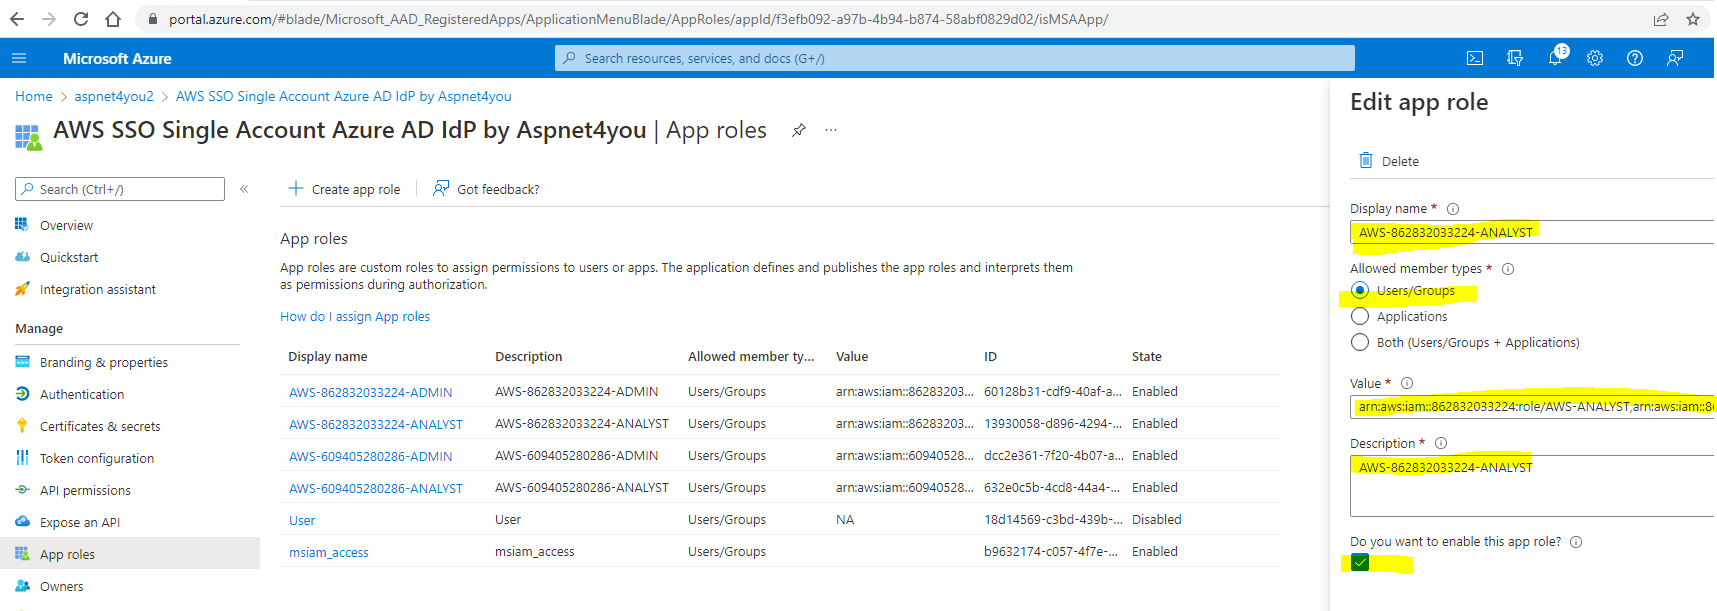
In Azure Portal, go to Azure Active Directory >> App Registrations >> All applications >> Select “AWS SSO Single Account Azure AD IdP by Aspnet4you” >> App roles.
Create new app role(s) with value to match AWS IAM Provider and IAM role. Example: AWS-862832033224-ANALYST role with value (aws role arn,aws iam provider arn) arn:aws:iam::862832033224:role/AWS-ANALYST,arn:aws:iam::862832033224:saml-provider/Azure-AD-SAML-SSO. Repeat the role for each AWS account.
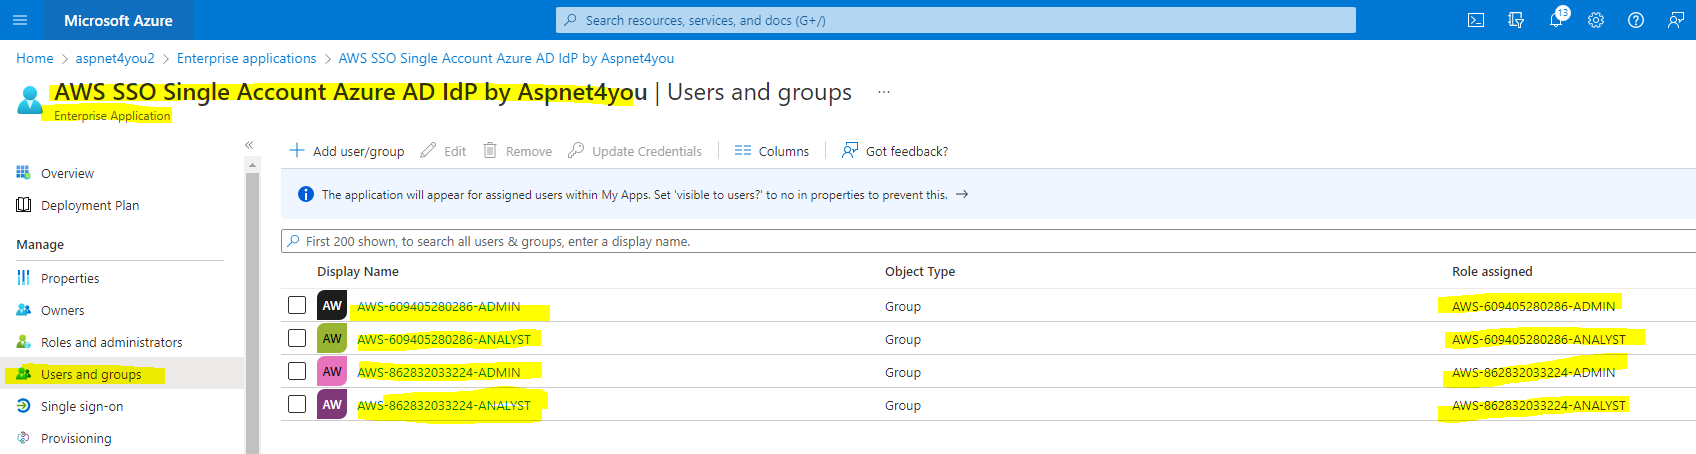
In Azure Portal, go to Azure Active Directory >> Enterprise applications >> All applications >> Select “AWS SSO Single Account Azure AD IdP by Aspnet4you” >> Users and Groups
Add user/group and assign role.
We will use previously created AD group to assign role based on naming convention. For this exercise, we are doing manually but this step
should be automated via Azure Graph API – when a new federated role is added in AWS account(s). These roles would be passed to AWS sign-in page as claims (user.assignedroles). Note that you can assign only one role to a group/user. This is not a problem since user can be member of multiple groups.
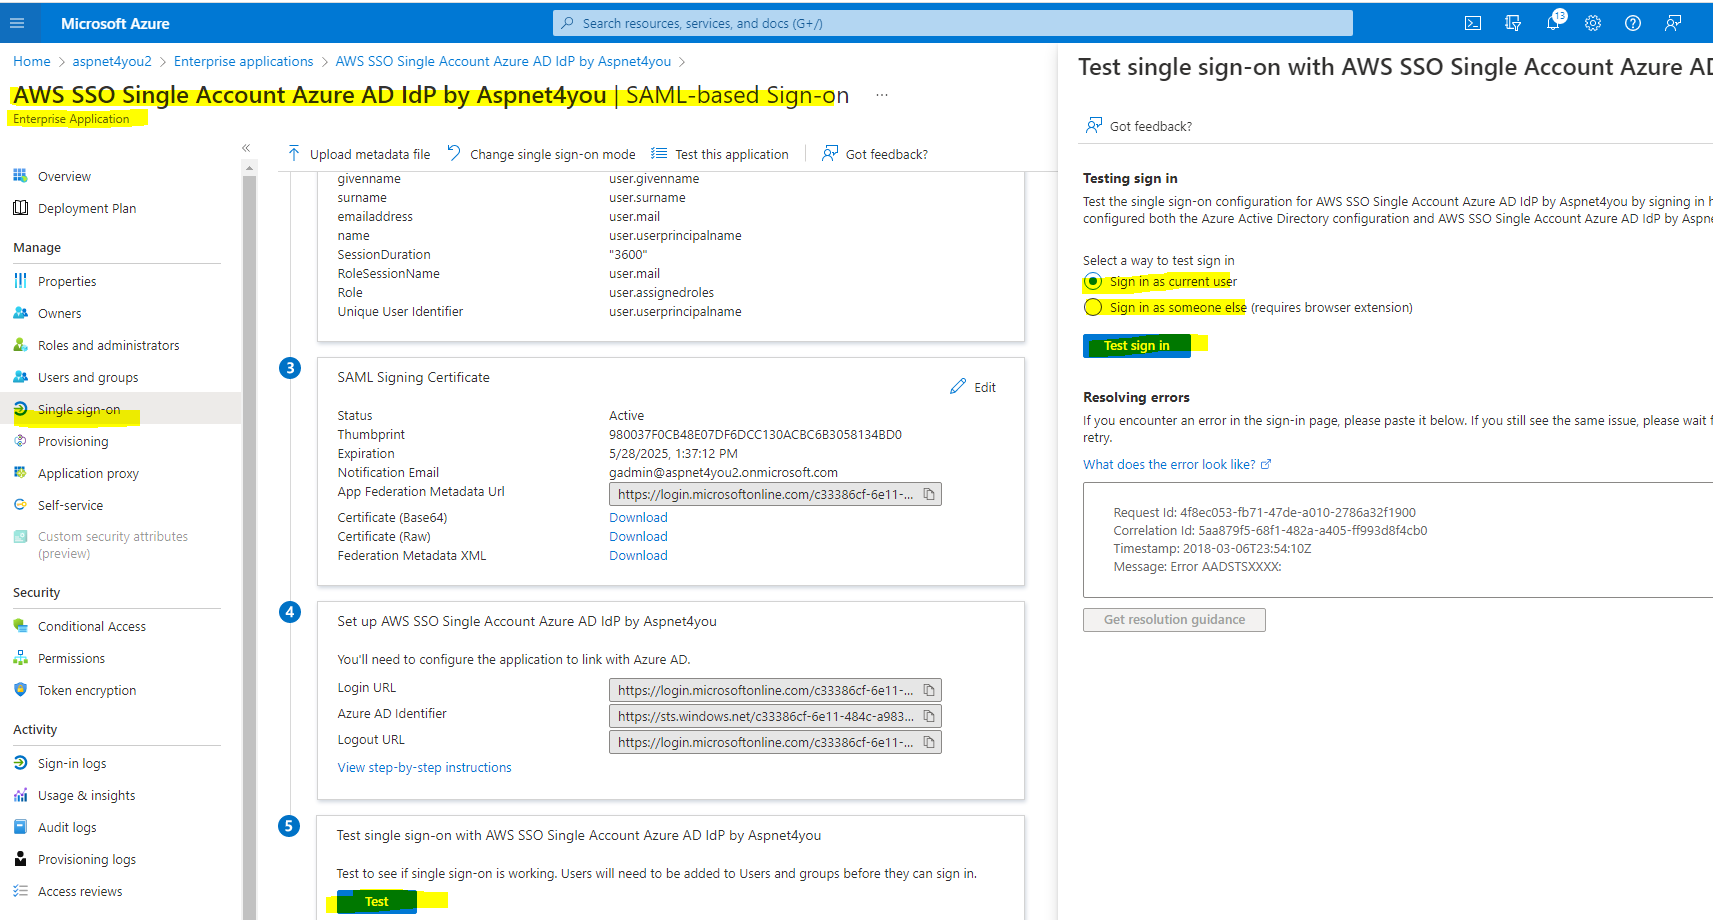
Okay, this concludes our configurations in Azure AD and AWS. It’s time to test to make sure configurations do work!
In Azure Portal, go to Azure Active Directory >> Enterprise applications >> All applications >> Select “AWS SSO Single Account Azure AD IdP by Aspnet4you” >> Single Sign-on
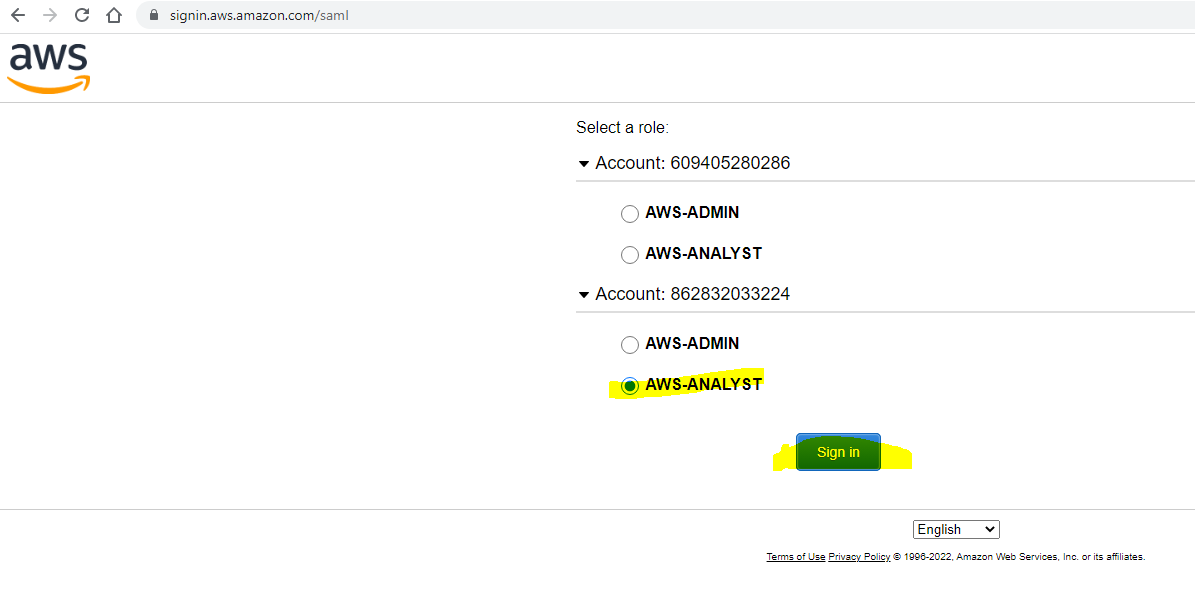
Click the Test button at the bottom of the Single Sign-on screen. A side pane will be visible to select sign-in as current user or sign-in as someone else. Click Test Sign-in and it will popup a new window. Follow the prompt and select a user who is member of one ore more AD groups assigned in the single sing-on application.
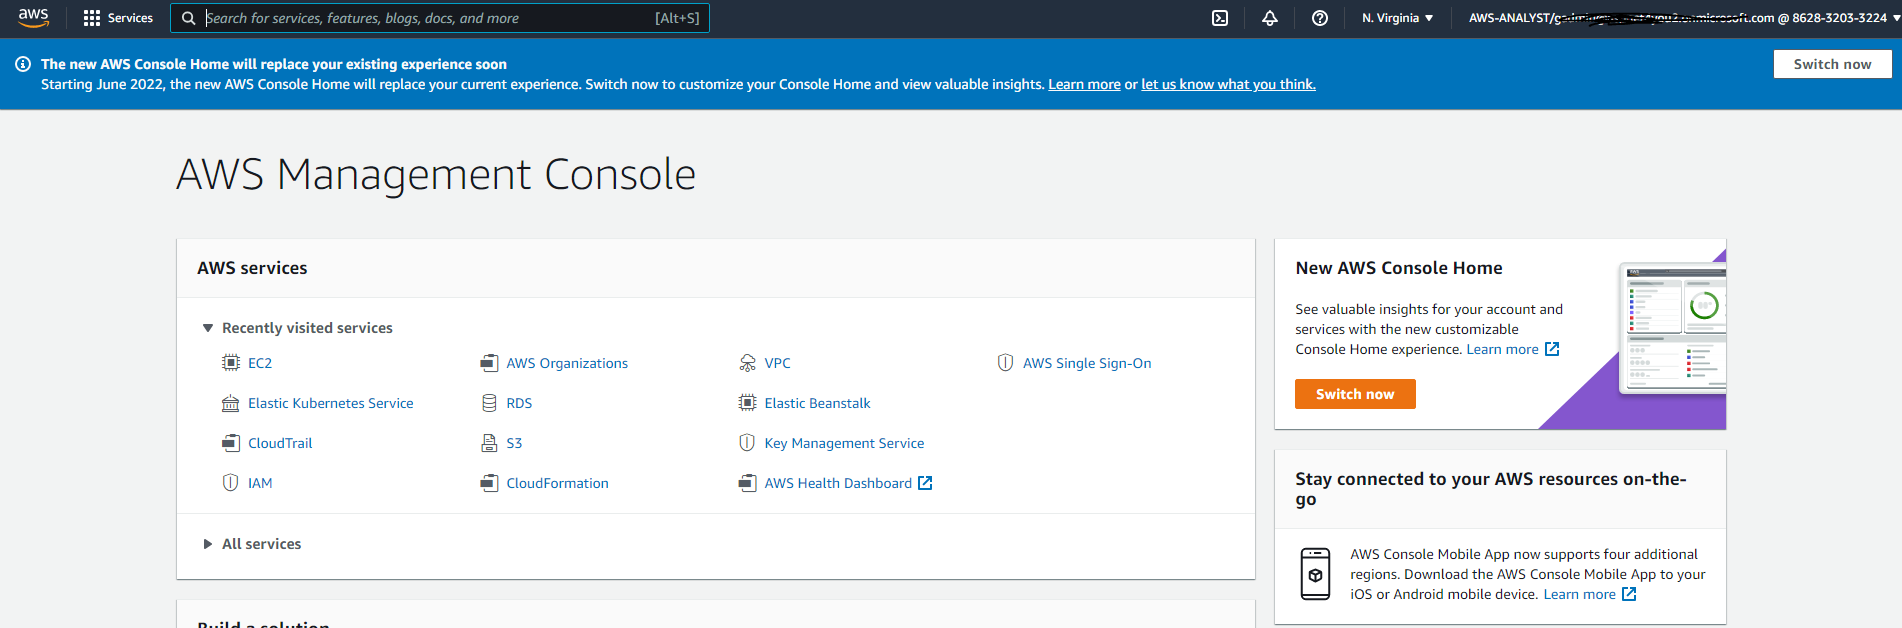
If user is part of multiple groups, AWS sign-in page will display all the roles user can use to login to AWS account. Pick a role and click sign-in. You will be successfully signed-in to the selected account/role. Wow, it works!
Test sign-in is for development and debugging. This test page will auto generate AuthNRequest which looks like-

A complete IdP initiated sign-in URL to Azure AD would look like – https://login.microsoftonline.com/c33386cf-6e11-484c-a983-b49975ce571a/saml2?SAMLRequest=jZFBS8NAEIXvgv8hrOcm203UuCSFxKRQqFBa9eBtiKNdyO7GnU0Vf73bFA9e1Otj3sz73hQEuh9kNfq92eLbiOSjD90bKtnojLRAiqQBjSR9J3fV3VqKmEuNHp7BA4tWTcmWTdtm6bxOU15ldX5T5XlVX7WiFU1W8%2bs5ix7RkbKmZMEcPEQjrgx5MD5IXIgZv5yJ%2fF6kMuOSp0%2fHmQ0QqQOW7AV6QhZVROh82HJrDY0a3Q7dQXX4sF2XbO%2f9QDJJSL0aZWJ4pxg0fFoTd1YnR0h24pIT8O90g7PedjZYltZ1OJXzHWNxflZM%2bd1%2fegoIp8xs8XfCi6xITqvDkaiYtJ%2bvCfoX
SAMLRequest query parameter contains AuthNRequest xml which is Deflated + Base64 encoded + Url Encoded. For development purpose, you can use online saml tool to deflate + base64 encode and then url encode the AuthNRequest.
<samlp:AuthnRequest xmlns="urn:oasis:names:tc:SAML:2.0:metadata" ID="FDEE431B330A4B89A88AB6E2E2D4B071" Version="2.0" IssueInstant="2022-05-28T23:40:03Z" IsPassive="false" AssertionConsumerServiceURL="https://signin.aws.amazon.com/saml" xmlns:samlp="urn:oasis:names:tc:SAML:2.0:protocol" ForceAuthn="false">
<Issuer xmlns="urn:oasis:names:tc:SAML:2.0:assertion">https://signin.aws.amazon.com/saml#4</Issuer>
 </samlp:AuthnRequest>
For production application, we will need to build an application to generate Azure AD IdP initiated sign-in url with SAMLRequest parameter. For simplicity, I created an Azure Function (server-less app) which will Deflate + Base64 encode + Url Encode AuthNRequest and redirect to Azure sign-in url with encoded SAMLRequest parameter. Try it! https://function.aspnet4you.com/api/AADSamlAuthnRequest?aadid=c33386cf-6e11-484c-a983-b49975ce571a&acs=https://signin.aws.amazon.com/saml&issuer=https://signin.aws.amazon.com/saml%234
Of course, it would not work for you since you are not a valid user in my Azure tenant!
Currently, Azure Function is not protected by Azure AD authentication and authorization. In production, this function would be protected by Azure AD authentication and authorization. Federated Login to AWS is IdP initiated and you can create any url generator application with any language and deploy internally. Regardless of AuthN and AuthZ of url generator application, Azure AD will validate the user before sending saml response to AWS.
In case you are searching for how to deflate + base64 encode + url encode – all in sequence, here is the sample code (in C#) that I am using in dotnetcore project-
using System.Linq;
using System.Net;
using System.Net.Http;
using System.Threading.Tasks;
using Microsoft.Azure.WebJobs;
using Microsoft.Azure.WebJobs.Extensions.Http;
using Microsoft.Azure.WebJobs.Host;
using System.Text;
using Microsoft.WindowsAzure.Storage;
using Microsoft.WindowsAzure.Storage.Queue;
using System;
using System.Collections.Generic;
using System.Web;
using Newtonsoft.Json;
using Microsoft.AspNetCore.Http;
using Microsoft.Extensions.Logging;
using System.IO;
using System.IO.Compression;

namespace AzureFunctionAppsCore
{
    /// <summary>
    /// References:
    ///
    /// </summary>
    public static class AADSamlAuthnRequest
    {
        [FunctionName("AADSamlAuthnRequest")]
        public static async Task<HttpResponseMessage> Run([HttpTrigger(AuthorizationLevel.Anonymous, "get", Route =null)] HttpRequestMessage req, ILogger log)
        {
            string authNrequest = null;
            var body = req.Content.ReadAsStringAsync().GetAwaiter().GetResult();

            string uuid = Guid.NewGuid().ToString("N").ToUpper();
            uuid = $"F{uuid.Substring(1, uuid.Length - 1)}";

            var query = HttpUtility.ParseQueryString(req.RequestUri.Query);
            string aadId = query.Get("aadid");
            string issuerUrl = query.Get("issuer");
            string acsUrl = query.Get("acs");

            StringBuilder sb = new StringBuilder();
            sb.AppendLine($"<samlp:AuthnRequest xmlns=\"urn:oasis:names:tc:SAML:2.0:metadata\" ID=\"{uuid}\" Version=\"2.0\" IssueInstant=\"{ DateTime.Now.ToString("yyyy-MM-ddTHH:mm:ssZ") }\" IsPassive=\"false\" AssertionConsumerServiceURL=\"{acsUrl}\" xmlns:samlp=\"urn:oasis:names:tc:SAML:2.0:protocol\" ForceAuthn=\"false\">");
            sb.AppendLine($"<Issuer xmlns=\"urn:oasis:names:tc:SAML:2.0:assertion\">{issuerUrl}</Issuer>");
            sb.AppendLine(" </samlp:AuthnRequest>");

            string authnrequest = sb.ToString();
            authNrequest = Utils.DeflateAndEncodeSaml(authnrequest);

            string loginRequet = $"https://login.microsoftonline.com/{aadId}/saml2?SAMLRequest={authNrequest}";

            HttpResponseMessage response = req.CreateResponse(HttpStatusCode.Moved);
            response.Headers.Location = new Uri(loginRequet);
            return response;

        }
    }

	private static string DeflateAndEncodeSaml(string authnRequest)
	{
		var bytes = Encoding.UTF8.GetBytes(authnRequest);
		using (var output = new MemoryStream())
		{
			using (var zip = new DeflateStream(output, CompressionMode.Compress))
			{
				zip.Write(bytes, 0, bytes.Length);
			}
			var base64 = Convert.ToBase64String(output.ToArray());
			return HttpUtility.UrlEncode(base64);
		}
	}
}
AWS Single Account (SSO) with Azure AD as External Identity Provider (IdP) is a decentralized pattern. That means you have to add IAM provider and IAM roles in each AWS account. You have to map those roles in Azure AD group and assign the role to the group. Automation, automation and automation- as long as you automate those process, your solution will work without hiccups.
Like this or any of my blog post and you would like to reach out? Feel free to connect with me via LinkedIn profile.